
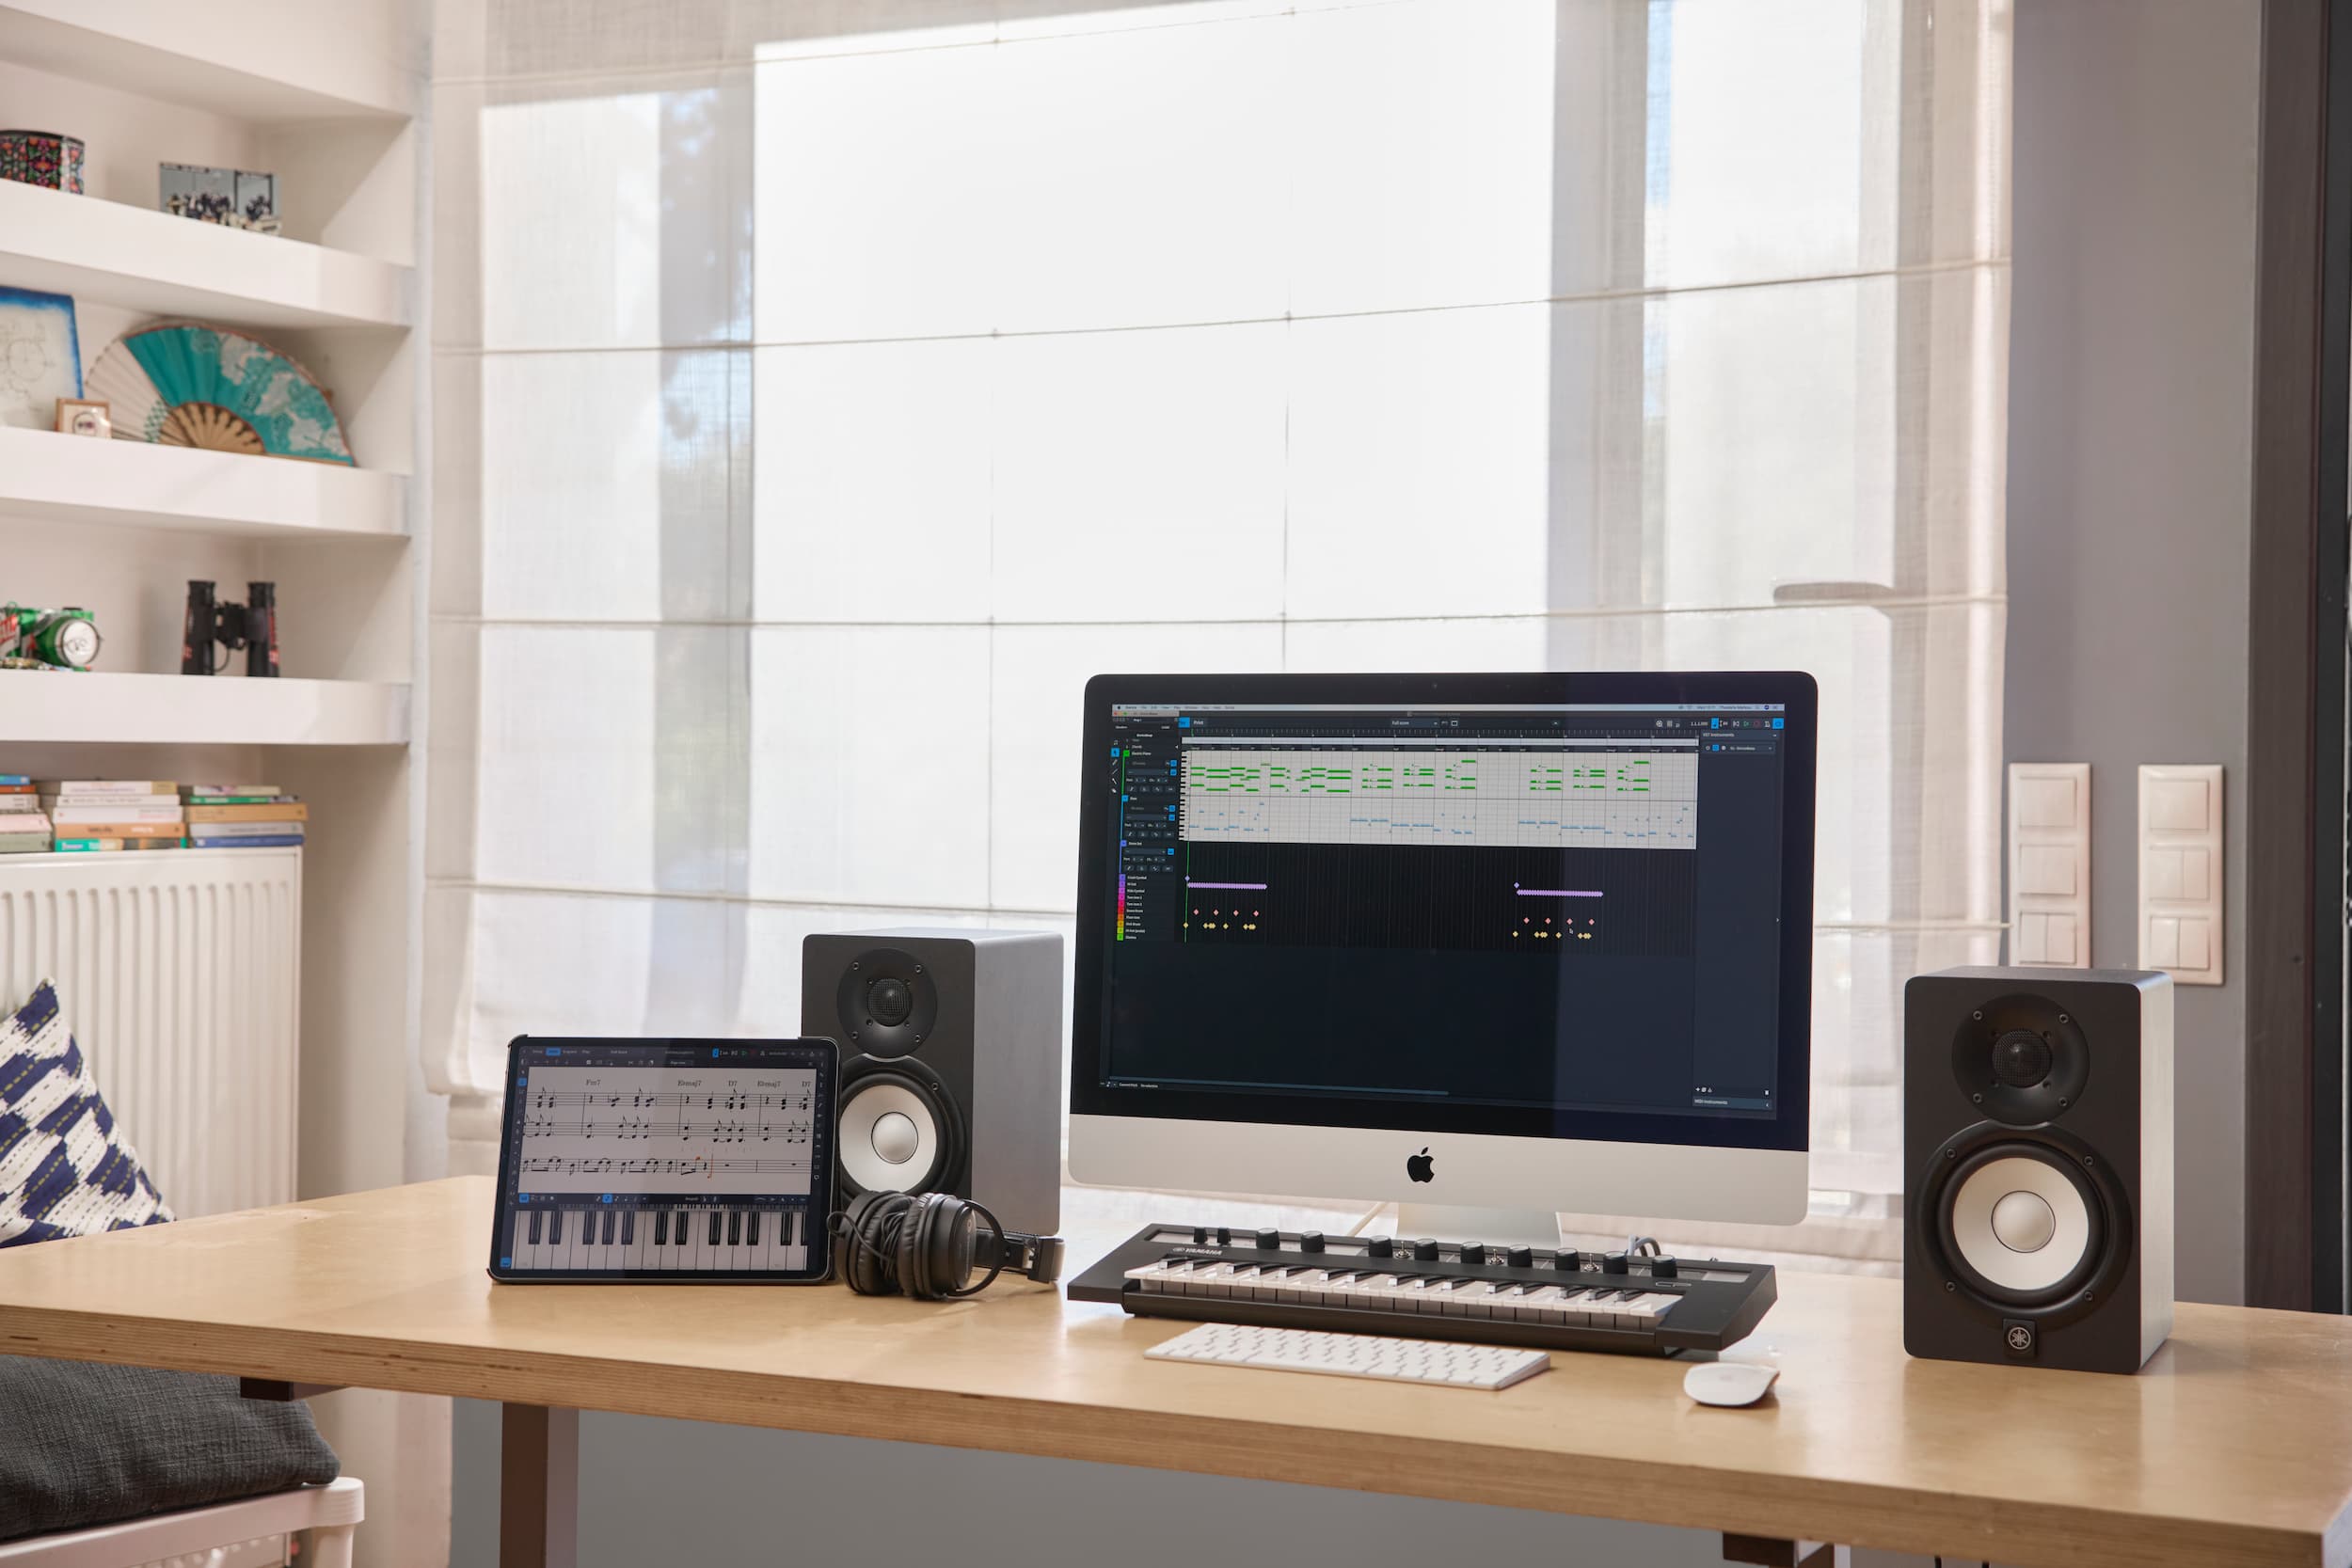
Today is perhaps the most significant day in Dorico’s history since the release of Dorico 1.0 for macOS and Windows back in October 2016: we are delighted to announce that Dorico is now available for iPad, and can be downloaded free from the App Store. Dorico for iPad packs all of the music notation and composition power of the desktop version into a whole new form factor, and opens up the use of this revolutionary application to the hundreds of millions of iPad users worldwide. Make no mistake: this is no mere companion app that requires the desktop app. It’s Dorico, it’s on the iPad, it’s free… and it’s pretty great.
As is customary, please allow my honey-voiced colleague Ant to introduce Dorico for iPad with this brief overview video:
For a more in-depth look at the software, John Barron presents a one-hour live demonstration of the app in English at 1300 UTC (2pm London, 9am New York, 6am Los Angeles, 10pm Tokyo, 11pm Sydney), and Markus Hartmann has a German-language demonstration at 1400 UTC (4pm Berlin).
If you’d like to find out more about the story behind the creation of Dorico for iPad, you can check that out elsewhere on the blog. But right now let me give you a quick tour of the app and tell you a little more about it.
Who is it for

In some senses, Dorico is pretty late to the party for notation software on the iPad. For a decade now, apps like Notion and Symphony Pro have provided rich and functional options for users looking to create scores on their iPads, and of course just last year saw the introduction of StaffPad for iPad after several years as a Windows-only app. But Dorico brings with it several new and unique strengths: it is the only music notation app for iPad capable of producing publication-quality results (and indeed the only one that produces results pretty close to publication-quality by default with no intervention from the user); it is the only app that includes support for third-party Audio Unit virtual instruments and effects; and it is the only app to include an integrated Key Editor, with powerful MIDI editing tools available both in Write and Play modes. And it’s also the only high-quality music notation and composition app that’s available for free.
We hope that it will appeal to exactly the same kinds of musicians who are already using Dorico on macOS and Windows, and indeed to the kinds of musicians who are using these other music notation apps for iPad. Whether you’re a composer, arranger, instrumentalist, teacher, or student, we have built Dorico for iPad for you. Whether you already use Dorico or this is your first time, we hope you will find the app easy to learn, efficient to use, and a useful addition to your musical toolbox.
Getting started
When you first run Dorico for iPad, you will be walked through a few simple steps: first, you will be invited to sign in with your existing Steinberg ID or create a new one. If you sign in with your Steinberg ID, the limit on the number of players you can write for in your projects is increased from two to four, and this is completely free, so it’s worth taking advantage of this. If you’re creating a new Steinberg ID, please consider opting in to joining our email list, so that we can send you emails with news, special offers, and other information. If you already have a Steinberg ID but you’re not sure whether or not you have opted in to receive emails from us, you can check here (you may be prompted to sign in).
Next, you will be invited to buy the optional in-app subscription to unlock further features. Although Dorico for iPad is completely free to use, and will allow you to create and edit projects for up to two (or four, if you sign in) players, and to open larger projects read-only for playback and printing, if you want to get the most out of the app, you should consider buying a monthly or annual subscription, which will unlock a number of additional features: you can create and edit projects with up to 12 players; you can access graphical editing in Engrave mode; you can access Notation Options; and you can use third-party Audio Units. If you’re not ready to subscribe right away, don’t worry: it’s easy to subscribe at any later point using the prompts within the app.
Finally, you will be asked whether you want to share analytics data with Steinberg. Please be assured that we do not track any data in such a way that would allow us to identify individual users: for example, even if you sign in with your Steinberg ID, we never collect any data about your usage of the app in any way that could tie it back to your email address or your Apple ID. In this initial release, we collect simple information such as when you launch the app, when you complete a tutorial, or when you choose to subscribe. We encourage you to opt in to sharing this data with us, as it will help us to improve the software, learn about how musicians are using it, and find and fix problems.
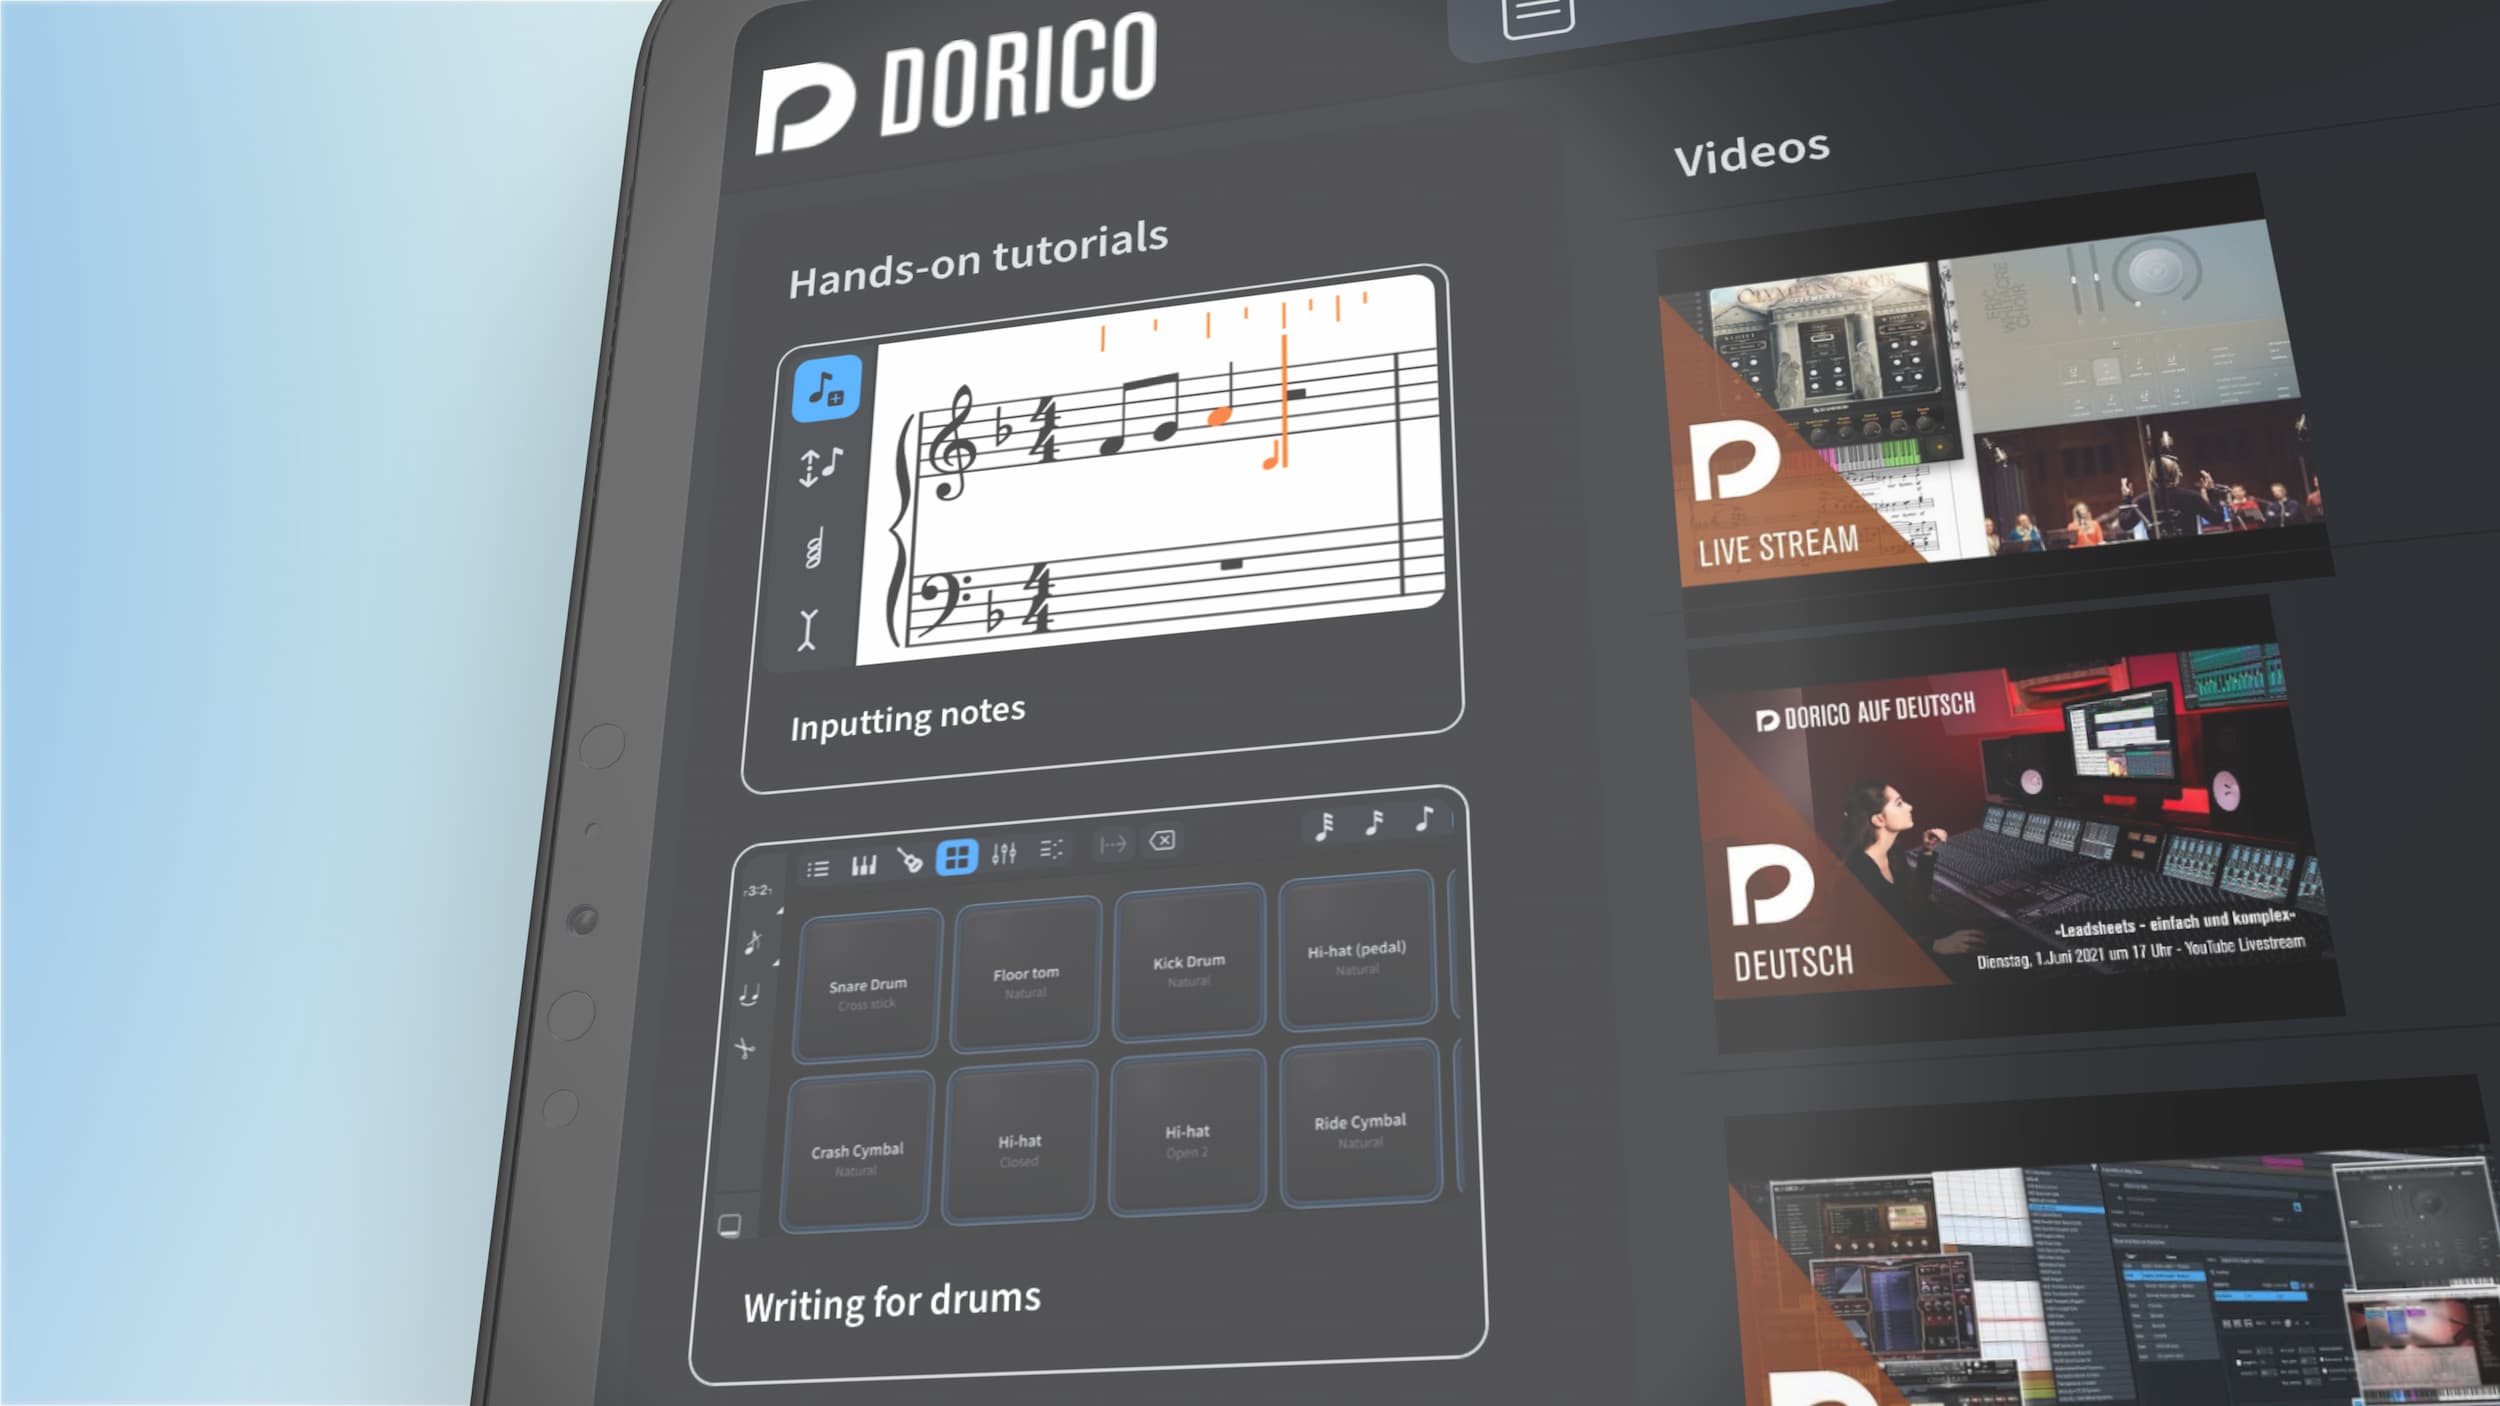
After you have made your way through this handful of screens you will be taken to the Learn page of the redesigned Hub. The Hub is the central area from which you can open existing projects, start a new project, or learn about how to use the app. Whether or not you’re new to Dorico, we encourage you to take a few minutes to work through a couple of the provided hands-on tutorials. They will help you to take your first steps with inputting and editing music, which is a little different than you are used to in Dorico for macOS and Windows.
Project window
To start a new project, you can tap the New page to choose one of the provided templates. A greater variety of templates for larger ensembles is available if you have an active subscription. After choosing a template, on the right-hand side you can set up some basic choices for the new project, including specifying its title and composer, initial key and time signature, and number of bars. This is completely optional, of course: if you are familiar with Dorico for macOS and Windows you will know that traditionally new projects are created with no time signature and a single quarter (crotchet) rest, allowing you to make every decision for yourself. But we wanted to provide options to make it quick and easy to get started and have some of those initial steps taken care of for you. Naturally, every decision made in the Hub can be easily changed later on, because nothing in your Dorico project is ever set in stone.
Once you have created a new project, or chosen an existing one on the Open Recent page of the Hub, you will be taken to the project window. On iPad, only one project can be open at any time, and you can return to the Hub by tapping the left-pointing chevron in the top left corner of the project window. This saves and closes the project. In general, you don’t need to worry about saving: Dorico will automatically save your project periodically, including when you close it, when you put the app into the background, before you share it, and if you open another project from another app.
Just like Dorico for macOS and Windows, you can switch between the app’s main modes using the buttons on the toolbar. If you don’t have an active subscription, when you tap on the Engrave button you will be prompted to subscribe.
Setup mode
In Setup mode, you will notice a couple of new features: there are new buttons in the action bars for both the Players and Layouts panels that allow you to sort the contents of each panel. In new projects started in Dorico for iPad, players are automatically sorted into standard orchestral order as you add their instruments. If you are working on a piece with a dedicated soloist, you can also designate a player as a soloist, which will place them at the appropriate point in the score order, update their name accordingly, and set the bracketing too. If you’re bringing a project over from Dorico on the desktop, by default no score order will be specified, but you can long-press the Sort button in the action bar to bring up a menu from which you can choose the Orchestral score order, which will then be applied whenever you add players or instruments, or when you tap the Sort button. The other new button in the action bar shows the contextual menu for the selected player or layout.
The Flows panel has gained a new Reorder button on its heading; if you want to change the order of flows in your project, activate the Reorder button and then drag the flows into the desired order. If you have many flows, you will probably find this easier in the Project Info dialog, which you can access by tapping the project’s title in the toolbar, or using the application menu at the right-hand end of the toolbar.
Write mode
Write mode perhaps has the most obvious differences over and above the desktop version. There is a new secondary toolbar (which also appears in Engrave mode, albeit with fewer buttons) directly below the main toolbar, and the toolboxes to the left and right have been extended, too. Finally, the lower zone, where the Properties panel has traditionally appeared, has been greatly extended, and now includes not only Properties but also on-screen Keyboard, Drum Pads and Fretboard panels for note input and editing, an embedded Mixer, and the Key Editor, which brings the powerful MIDI editing tools formerly found only in Play mode into Write mode.
On the left-hand side, the Notes toolbox contains the usual buttons relating to note input and editing, with a few new additions. Several of the buttons now respond to a long press and show a menu with useful options: for example, a new button has been added to allow you to start a new voice or cycle between existing voices; the tuplets button now allows you to choose between common ratios or the popover by a long press; and the rhythm dot and grace note buttons show a menu allowing you to choose the number of rhythm dots or between slashed and unslashed grace notes. There is also a new and very important button at the top of the toolbox, which allows you to start note input, showing the caret either at the position of the selection or in the first bar if there is no selection.
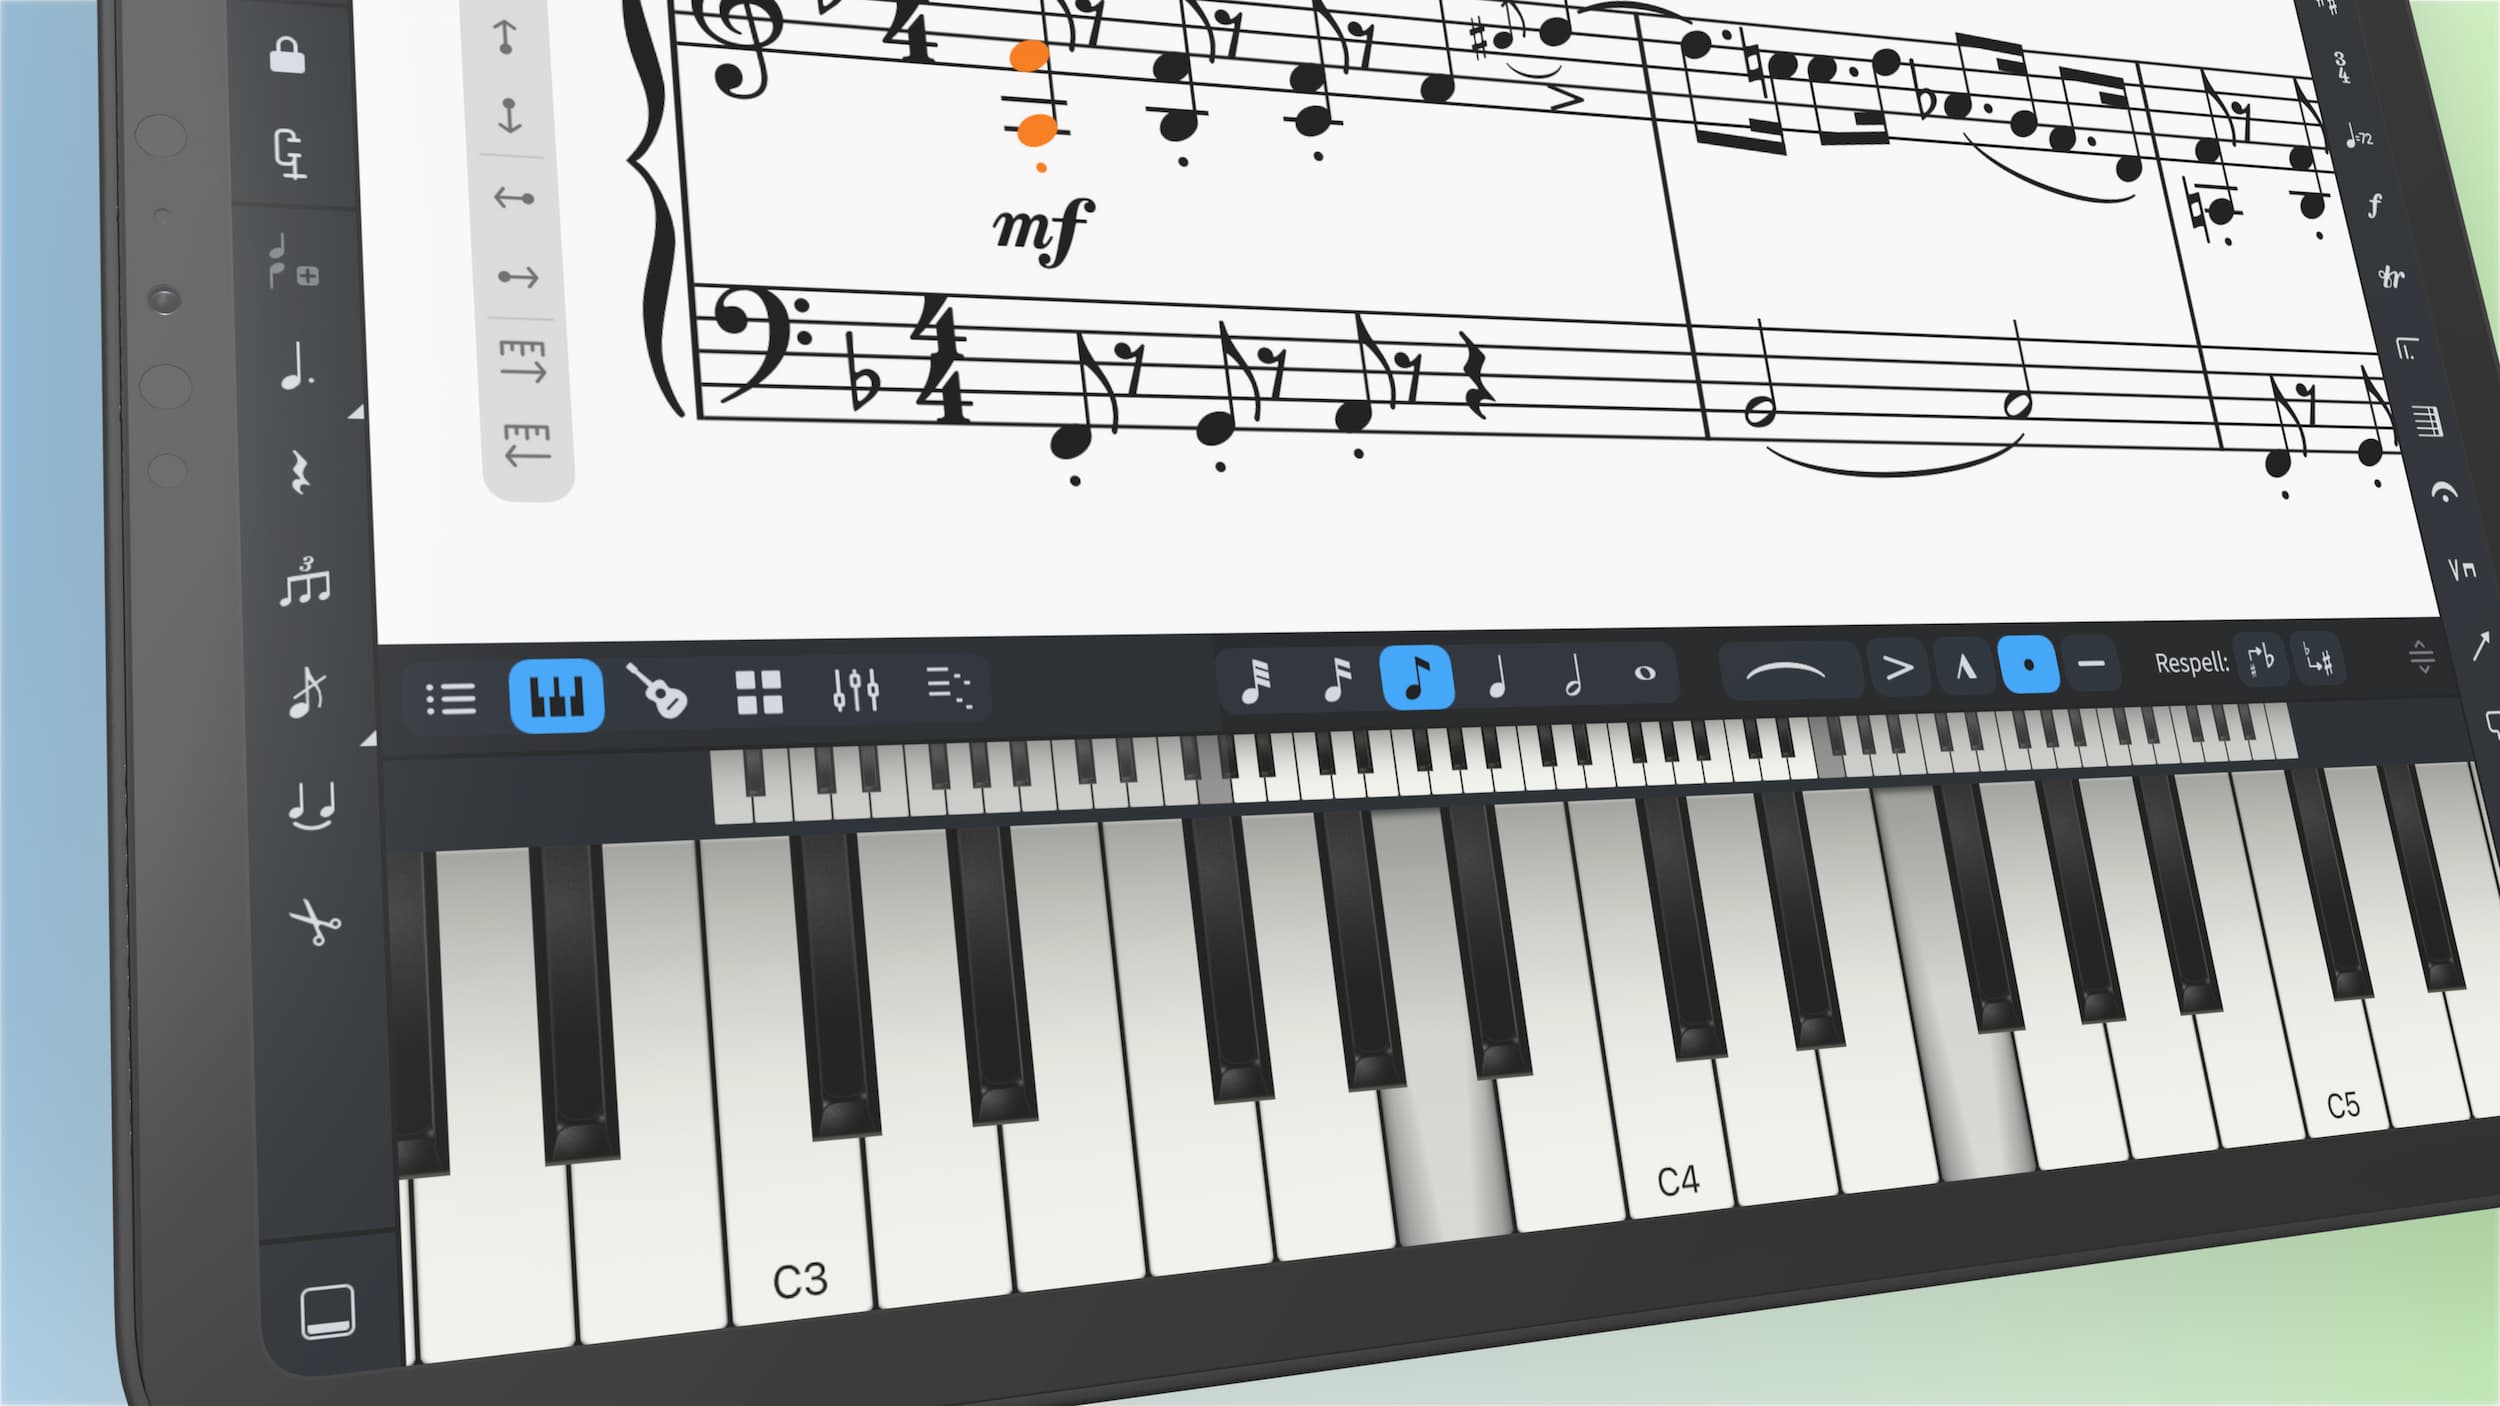
You will notice that the Notes panel itself is not shown by default: that’s because the lower zone is set to show the Keyboard panel by default, and this is the way we recommend you start off with note input. If you have a USB- or Bluetooth-connected MIDI keyboard, you can use that with Dorico, too, but in any case you should find the on-screen keyboard a very comfortable way to input notes. You can resize the lower panel by grabbing the handle at the right-hand side of the toolbar to make the keys taller or shorter, and you can change the width of the keys by dragging the grey keys in the overview directly above the full size keyboard. The keyboard is fully multi-touch enabled, so it’s easy to input chords as well as single notes, and it works in real-time recording, too. The Keyboard panel toolbar also includes all the basic controls from the Notes panel, so that note durations, articulations and slurs are all available without needing to show the Notes panel.
If you’re inputting onto a drum kit or other unpitched percussion instrument, you can use the Drum Pads panel. Each playing technique for each instrument in the kit is given its own drum pad, and if you would prefer a different arrangement of pads, you can tap the Reorder button in the toolbar to drag the pads into any order you like. You can even add spacers so that the pads don’t have to be directly adjacent. Each drum pad arrangement is saved in the current project (and we hope to provide a way to share these arrangements between projects in future). The drum pads work both in regular step-time input and in real-time recording, making it a very convenient and powerful way to input music for drums and percussion.
If, on the other hand, you’re inputting into a guitar or other fretted instrument, the Fretboard panel presents you with a beautiful visual representation of the fretboard of the instrument, and this allows you to easily input music into tablature, specifying not only the pitch but also the string in one step. At the moment, the Fretboard panel doesn’t support real-time recording, but we intend to introduce this in due course.
On the right-hand side, the Notations toolbox has also been expanded: you will notice at the top a pair of toggle buttons that allow you to choose between showing panels or opening popovers. This provides easy, one-touch access to every panel and to every popover. If you have an external keyboard connected to your iPad, you can also use almost all of the key commands that you already know from Dorico for macOS and Windows (and you can even set your own custom shortcuts, just like in the desktop version, on the Key Commands page of the Preferences dialog, which can be accessed from the application menu).
Finally, the buttons in the secondary toolbar are arranged into several groups. The first group allows you to navigate the caret when it is shown, or otherwise hop the selection around as if you were using the arrow keys on an external keyboard (which of course also work exactly as you would expect). The second group allows you to change the current rhythmic grid setting, and then manipulate selections: the Add To Selection button allows you to tap items in succession to make a larger selection (equivalent to holding down Command on macOS or Ctrl on Windows), while the Extend Selection allows you to quickly build continuous selections (eqvuialent to holding down Shift on macOS and Windows). The third group is for clipboard operations: cut, copy, paste, repeat (equivalent to hitting R on the desktop version), and delete. And finally, you can open a View Options dialog, allowing you to hide and show signposts, the system track, note and voice colours, as well as switch between page and galley view and between concert and transposed pitch. The menu button to the right of the View Options button opens a contextual menu whose contents differ according to the items you have selected in the music (equivalent to right-clicking on macOS and Windows).
Although there are a lot of buttons on-screen in Write mode, we believe we have struck a good balance between providing one-tap access to all of the most important capabilities, while still providing as much room as possible for the music itself, which should always be the star of the show.
Engrave mode
If you have an active subscription, you have access to Engrave mode, which shows your music exactly as it will be printed or exported. You have access to the graphical editing tool from Dorico for desktop, allowing you to directly manipulate the fine graphical appearance of every item in the music. You also have access to an expanded set of Properties in the lower zone, and the page formatting controls for making system and frame breaks in the left zone. The secondary toolbar also appears in Engrave mode, providing easy access to the Add To Selection and Extend Selection tools, and the contextual menu.
Play mode
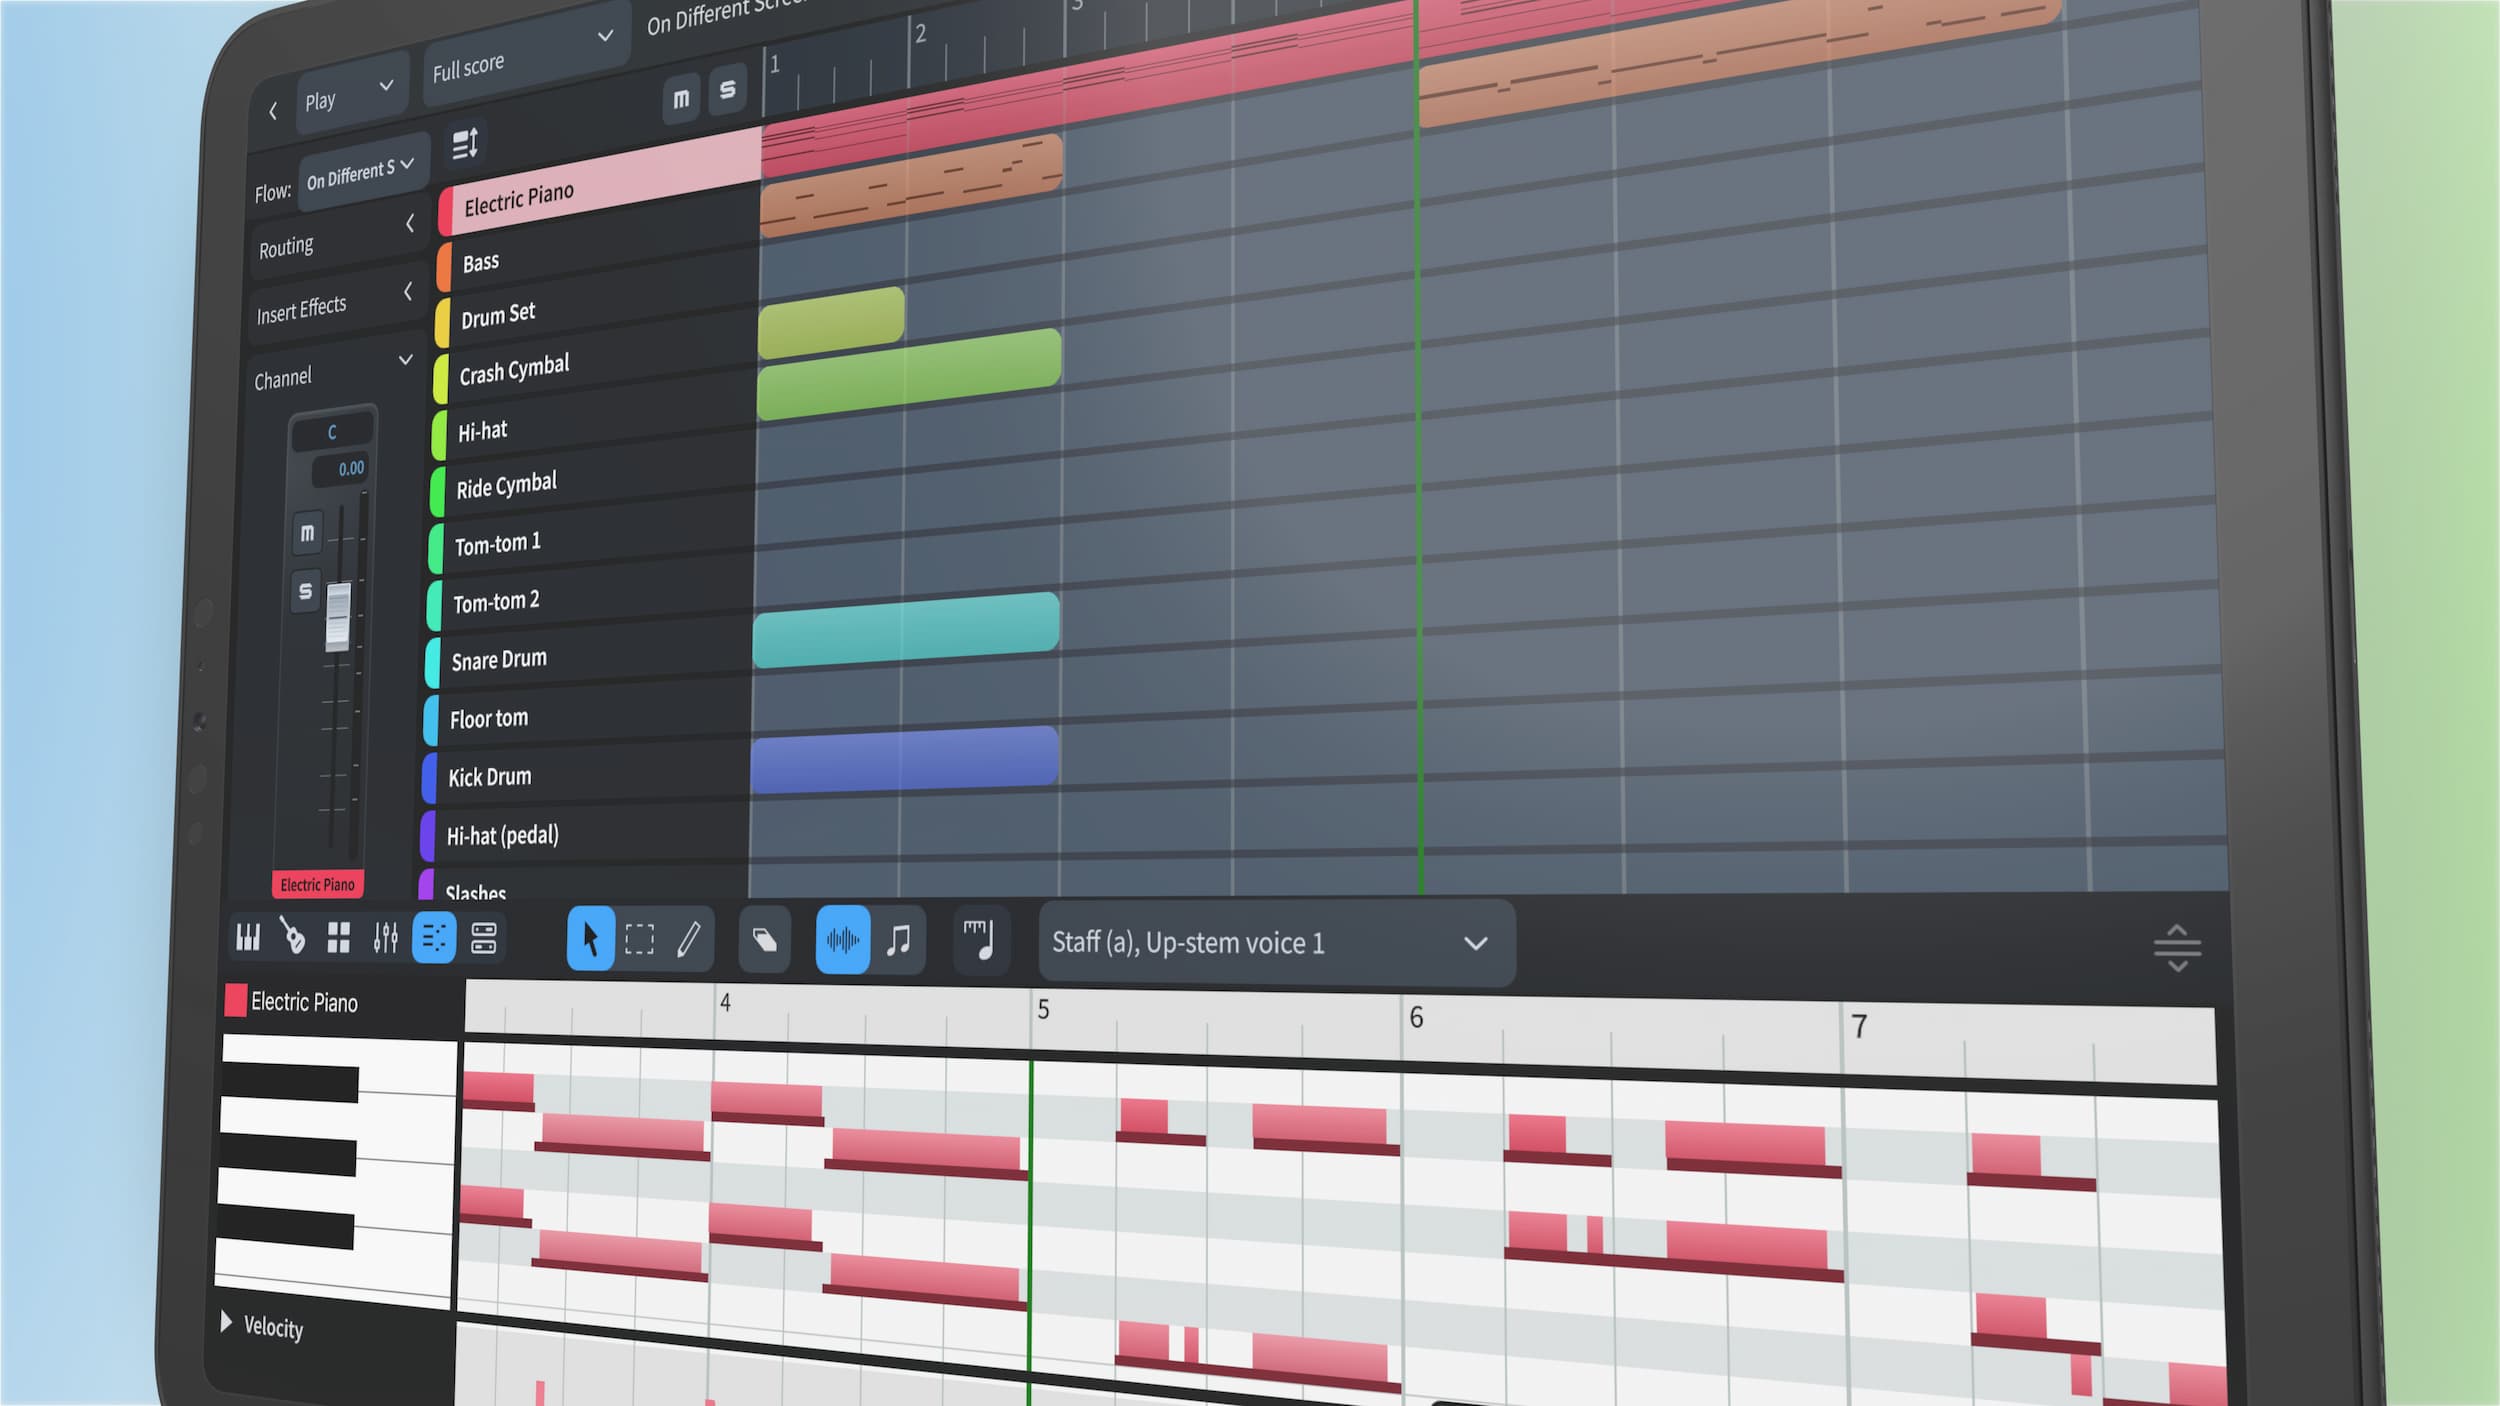
Of all of Dorico’s modes, Play mode perhaps looks most different to its familiar appearance on macOS and Windows, and that’s because it has been completely rebuilt from the ground up for the iPad. Throughout this project we have been working closely with Alex, Artur and Jan, our colleagues in the team behind our award-winning digital audio workstation for iOS and Android, Cubasis, and we have taken inspiration from the beautiful and functional design that they have honed and refined over many years, putting a Dorico spin on it. Instead of expanding each track to expose the piano roll and velocity lanes as in Dorico on the desktop, the main part of the display simply provides an overview of the material on every track in the chosen flow.
Select a track, and then the inspector to the left of the display and the lower zone will update as appropriate for the selected track. The inspector on the left allows you to choose a different sound from the included Microsonic sampler, or to choose an entirely different sound source: if you have an active subscription and have installed any Audio Unit virtual instruments, you can choose them here. The user interface for the AUv3 plug-in can be seen in the Device panel in the lower zone, allowing you to tweak the sound you hear.
You can also access the Mixer channel for that track in the inspector, making it easy to tweak the settings for that channel without locating it in the Mixer in the lower zone. And you can also add insert effects if you wish: Dorico comes with a couple of built-in effects (and this suite will expand over time), and if you have an active subscription you can use any compatible AUv3 effect as well.
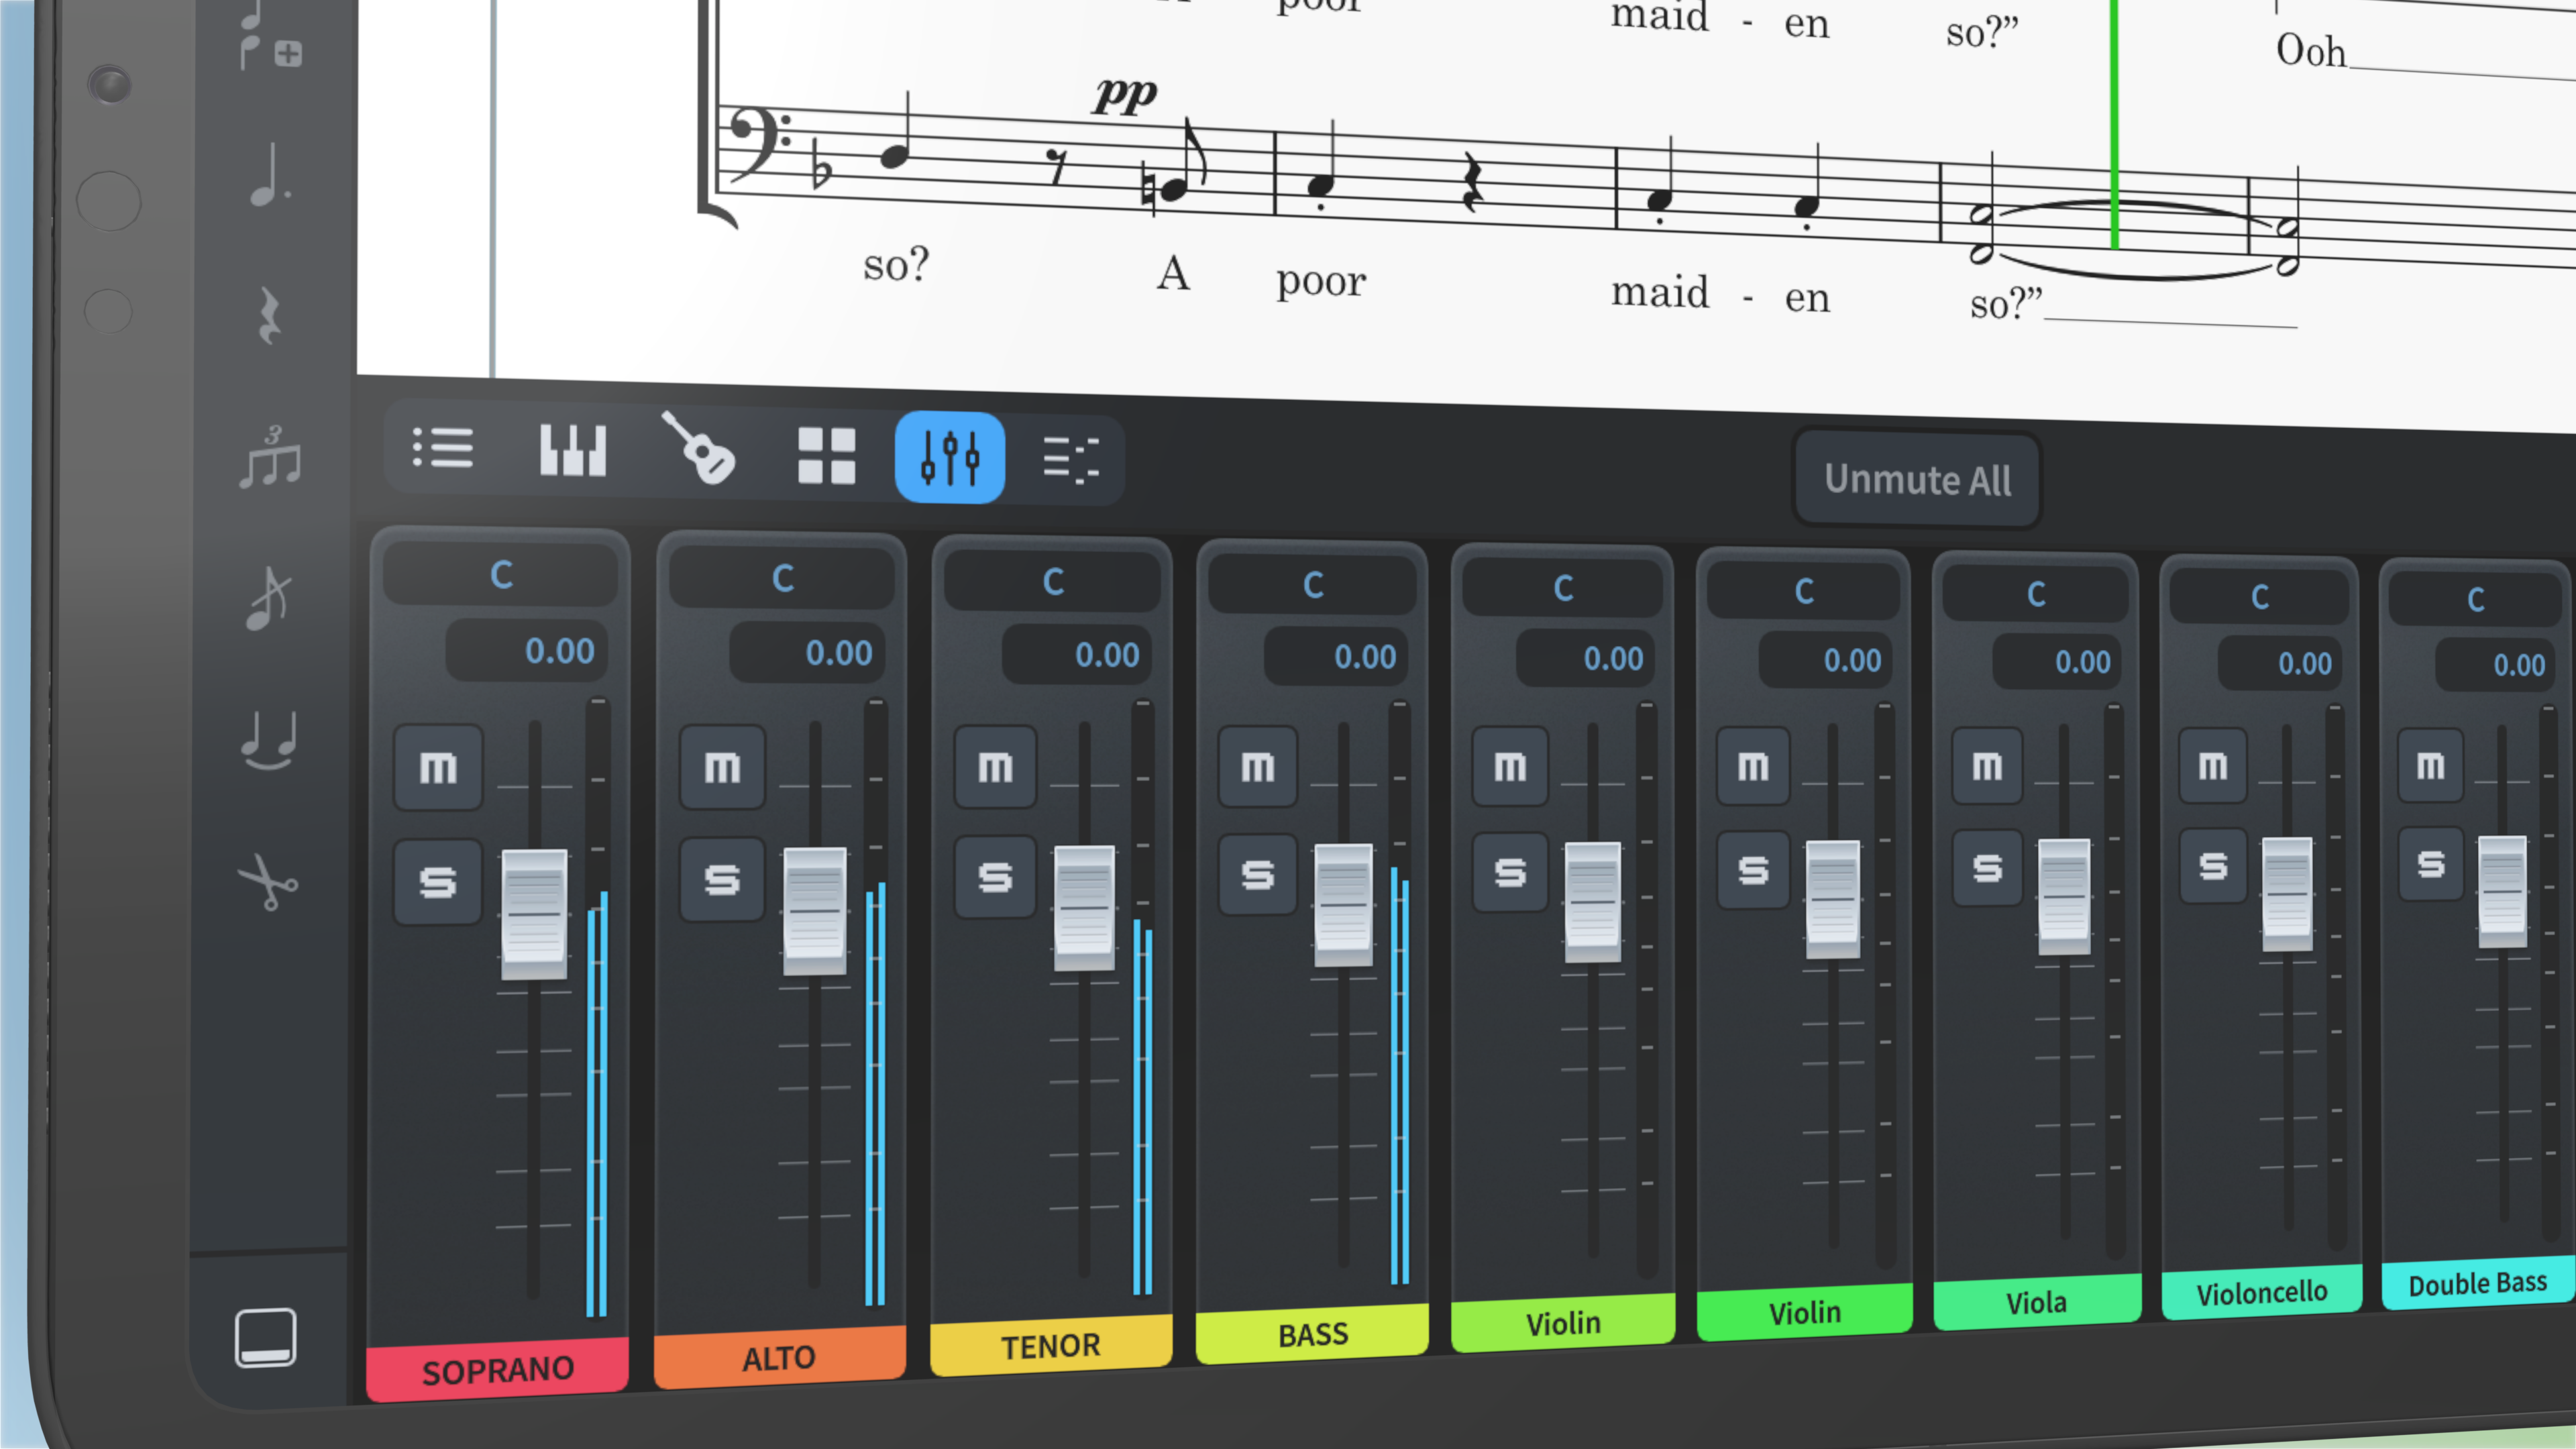
Compared to Dorico for macOS and Windows, the Mixer itself has had a major upgrade, and in addition to being usefully tucked away in the resizable lower zone it has been completely rebuilt using new, high-performance components that provide both finer control and a more responsive feel than on the desktop. This new Mixer will form the basis for further development in future updates to the desktop version, too.
Key Editor
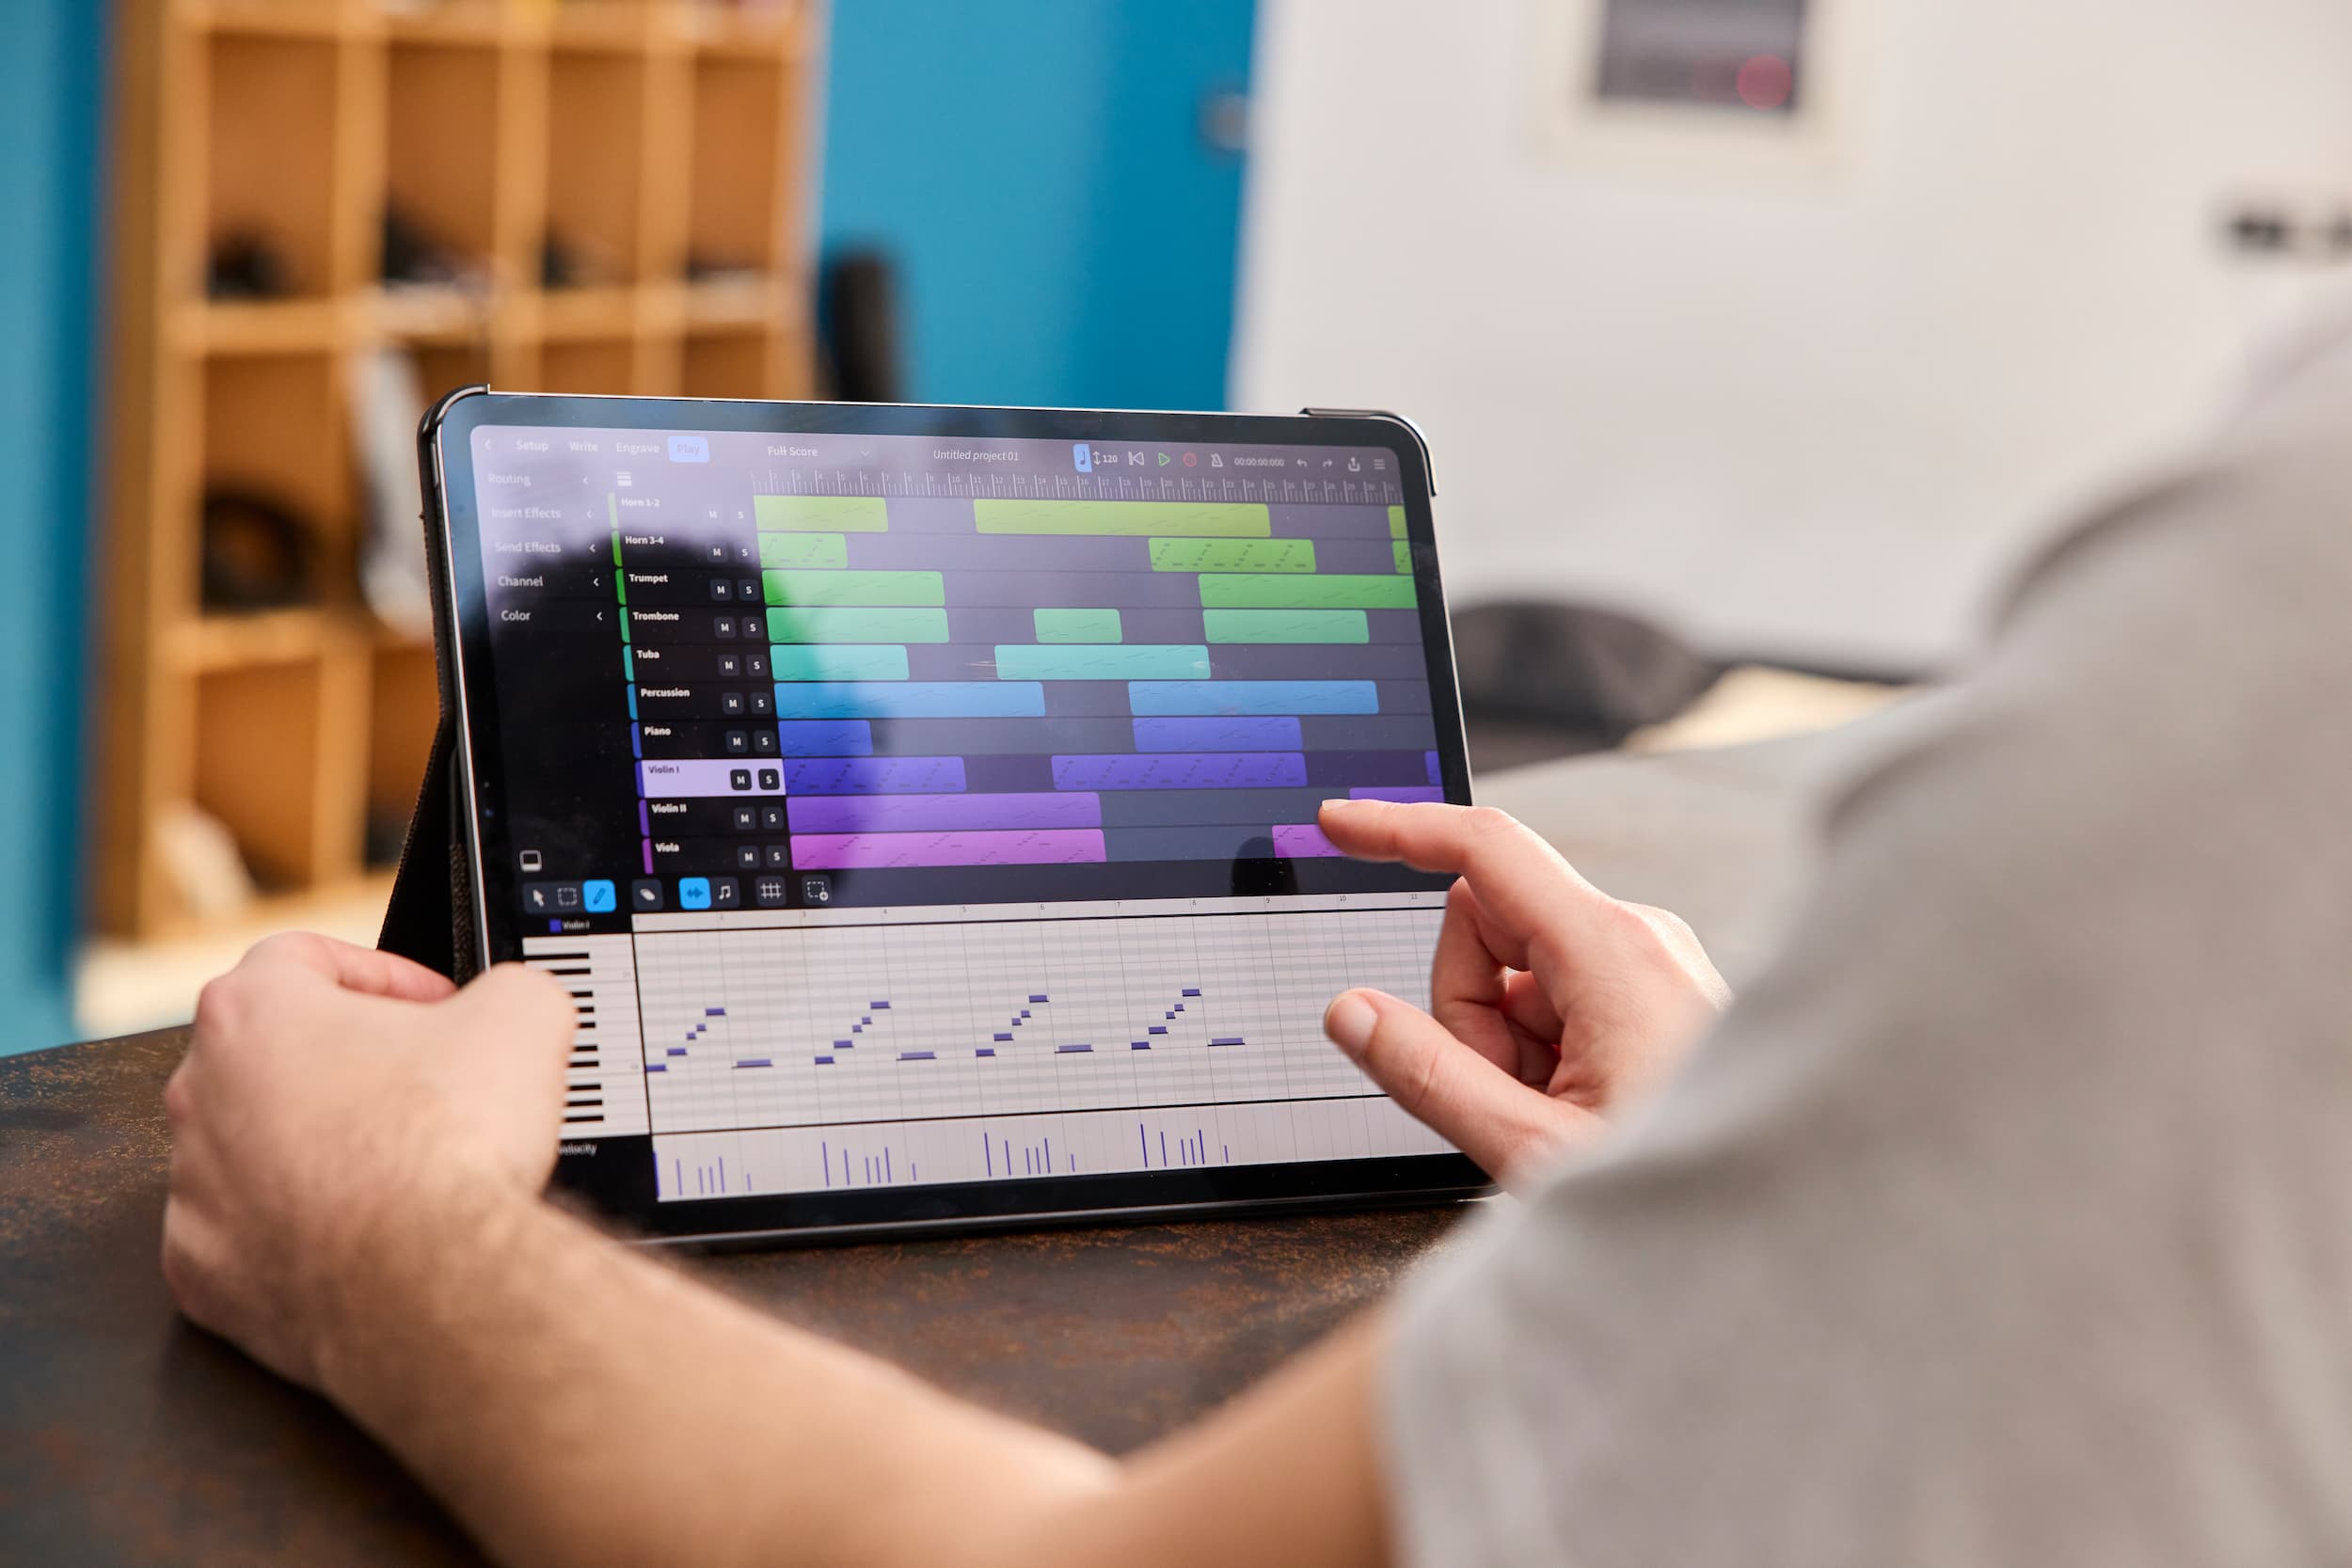
Available in the lower zone in both Play mode and Write mode, perhaps one of the most significant changes in Dorico for iPad is the brand new Key Editor, which has been rebuilt from scratch with the goal of realising the promise shown by the initial versions of the MIDI editing tools in Dorico for macOS and Windows. Again drawing inspiration from the great look, feel and function of the MIDI editors in Cubasis, we have built really great touch-centric piano roll and velocity editors that will also form the foundation of improving the MIDI editing experience in Dorico on the desktop in future versions.
When the Key Editor is shown in the lower zone in Write mode, you will notice that it updates as you change the selection: it follows the selected instrument, and also automatically shows the same music that is shown in the system in which the selection begins. This makes it very easy to correlate the music shown in standard notation and the music shown in the piano roll or velocity editor. If you start scrolling or panning through the music in the Key Editor, you will notice that the Link button in the Key Editor toolbar is deactivated: to bring the music back into sync, simply tap the Link button to reactivate it again.
The standard pencil, line and eraser tools are present and correct, allowing you to add, edit and delete notes and velocities. But the velocity editor, in particular, has some unique tricks up its sleeves. First, if you make a multiple selection by tapping, holding and then dragging over a series of notes, you will see a set of tools for modifying the selected velocities en masse, including tools for tilting, scaling, changing by a delta (maintaining their relative values), and randomising them. This provides the same kind of power that you would find in Cubase itself.
Secondly, you can view a histogram of all of the velocities in a track. Tap the Histogram button at the bottom of the Velocity track header, and you will see a bar graph that shows the distribution of all of the velocity values in the track. You can then apply various edits to trim any outlying velocities that are either much louder or quieter than the average, or you can expand or compress the values, providing a quick way to either increase or decrease the overall range of velocities. You can also apply randomisation to the whole set of values. Dorico is the first music notation and composition application to use the power of histograms for editing MIDI data in this way, and we intend to expand this capability to other kinds of MIDI data in future versions.
Overall, having the new Key Editor available not only in Play mode but also synchronized with the standard notation in Write mode is a huge step forwards for the editing of MIDI performance data in your projects, and you can look forward not only to further development of the Key Editor in Dorico for iPad, but also to this new and improved experience making its way into Dorico for macOS and Windows in future.
Read view
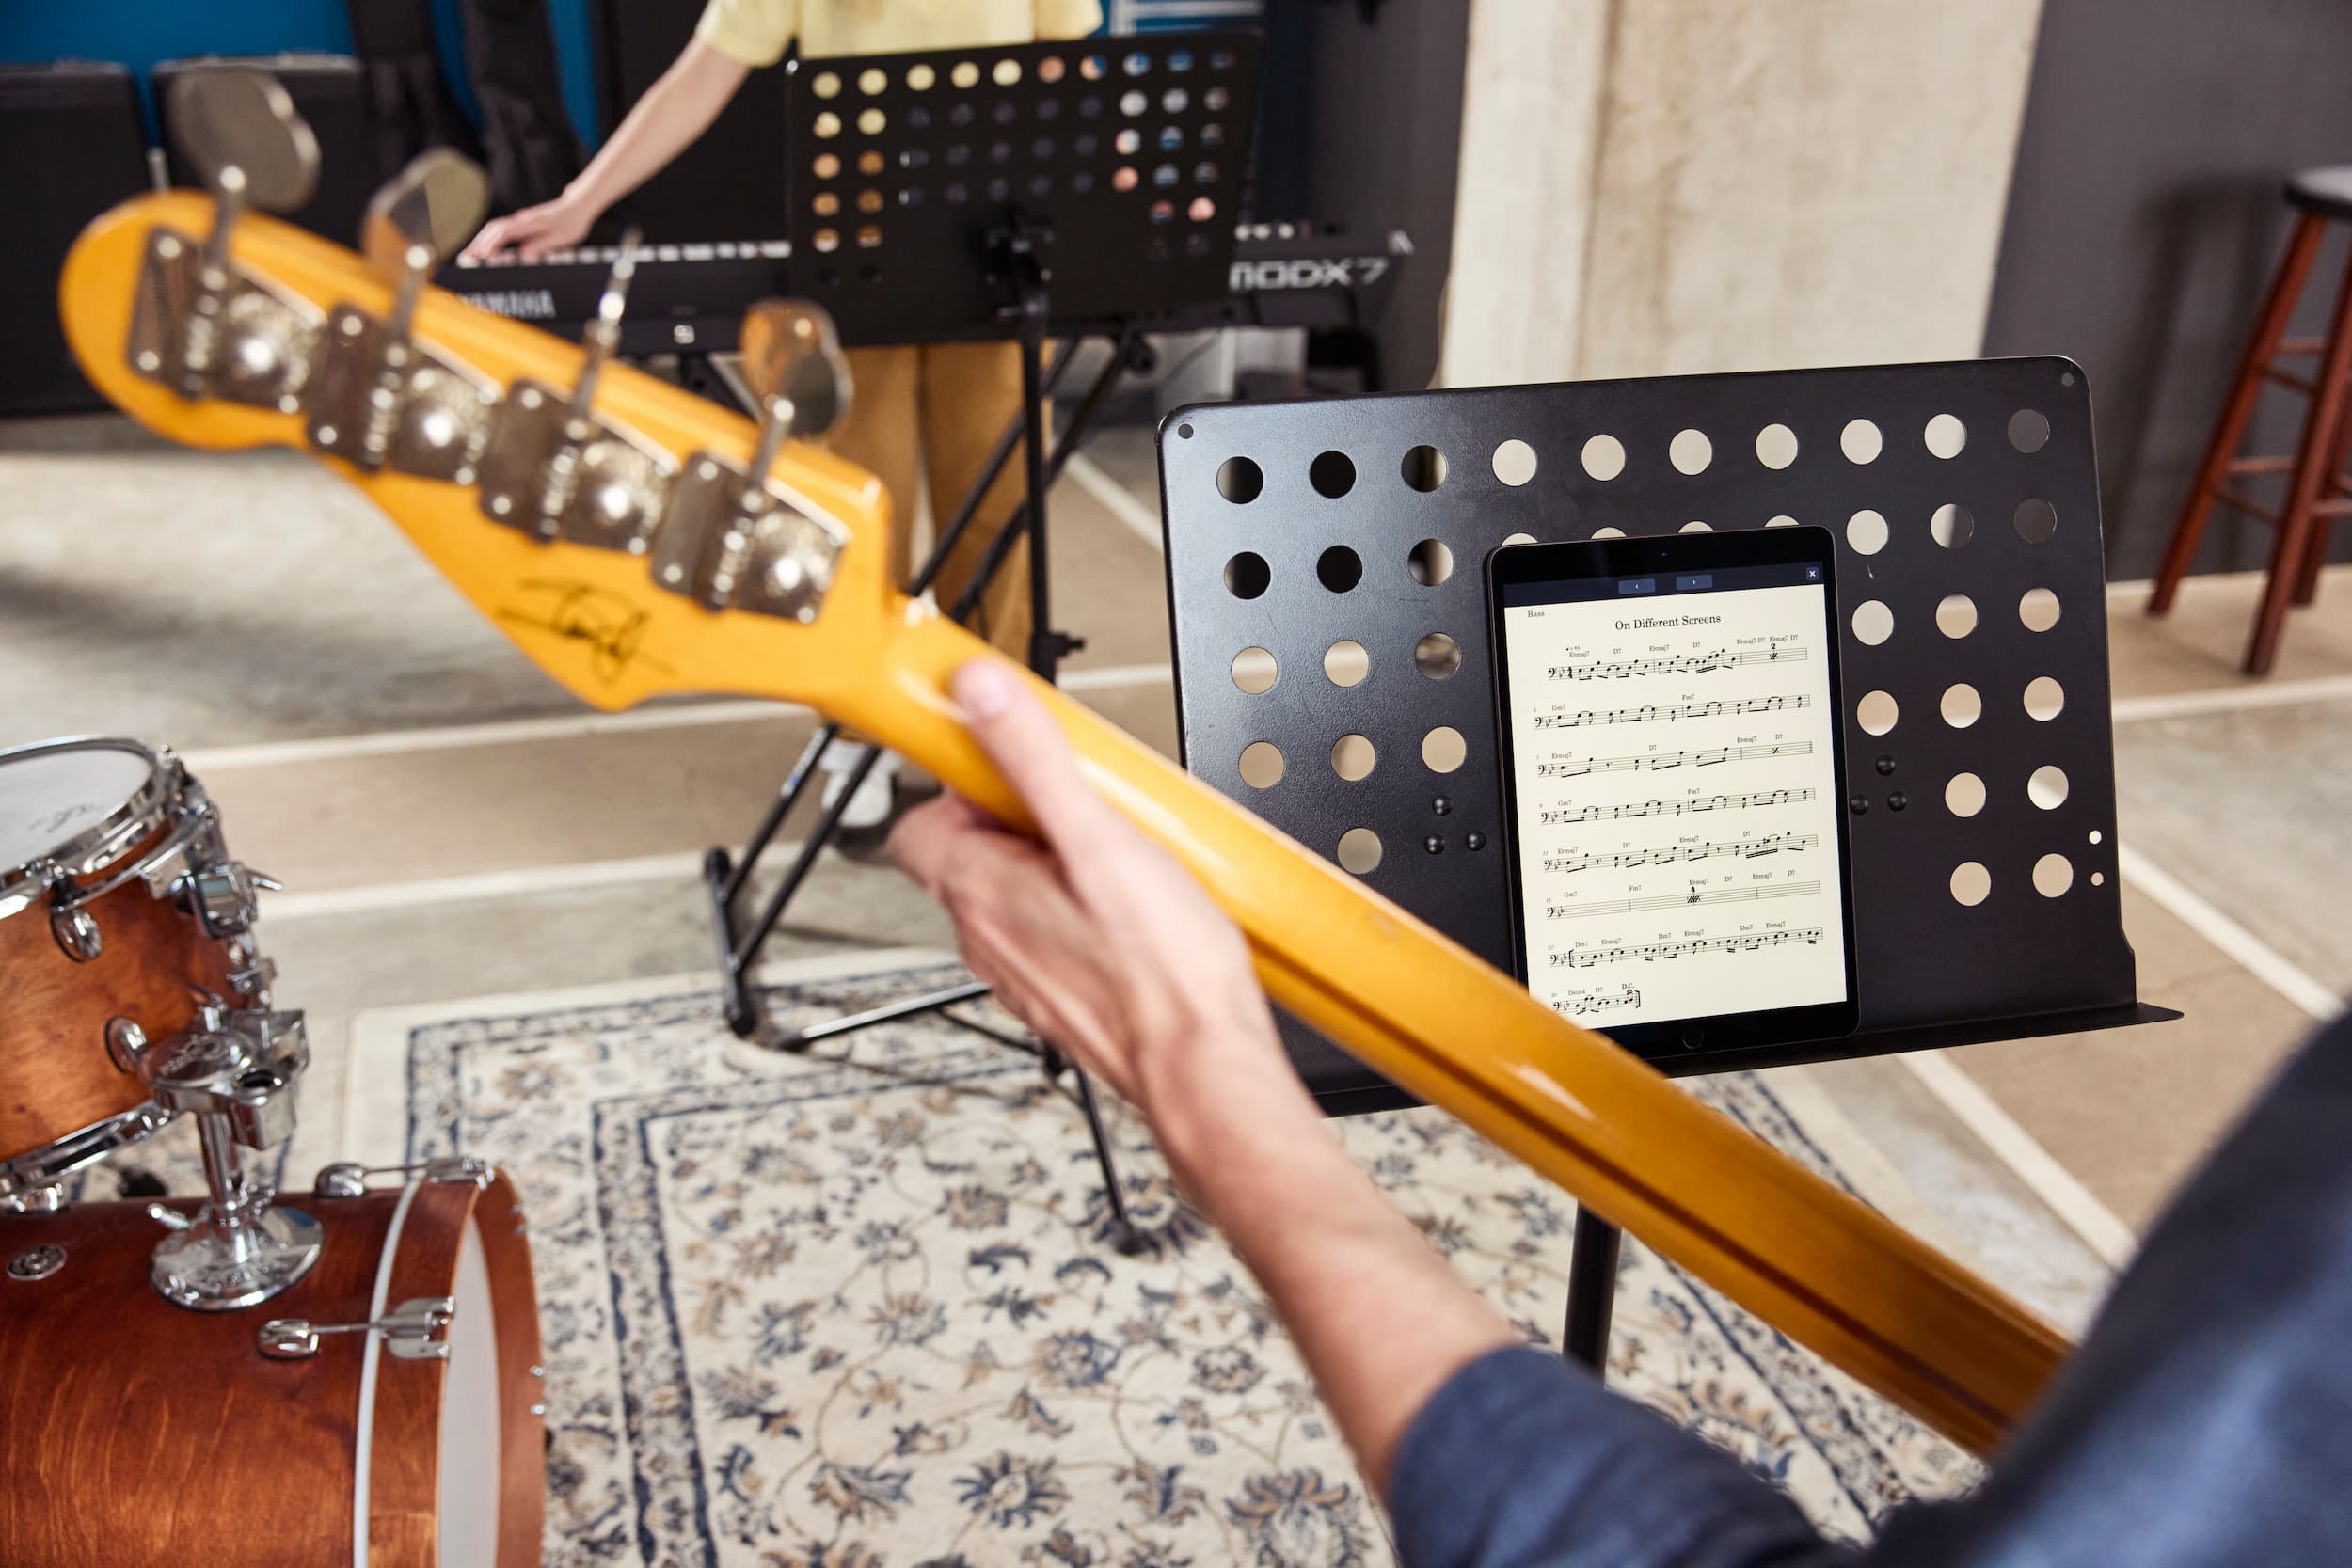
Although the iPad is exceptionally well-served with powerful music reading apps – and you can easily send PDFs or MusicXML files created in Dorico for iPad into your favourite music reading app, whether it’s forScore, Newzik, Piascore, etc. – we wanted to provide a quick way to be able to perform directly from your iPad without the need for any other apps. In Write mode, simply tap on the score with four fingers, and you’ll be taken directly to Read view, which simply shows the music with some basic controls for paging through at the top of the display. You can turn pages with a single tap: tap on the right-hand side of the screen to advance, or on the left-hand side to go back to the previous page. If you have a Bluetooth-enabled foot pedal, you can also use that, with no configuration required besides making sure it’s connected in the Bluetooth pane in the Settings app.
There’s no annotation or editing features available in Read view in this initial version, though we know that many of you would find it useful. This is certainly something we will consider as we see how Dorico for iPad is used out in the world and as we are making our plans for future features.
Compatibility
Dorico for iPad requires iPadOS 13 or later. Any iPad released since the first-generation iPad Pro in 2016 should be capable of running Dorico for iPad. We recommend an iPad with at least a 10.9″ display (such as the current-generation iPad Air, or any iPad Pro), but we have tried to make the app’s interface accessible on any non-mini iPad that is capable of running iOS 13 or later. We have designed the app for landscape orientation, and we recommend that you use Dorico in that orientation if possible, with the exception of Read view, which works equally well in either portrait or landscape orientation.
Dorico for iPad can open Dorico projects created in any version of Dorico for macOS and Windows, and vice versa, so it’s easy and practical to take projects back and forth between different platforms. There are a few things to be aware of, however: firstly, Dorico for iPad only supports the fonts that are included with the app (the Bravura and Petaluma music font families, and the Academico, Bodoni, Crimson, Lato and Source Sans text families) and the standard iOS system-provided fonts. If you are using other fonts in your projects created on macOS or Windows, they will be automatically substituted when you open your projects on your iPad.
Secondly, Dorico for iPad does not yet support iCloud Drive, which means that you cannot yet seamlessly work on the same project on your iPad and on your macOS or Windows computer. We are planning to add this feature, but it requires additional work not only in Dorico for iPad but also on the desktop operating systems: if iCloud Drive was supported only by Dorico for iPad, you could easily get into the situation that you could overwrite work done on the other platform, because the desktop version would not be aware of the changes. So we will introduce this in future when we can update Dorico on all platforms together.
In the meantime, it’s easy to bring projects in and out of Dorico for iPad: you can open them from iCloud Drive, Dropbox, OneDrive or any other file syncing app or service, and they will be copied into Dorico’s own local document storage. Any changes you make to the project will be saved to this copy of the project, so if you want to replace the version of the project saved in your cloud storage, use the Share button on Dorico’s toolbar to save the Dorico Project to another app. You can also easily send a project by email, Messages, or via AirDrop.
Import and export
Dorico for iPad can import MusicXML and MIDI files sent from another app. When you use the Share function of another app to send a MusicXML or MIDI file to Dorico, you may find that Dorico only appears after you tap the More button at the end of the row of apps suitable for handling files of that type. This depends on how many apps you have installed on your device that are capable of handling that kind of file, and how recently you have used them. Note that Dorico expects MusicXML files to have either the .musicxml file extension for uncompressed files, or the .mxl file extension for compressed files; the generic .xml file extension is not handled.
You can therefore bring MusicXML files in from other apps you have on your iPad, including scanning apps like PlayScore 2 or NotateMe, or other music notation apps like StaffPad and Notion. You can bring MIDI files in from apps like Cubasis and Music Studio, too.
Once you’ve completed your project and you’re ready to share it, you can export it in a variety of formats via the Share menu on the toolbar: export uncompressed WAV audio, or compressed M4A audio; MusicXML; MIDI; PDF; or the Dorico project itself. Each of these takes just one tap, and you can instantly send the exported file to another app, to a contact via Messages, to another device via AirDrop, and so on. When you export audio, MusicXML or MIDI, Dorico exports the current layout and flow only, and for PDF it exports the whole layout (so it includes all flows).
Finally, you can of course print directly from Dorico to any AirPrint-enabled printer: although the detailed options for printing booklets, spreads, multiple copies of individual parts and so on that you may be familiar with from Print mode in Dorico for macOS and Windows are not present, if you need to quickly print out a chart on the spot, you will find that the music looks just as great when printed from Dorico for iPad as it does when you print from the desktop version.
Pricing and availability

Dorico for iPad is available right now worldwide from the App Store, and it’s a free download. You can create and edit projects for one or two players for free, and if you choose to sign in with your registered Steinberg ID email address, you can create and edit projects for up to four players without spending a penny. You can also open projects of any size created in any version of Dorico, either from iPadOS, macOS or Windows: if the project contains more players than your current player limit, the project will open read only, but you can still play it back, use Read view, and print it.
If you want to get more out of your usage of Dorico on the iPad, you can optionally buy an automatically-renewing subscription, either on a monthly or annual basis, to unlock more functionality. Subscribers can create and edit projects for up to twelve players, and also enjoy the benefit of graphical editing in Engrave mode, access to the Notation Options dialog, support for third-party Audio Unit virtual instruments and effects, and the Manual Staff Visibility dialog. A monthly subscription costs just $3.99 US (or equivalent in your local currency, as determined by Apple), which is around the price of a single cup of coffee in your local chain coffee shop. To subscribe for a whole year costs just $39.99 US (or equivalent in your local currency), which is 12 months for the price of 10. For the price of a night out at the cinema for you and your significant other (depending on where you are in the world, that might include popcorn or nachos too, but not here in London), you can enjoy a whole year of everything that Dorico for iPad has to offer.
We anticipate releasing regular updates for Dorico for iPad, both to fix bugs and to add further features. Because Dorico for iPad is built from precisely the same code as Dorico for macOS and Windows, we plan to update the iPad version as closely as possible in step with the macOS and Windows versions. You will receive those updates whether you are using the free version or whether you choose to subscribe, and some new features will be available to users of the free version, while others will only be available to subscribers.
We know that subscription pricing is not a universally popular business model, but it is increasingly the business model that independent app developers like Steinberg are being encouraged to adopt on platforms like the App Store. Apple provide no options to developers or end users for traditional software business models such as free trials, paid updates, and upgrades. Adopting optional subscription pricing for Dorico for iPad allows us to provide the best user experience supported by the App Store, and to maintain a single version of Dorico for iPad into the future, so that all users can always be running the most up-to-date version of the app, while (we hope) providing us with a revenue stream that will allow and encourage us to invest further in the platform.
We also know that existing Dorico users may be fearful that the introduction of an optional in-app subscription for Dorico for iPad heralds the imminent introduction of subscription pricing for Dorico for macOS and Windows. Please allow me to be very clear: the introduction of Dorico for iPad does not change the way we are selling Dorico 3.5 (or the forthcoming Dorico 4) at all. We will continue to offer Dorico for macOS and Windows using perpetual licensing where you pay once, and you have a non-expiring license to use that version of the software.
Nevertheless, we hope that users of Dorico for iPad will find the modest subscription pricing on offer to provide really serious value for money, and that many of them will choose to subscribe to directly support the ongoing development of the app.
Other platforms
For the time being, we have no plans to introduce Dorico for any other platforms: I’m sorry, fans and users of iPhones, Android phones, Android tablets and Chromebooks. At least for now, we don’t have sufficient man- and woman-power to extend Dorico on to any other platforms. Although we are not ruling this out forever, it’s not something you should expect any time soon.
What’s next?
We’re so excited to be able to share Dorico for iPad with you today, but perhaps you were expecting or hoping for news about Dorico 4. Work on Dorico 4 is well underway, and indeed Dorico for iPad introduces some new features that will of course also be included in Dorico 4, when it arrives. Many of the features that we have developed specifically for Dorico for iPad – including the redesigned Hub, the on-screen instruments, the linked Key Editor in Write mode, the new Mixer, etc. – will all make their way into Dorico for macOS and Windows in the next version. And Dorico 4 will be packed with other, brand new features that we have held back from this initial iPad version – but you will have to wait a bit longer for more information about them.
In the meantime, we hope you will love Dorico for iPad as much as we do. We can’t wait to see what existing users of Dorico for macOS and Windows and users who are coming to Dorico anew on the iPad alike will do with the software. So what are you waiting for? Go and download it now.
Such a pity. But a subscription model I will never use.
And there are other apps with a light version to try and a paid version to work.
Congratulations to the whole team. This is an impressive achievement. Onwards and upwards for Dorico!
I own Dorico Pro for desktop… do I have to pay an additional subscription to unlock the features on iPad? If so, no way am I going to use this.
@Ray Richards: Yes, I’m afraid at the moment there is no way for us to connect your use of Dorico on the desktop to Dorico for iPad. We hope this is something that we will be able to address in future, once we have moved to our new licensing system for our desktop software. That new system will be based around user identity, which should make a number of interesting new things possible. In the meantime, you don’t lose anything by giving Dorico a try: it’s free, and it works great even if you decide not to spend any money on the optional in-app purchase subscription.
why would we not expect steinberg to charge for a full version? this is first of all a business for them. I was surprised to see an ipad version but am so pleased since I spend so much time away from my desktop. great job. I am not crazy about subscriptions and prefer to just buy a full version if it is not overwhelming. but here we are and I am not hesitating.
Too bad it won’t run on my iPad.
Even if it did, I will never use software that is a subscription model.
@James: It’s a pretty functional free app, too. The subscription is optional. You can think of it as a Dorico reader with a one or two instrument sketch pad attached. That’s pretty useful in itself.
Big congrats to the whole team for the release, by far, the best free app I’ve tried.
I was wondering if the monthly or annual subscription has an educational discount (or will have in future updates) like other steinberg products, including Dorico pro.
@Daniel: Thanks for your comment, and for your kind words. I’m afraid Apple does not provide a means of selling in-app purchases with educational pricing at the moment.
Fantastic work to the whole Dorico team! The free/subscription model, in my opinion, is very respectable. I’m really looking forward to working with the new App. As an amateur app developer myself, a massive congratulations on this new software :)!
@E Ludema: Thank you very much, and I hope you will find Dorico useful and fun to use!
I own 2 full desktop versions of Dorico, If I buy the subscription let us say for a full year, and in that time you guys move to the new system with the new license method that avoids the dongle and decide to integrate Dorico for I pad, with a new version of Dorico. When that rime comes would you make a discount for a user like me because I have a current active subscription? if so I’m in.
Also Would I need two Dorico I pad subscriptions? one for each of my Full desktop versions? both subscriptions are under the same account naturally.
@OCK: At the present time there’s no practical way for us to connect your usage of Dorico for macOS and Windows with Dorico for iPad. You can think of the two products as effectively completely independent for now. If you choose to subscribe to Dorico for iPad, one subscription will work for all your devices, so even if you have 10 iPads, provided you are signed in with the same Apple ID, all of them will have access to the subscription. We hope that in future we will be able to provide some additional functionality or some other special benefits for Dorico for iPad users who also have Dorico Pro on the desktop, but that’s not something we can do right now.
I’m impressed and delighted… including with the subscription pricing!
First, $3.99 is quite reasonable for the power you’re offering.
Second, I’ve seen firsthand that subscription-structured services tend to get more frequent and useful updates.
But more importantly, I think you’re offering an amazing value for free!
P.S. — Lastly, I really appreciate the tone and depth of your blog post. I’ve gotten so sick of ridiculously vacuous and overly “safe” corporate-speak that it’s refreshing to see a company offer honest comparisons with (named!) competitors, admit limitations clearly, and so on.
@Adam: Thank you very much for your kind words. I’m delighted to hear that you like the look of Dorico for iPad and I hope it will prove to be a really useful companion in your musical work.
Thank you and congratulations!
I am a reader of your Making Notes Blog from day one back in 2013 and bought Dorico 1.0 at the day of it’s release. I was immediately enthusiastic about the news, that Steingerg had hired the entire Sibelius team and I was never in doubt, that Dorico would become an excellent tool and would enrich my life as a musician. And it does!
Even if it seems like an encore to some, I am also very happy about the reader function, as I can now use my Dorico scores and worksheets in class without detours via pdf, and even edit them on site.
For me, Dorico is worth every penny you ask for it. All the best for the future!
@Robert: Thank you so much for your kind words. I’m delighted to hear that Dorico is a useful tool in your musical life. Long may it continue!
I am happy to use Dorico with my iPad Pro. I have used Dorico (Pro) since version 1, however a few months ago when I bought a new computer, I didn’t install it and switched to MuseScore. The reason was the installation process with eLicenser and Download-app – I do understand that software-piracy is an issue, however the whole purchasing and installation process was just too cumbersome, I couldn’t overcome myself to install it again, probably also because MuseScore was just one click away and very capable. Anyway, I am really happy to see Steinberg getting out of the way and letting Apple handle this. I hope one day there will be an MacAppStore subscription version of Dorico Pro. Until then, I use the iPad version and for more advanced stuff MuseScore. I had to laugh when Dorico asked me to log in with my „Steinberg-ID“ though, that’s so typical, there is one account for the forum, one account for the Steinberg-Store, and now there’s a new one, argh…
@Melonsoda: Thanks for your feedback. The good news is that we are in the process of retiring the eLicenser system altogether, and it will be replaced by something much more like the system employed by Adobe and Microsoft for their apps, i.e. based around simply signing in with your registered email address. We hope we will be able to welcome you back to Dorico at that point. In the meantime, note that your Steinberg ID is the same address you use to log in for registering your software, and for the forum; only really the online shop now uses a different account, but we are of course working towards unifying them as well.
Android coming any time soon?
@TWC: No, we don’t have any immediate plans.
Can you write to me when you get Android running? Android gear is cheaper, and I don’t want to buy another tablet just to see if this program is useful for playing.
Are you planning to add pencil support like StaffPad, notion, notateme?
@Femi: We’re not planning to add handwriting input like StaffPad, NotateMe, or the in-app purchase available for Notion or Symphony Pro, no. We do absolutely intend to expand support for Apple Pencil in Dorico for iPad, but not in the direction of handwriting. We simply feel that the technology is not available to make it work first time, every time, and it would be a massive development effort with no guarantee of success. If you find those other tools work well enough for you, you can at least send music to Dorico after inputting it into one of those apps via MusicXML.
Thanks Daniel. Please try not to blush, but having you as a voice of the company is the main reason why I followed you from Sibelius to Dorico. I still use Sibelius for most day-to-day work, but as I ramp up on Dorico I suspect I will be eventually switching completely.
Will this offer handwriting support using the Apple Pencil?
@Carmine: No, we don’t plan handwriting support at this time. Please see my earlier reply to Femi’s similar comment.
Absolutely fantastic! So delighted to see an iPad app come to fruition. You guys are my favorite team of software developers ever. Like the person above, I also INCREDIBLY appreciate your open, honest, helpful, real-life tone here.
I downloaded the app as I watched John Barron’s intro video. I immediately bought an annual subscription, which I would have done even at $10 per month / $100 per year. As a classical composer, if all this product does for me is string quartet/woodwind quintet scratchpad ideas development, it is a huge bargain. I’ll be very pleased to see full integration with iCloud. Bravo, Dorico team!!
@Charles: Thank you very much for your kind words! I’m delighted to hear that Dorico is what you are looking for.
Wonderful app! Is apples family sharing possible – so me and my son could use all functions of the app? Or do we need two licenses/subscriptions? Regards, Markus
@Markus: At the moment, Family Sharing is not enabled for the monthly or annual subscriptions, but we’ll discuss whether or not it would make sense to enable this.
Thank you for your reply. So we need two licenses – that’s not so nice…
Can’t find Tonality Systems. Are they missing in Dorico for iPad?
@JakN: That’s right: editing tonality systems is a Dorico Pro-only feature and not currently included in Dorico for iPad.
Ah, OK. Then it was hasty of me to pay for the one-year subscription but I should have checked.
Thank you! It is really a super good app. This change the way how I can fast make new work ‘on the road’, edit music while I am working with my musicians or when an idea comes into my head. The app gives me the power (like LumaFusion) for working with my iPad Pro.
Daniel you all at Steinberg are monsters!! I hold a music director position at a Cathedral and it baffles me
to see how hard you all work to offer “all of us” the professional tools needed for music engraving at such a high degree of skill and quality needed to publish.. Now a free mobile version? I’m in for the subscription at that annual price..
Thank you!
If we have a perpetual licence to Dorico, but also want it on the iPad as its more portable, we surely don’t have to pay a subscription to a product we already have? Isn’t there a way for Dorico iPad to be released in a way that by when you sign in to your account, your perpetual licence holder on a Mac/PC activates and you continue working? Like having MS word across all your devices that you sign into?
@Matt: We would certainly like to be able to move in that direction, but that’s not something that our current licensing system permits. There is also a bit of a disconnect between the fact that to stay current with all the latest features for Dorico on the desktop, you are periodically asked to buy an update to a new major version, which you can choose to do or not. But because we will be maintaining a single iPad app for Dorico that will be updated alongside the desktop version, we would need to introduce different tiers for different features in the app that would make things a lot more complicated, both for us to develop, and for you as a user to understand. For example, say you have Dorico Pro 3.5 today, but you choose not to update to Dorico Pro 4 when it is released. At that point, you don’t “already have” the new features that are added in Dorico Pro 4, so you couldn’t have any expectation that you should get access to those features in the iPad app either, but to make that work, we would then have to implement multiple different product tiers in the iPad version to avoid giving you the new version 4 features.
If we had subscription pricing for Dorico on the desktop as well, then I think it would make sense for us to provide access to the software across desktop and iPad for a single payment, but because we don’t offer subscription pricing on the desktop, we can’t do it. Therefore the best way for us to balance the competing demands of maintaining the smallest possible number of different application targets from our code base, making it possible to try Dorico for iPad free of charge, making it easy to deploy new features, updates and fixes to as many customers as possible, work within the limits of the business models provided to software developers by Apple for selling apps in the App Store, and try to derive some income from the app in order to fund its future development, was to use a simple subscription payment for the iPad app.
As I read this post, I figured half the comments would either be “I will never use subscription software” or “Why should I be forced to pay for this when I already pay for the desktop version?” Daniel, you have the patience of a saint to politely respond to these people. Dorico for iPad looks like a fantastic achievement. Congratulations to the team on what was undoubtedly a difficult job.
I got Dorico Elements and honestly think I could be more productive using Studio One’s in-built score editor. I like the modularization, btu they’ve thrown the baby out with the bathwater by removing the entire Engrave page from the Elements SKU.
And it’s in the iPad App, which is odd, cause Elements costs ~3 Annual Subscriptions up-front.
I understand the market segment they are gunning for with Dorico Pro, but Elements does exists. So, for anyone below that, these weird feature disparities make very little sense and result in a workflow that becomes very messy quite quickly.
It doesn’t help that Steinberg is beyond tight lipped when it comes to upcoming releases. Clearly, Dorico 4 is coming. Clearly, we will know almost nothing about it until days before its release.
Will I waste my time waiting for Dorico 4, while slugging it out with Notion 6; or should I buy Sibelius | Standard now to get Dorico Elements’ feature set with the ability to do at least basic formatting of the score without paying over twice as much as the cost of that Sibelius SKU?
There are some features in the new iPad version that will be making it to Dorico Pro and Elements in the next release.
@Nate: Many of the features and improvements that we introduced in Dorico for iPad will be making their way to the next version of Dorico Elements for macOS and Windows, including access to the graphical editing tools in Engrave mode.
We don’t talk publicly about forthcoming releases in detail, because there can be last-minute changes that result in planned features being removed from the software, but in this case I feel pretty confident in saying that basic Engrave mode tasks will be possible in the next version of Dorico Elements.
If you have any other questions or comments about Dorico Elements, please feel free to get in touch.
So good, waiting for this for years but sadly the monthly subscription make it not a considerable option, and even more if you own the expensive pc version, I just don’t understand how they don’t include it or offer an upgrade with it, definitely a lost opportunity for stainberg to have a big leap over their competitors