
Dorico is uniquely powerful in terms of its handling of complex documents with multiple pieces of music contained within them, and in its ability to create consistent page layouts quickly and easily. But these tools may not present themselves hugely obviously to you at first, especially if you’ve been used to working in other music notation software that provides fewer features targeted at these kinds of use cases: you may well have become very proficient at bending other software to your will, and so when you come to try to do a similar job in Dorico, you might reasonably expect to find similar sorts of ersatz solutions, and consequently end up frustrated.
In this tutorial, we’ll introduce some of these powerful features and walk through the creation of a simple worksheet containing some major and minor scales. By the end of the tutorial, you will know something about important Dorico concepts like flows, vertical spacing, transposition, and more besides. So let’s get started.
The target
Here is what we are going to produce: a worksheet showing some of the scales that you are required to play to pass your ABRSM Grade 5 flute examination. (Click the picture or here to see a larger version.)
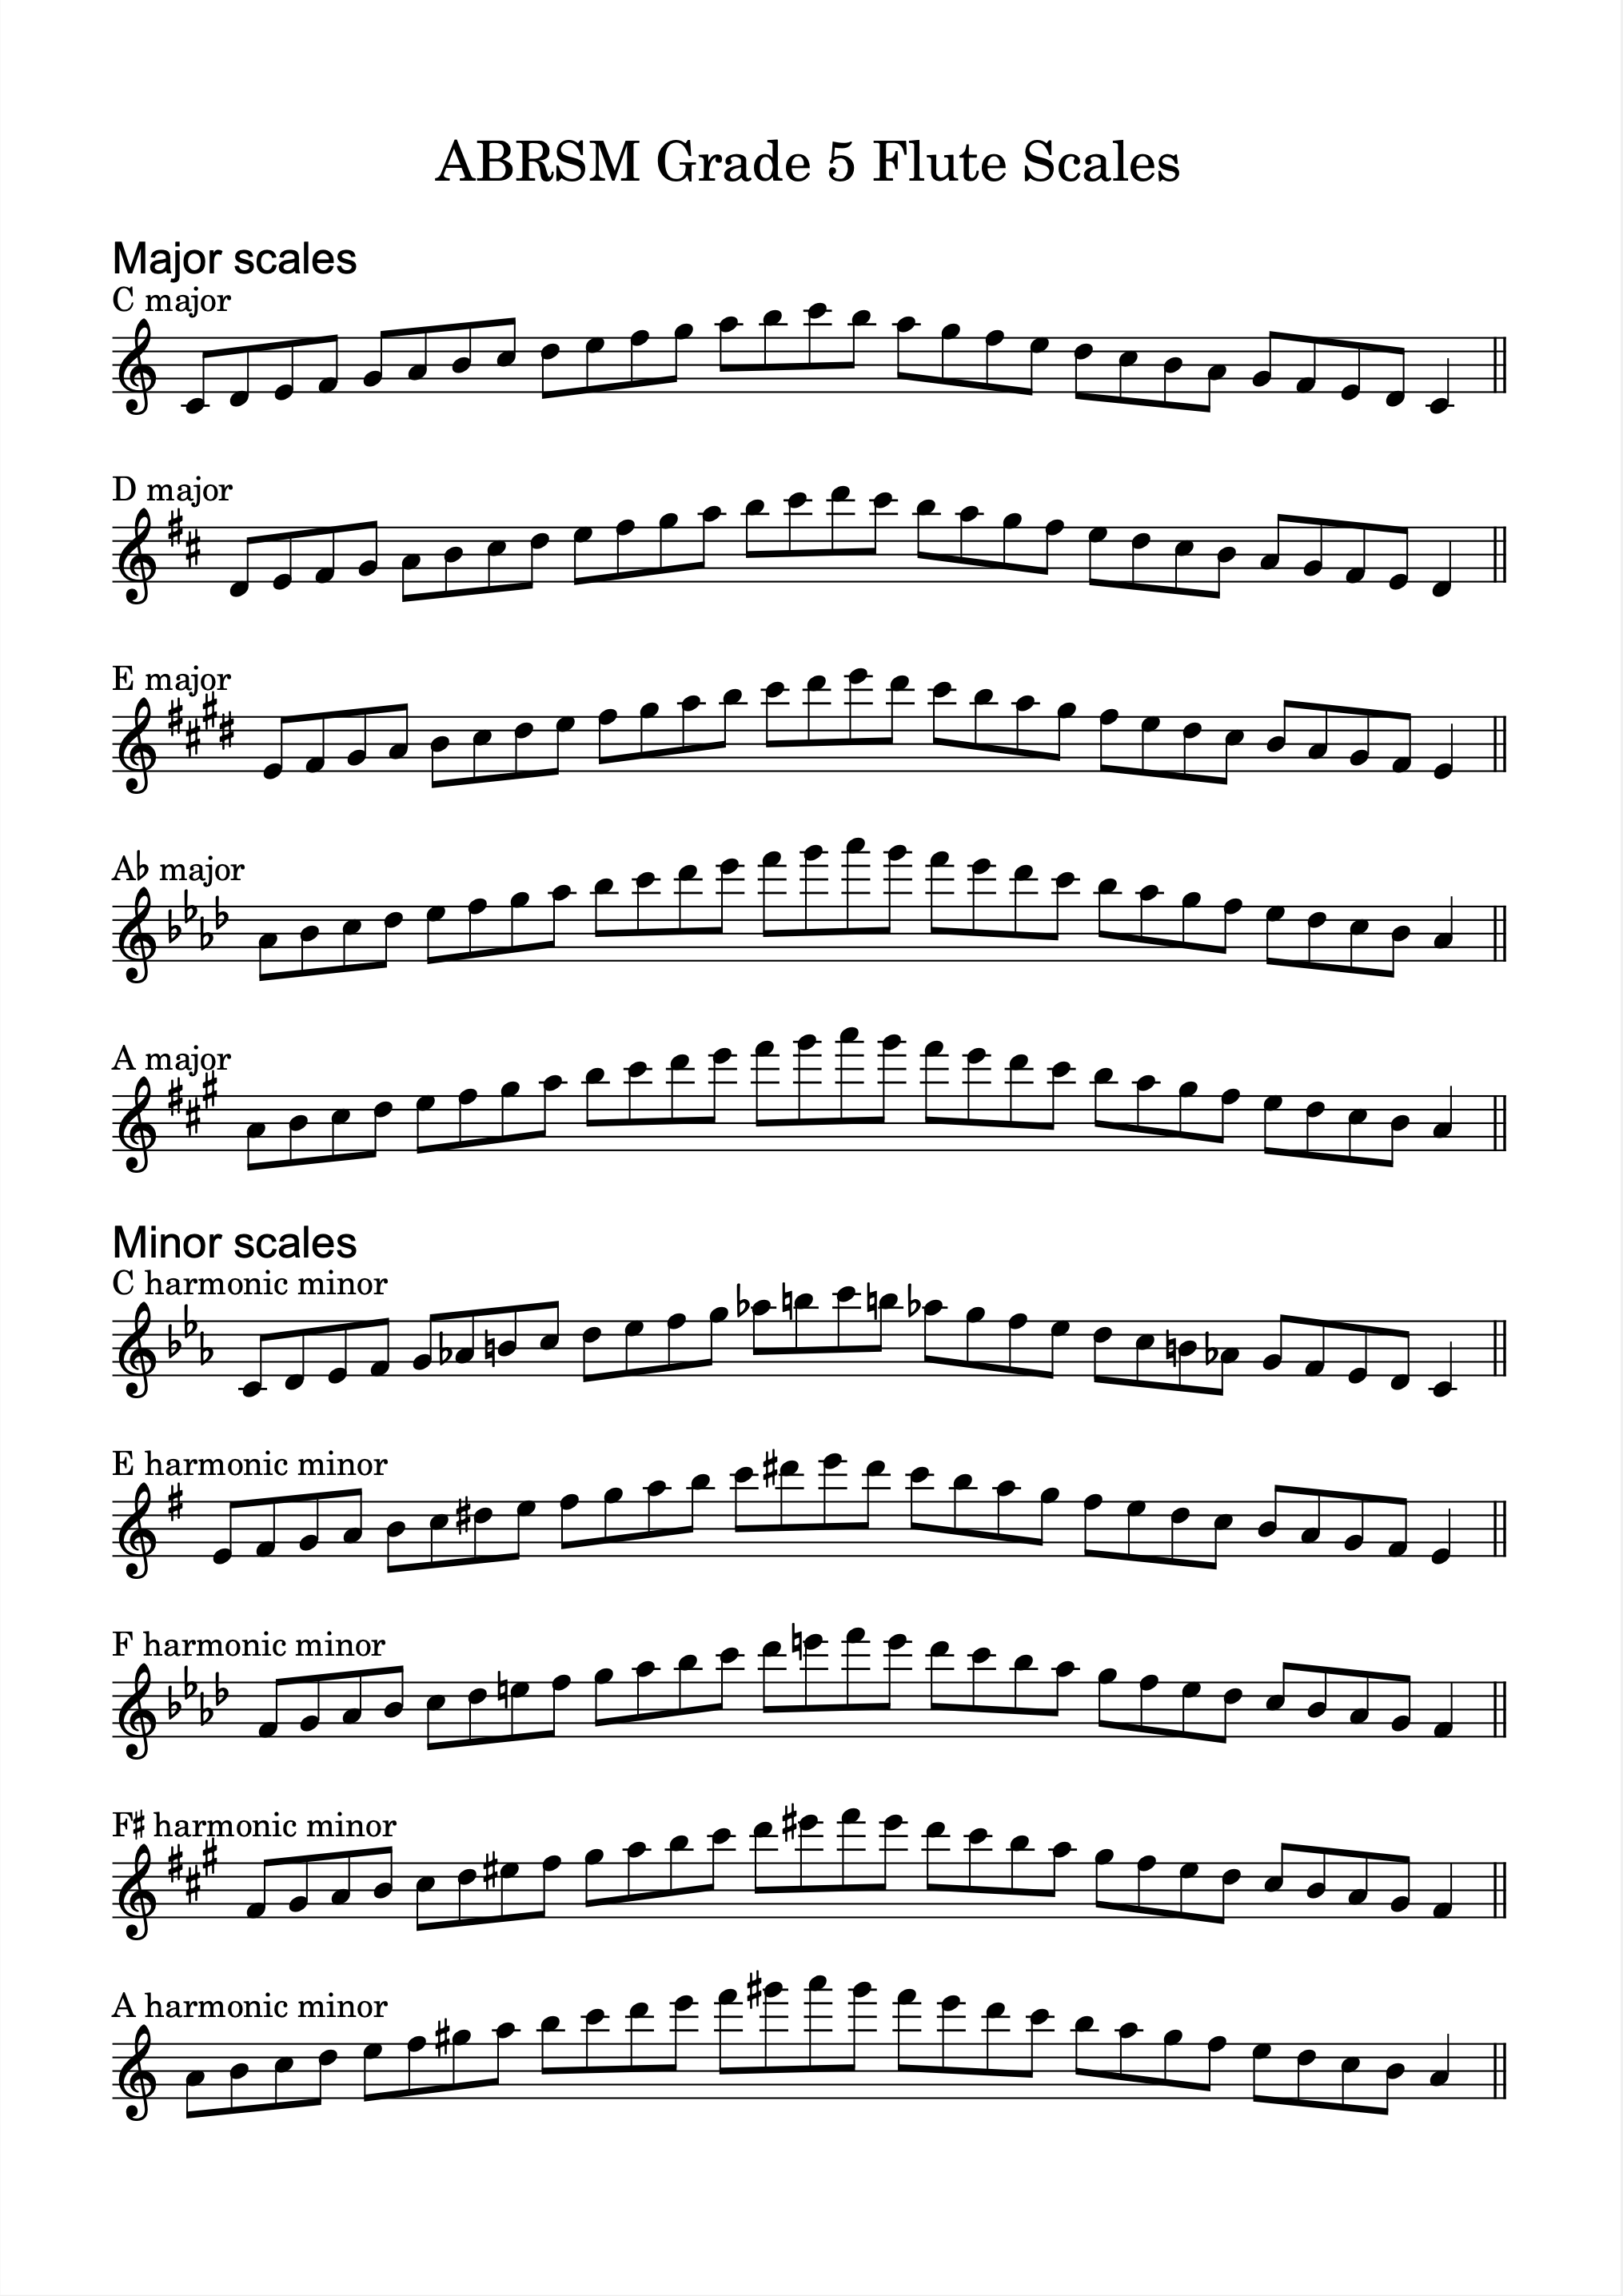 Click the picture to download a PDF version.
This tutorial assumes you are using Dorico Pro. At the time of writing, the current version is 3.5, though if you are using Dorico 3 or Dorico 2 you should still be able to follow along. If you are using Dorico Elements or Dorico SE, there will be certain things you can’t do, because you have no access to Engrave mode, but you can get a certain way through this procedure without using Engrave mode at all, and I’ll call out the things that can’t be done in Dorico Elements and Dorico SE specifically when we get there.
Getting started
- In the Hub window that appears when you first run Dorico, click New Empty Project to start a new project. The main project window opens up in Setup mode.
- Click Add Solo Player or use the shortcut Shift+P to add a player. The instrument picker opens.
- Type flute and hit Return to add a flute to our empty-handed player. If you prefer, you can click Woodwinds in the first column, Flute in the second column, then Add. A single open meter bar containing a quarter (crotchet) rest appears.
- Switch to Write mode by typing Ctrl+2 (Windows) or Command–2 (Mac), or click the Write button at the top of the window. Now we’re ready to write some notes.
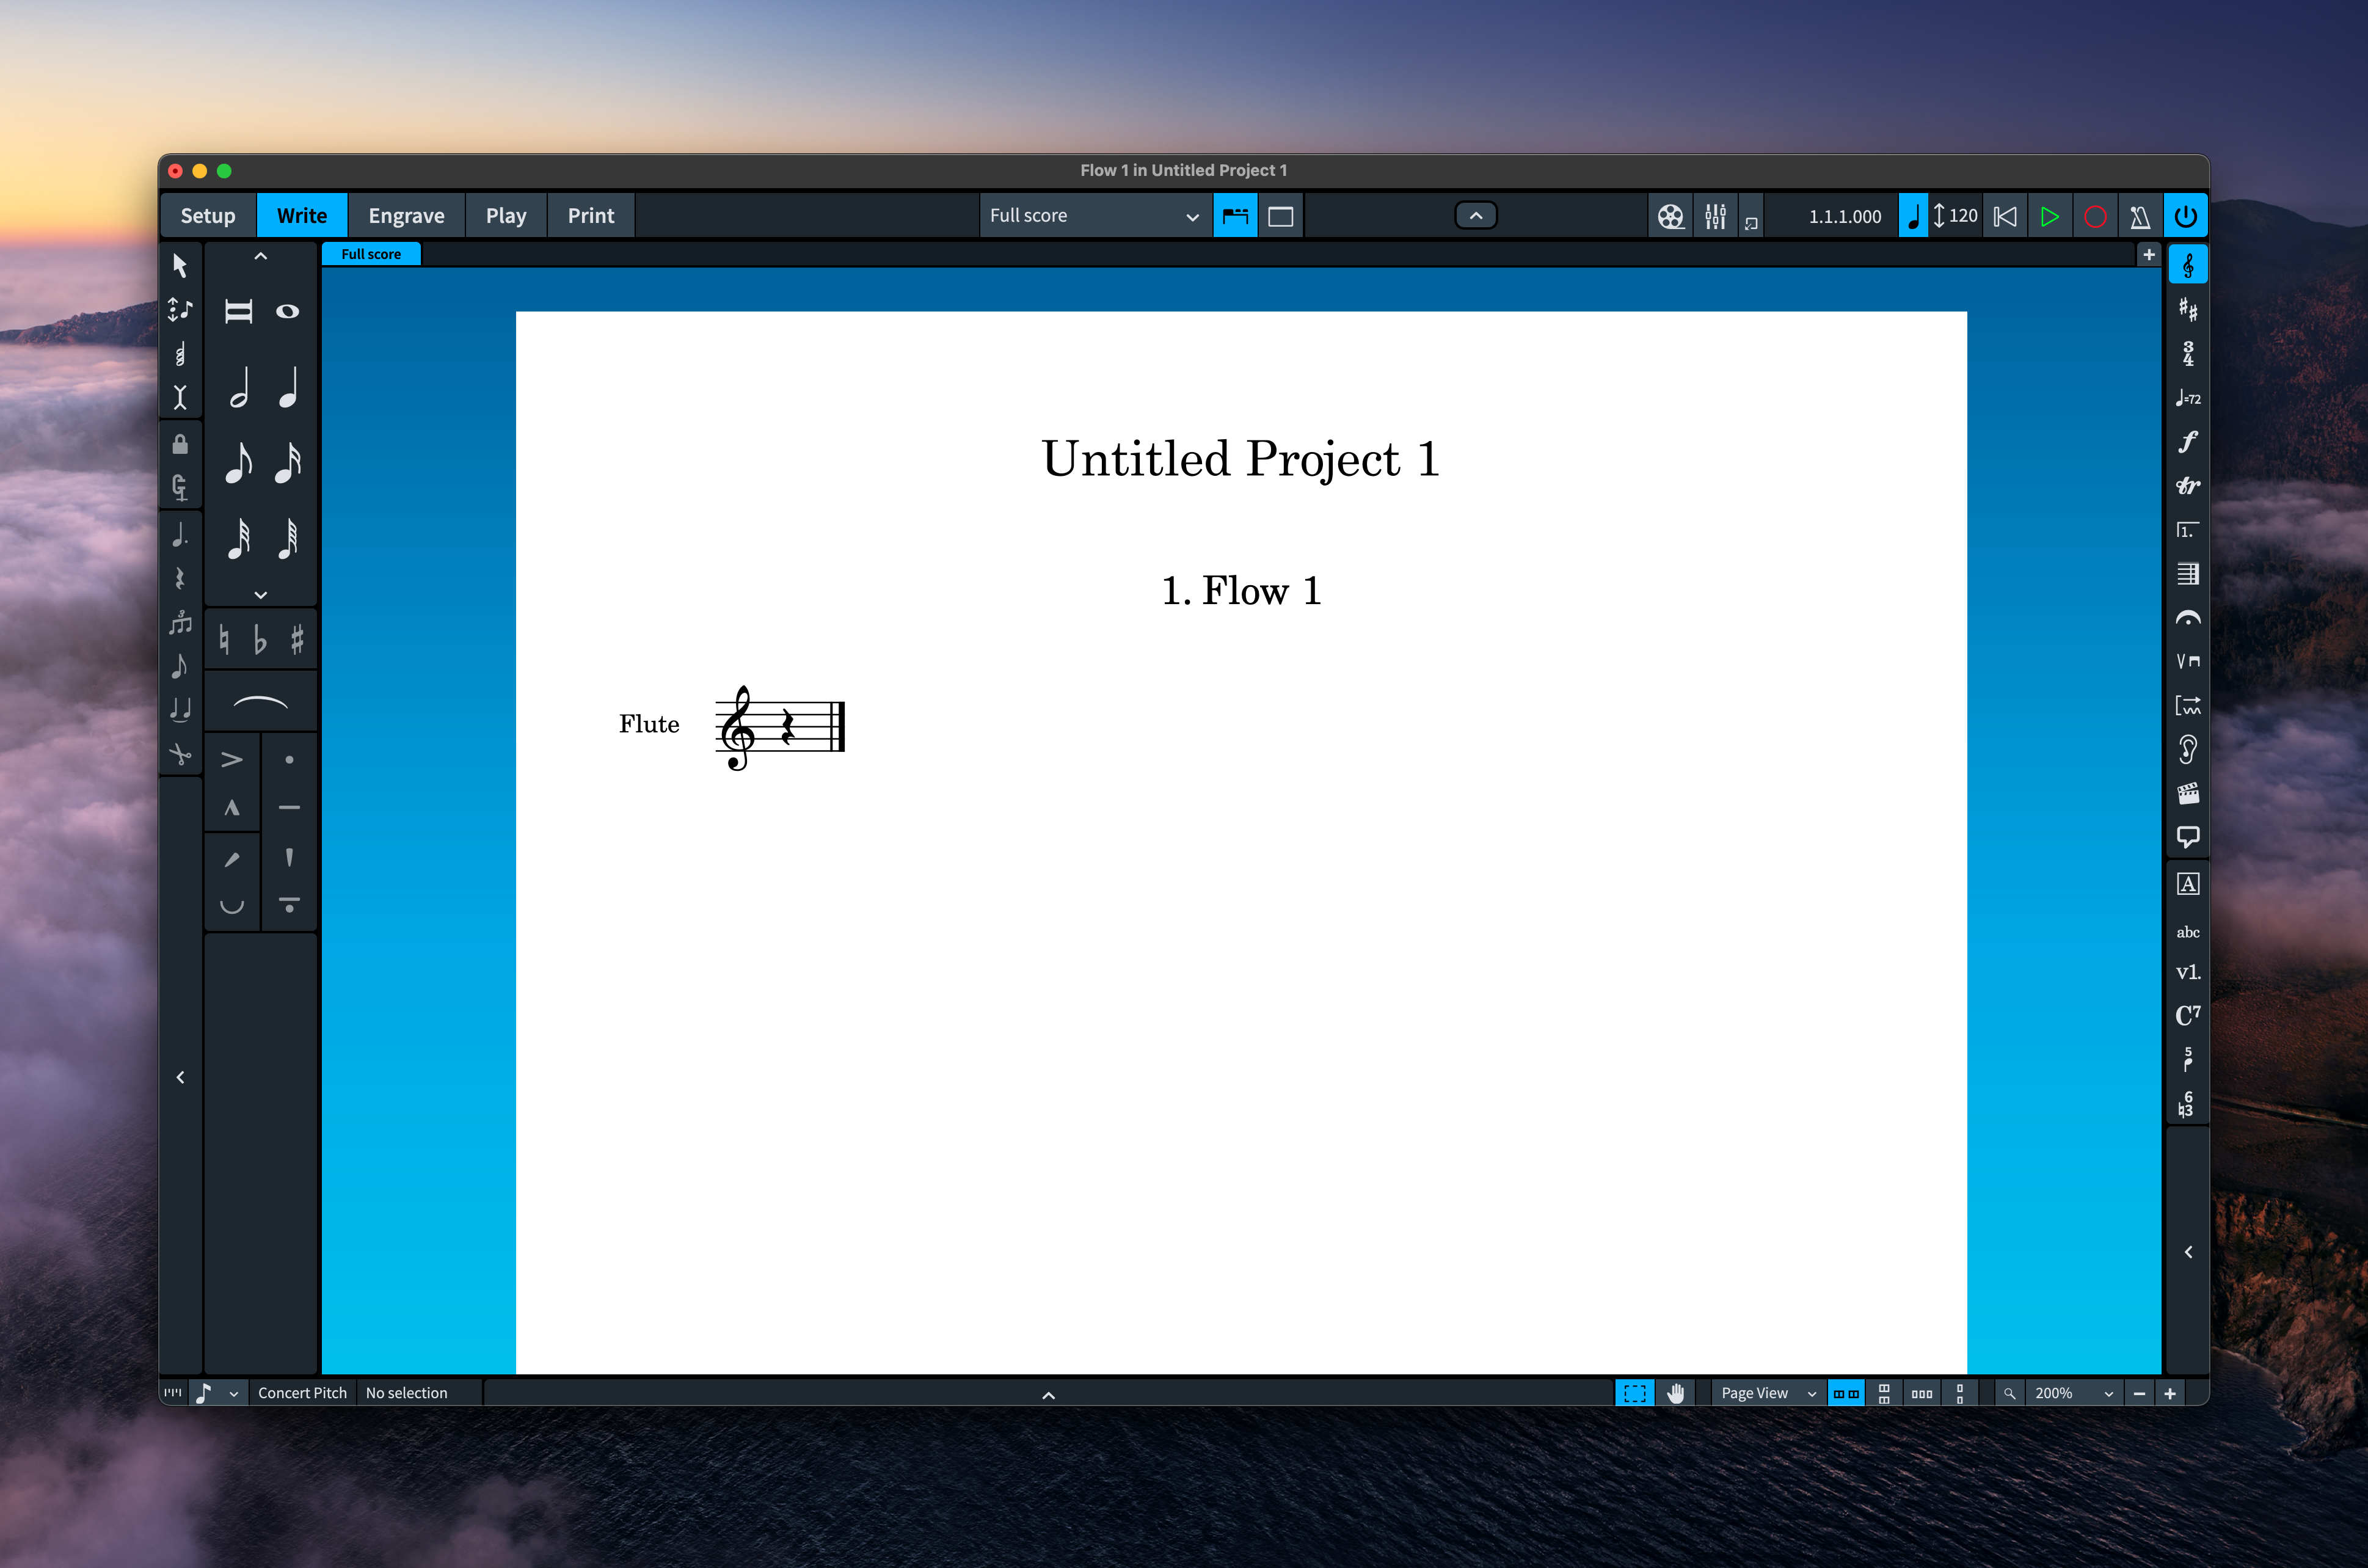
This is what you should see at this point:
Inputting the first scale
First off, we’re going to input a two octave C major scale, starting on middle C (C4) and proceeding up two octaves to C6, then back down again. We’ll be able to use this as the raw material to generate several more scales shortly.
- Press the right arrow key to select the quarter (crotchet) rest in the single open meter bar. Alternatively, select it with the mouse. The rest is coloured orange.
- Type Shift+N (or press Return) to start note input. The caret – a vertical orange line with a small up-stem quarter note (crotchet) at its lower left – appears.
- To input the C major key signature, type Shift+K to open the key signatures popover, then type C (an upper case C, i.e. holding Shift) and hit Return. No key signature will appear in the music, but a red signpost reading C Major will appear. (It’s important to input the key signature: if we don’t, when we later come to transpose this scale to a new key, we won’t be able to transpose the key signature, and we’ll get lots of redundant accidentals.)
- Now input the following scale, using whatever method suits you best (don’t worry about the unfriendly beaming for now):

- Type 5 to choose eighth note (quaver) before you start. If you’re using the computer keyboard for input, when you type C on its own, Dorico will create C5, an octave higher than we want, because that is the C that is closest to the hot-spot on the treble G clef (i.e. G4), so you can either type Shift+Alt+C (Windows) or Control–C (Mac) to input the C in the octave below, or you can transpose the C5 down an octave by typing Ctrl+Alt+down arrow (Windows) or Opt–Command-down arrow (Mac).
- Then either type the pitch names with your computer keyboard, or play the scale on your MIDI keyboard. For the final note, type 6 to choose quarter note (crotchet) before you input the last C.
- Next, we’re going to sort out the beaming. We want the notes to be beamed in groups of four, so select the first note, then every fourth note thereafter, by holding Ctrl (Windows) or Command (Mac). You should end up with the following notes selected:

- Now, right-click (or Control-click on Mac) and choose Beaming > Split Beam. You should end up with the following:

There’s still plenty more formatting to be done, but for the time being, let’s add some further scales.
Adding more major scales
We don’t need to input all of the scales by hand like this: we can duplicate the existing scales, and then transpose them. Instead of copying and pasting the music, we’ll do this by duplicating the flow we’ve already created. You can have as many flows as you like within the same Dorico project, and each flow is an independent span of music, which could be anything from the movement of a symphony for full orchestra to a song from a musical, all the way down to a simple scale for a solo instrument.
- Type Ctrl+1 (Windows) or Command–1 (Mac) to switch back to Setup mode. You can also click the Setup button on the toolbar at the top of the window.
- In the Flows panel at the bottom of the window, right-click (or Control-click on Mac) the large card for Flow 1 and choose Duplicate Flow from the context menu. Do this four more times, so that you have five flows in total.
- Click on each of the cards for the flows you have created: each one is on its own page. Don’t worry about that at this stage: we will be able to bring them all on to the same page in a few clicks a little later on.
- If the flows you have created are out of numeric order, you can simply drag them into the right order in the Flows panel. Try it out!
- Now return to Write mode by typing Ctrl+2 (Windows) or Command–2 (Mac), or by clicking the Write button on the toolbar.
- Select any note in the music on the second page, then type Ctrl+A (Windows) or Command–A (Mac) to select all the music in the flow. You can choose Edit > Select All if you prefer. All of the notes will be coloured orange.
- Choose Write > Transpose. The Transpose dialog opens.
- We are going to transpose this scale up a major second into D major. You can either set Interval to Second, Quality to Major and Direction to Up, or you can use the Calculate Interval box on the right-hand side of the dialog. Try it: leave the from row set to C natural in octave 4, and set the to row to D natural in octave 4, then click Apply, which will update the Interval, Quality and Direction controls for you, so you don’t have to do interval arithmetic in your head.
- Click OK to apply the transposition. You will see:

Repeating the last four steps above, use the Write > Transpose dialog to transpose each of the remaining three flows into the following keys:
- Flow 3: E major, beginning on E4 (Interval: Third, Quality: Major, Direction: Up)
- Flow 4: A flat major, beginning on Ab4 (Interval: Sixth, Quality: Minor, Direction: Up)
- Flow 5: A major, beginning on A4 (Interval: Sixth, Quality: Major, Direction: Up)
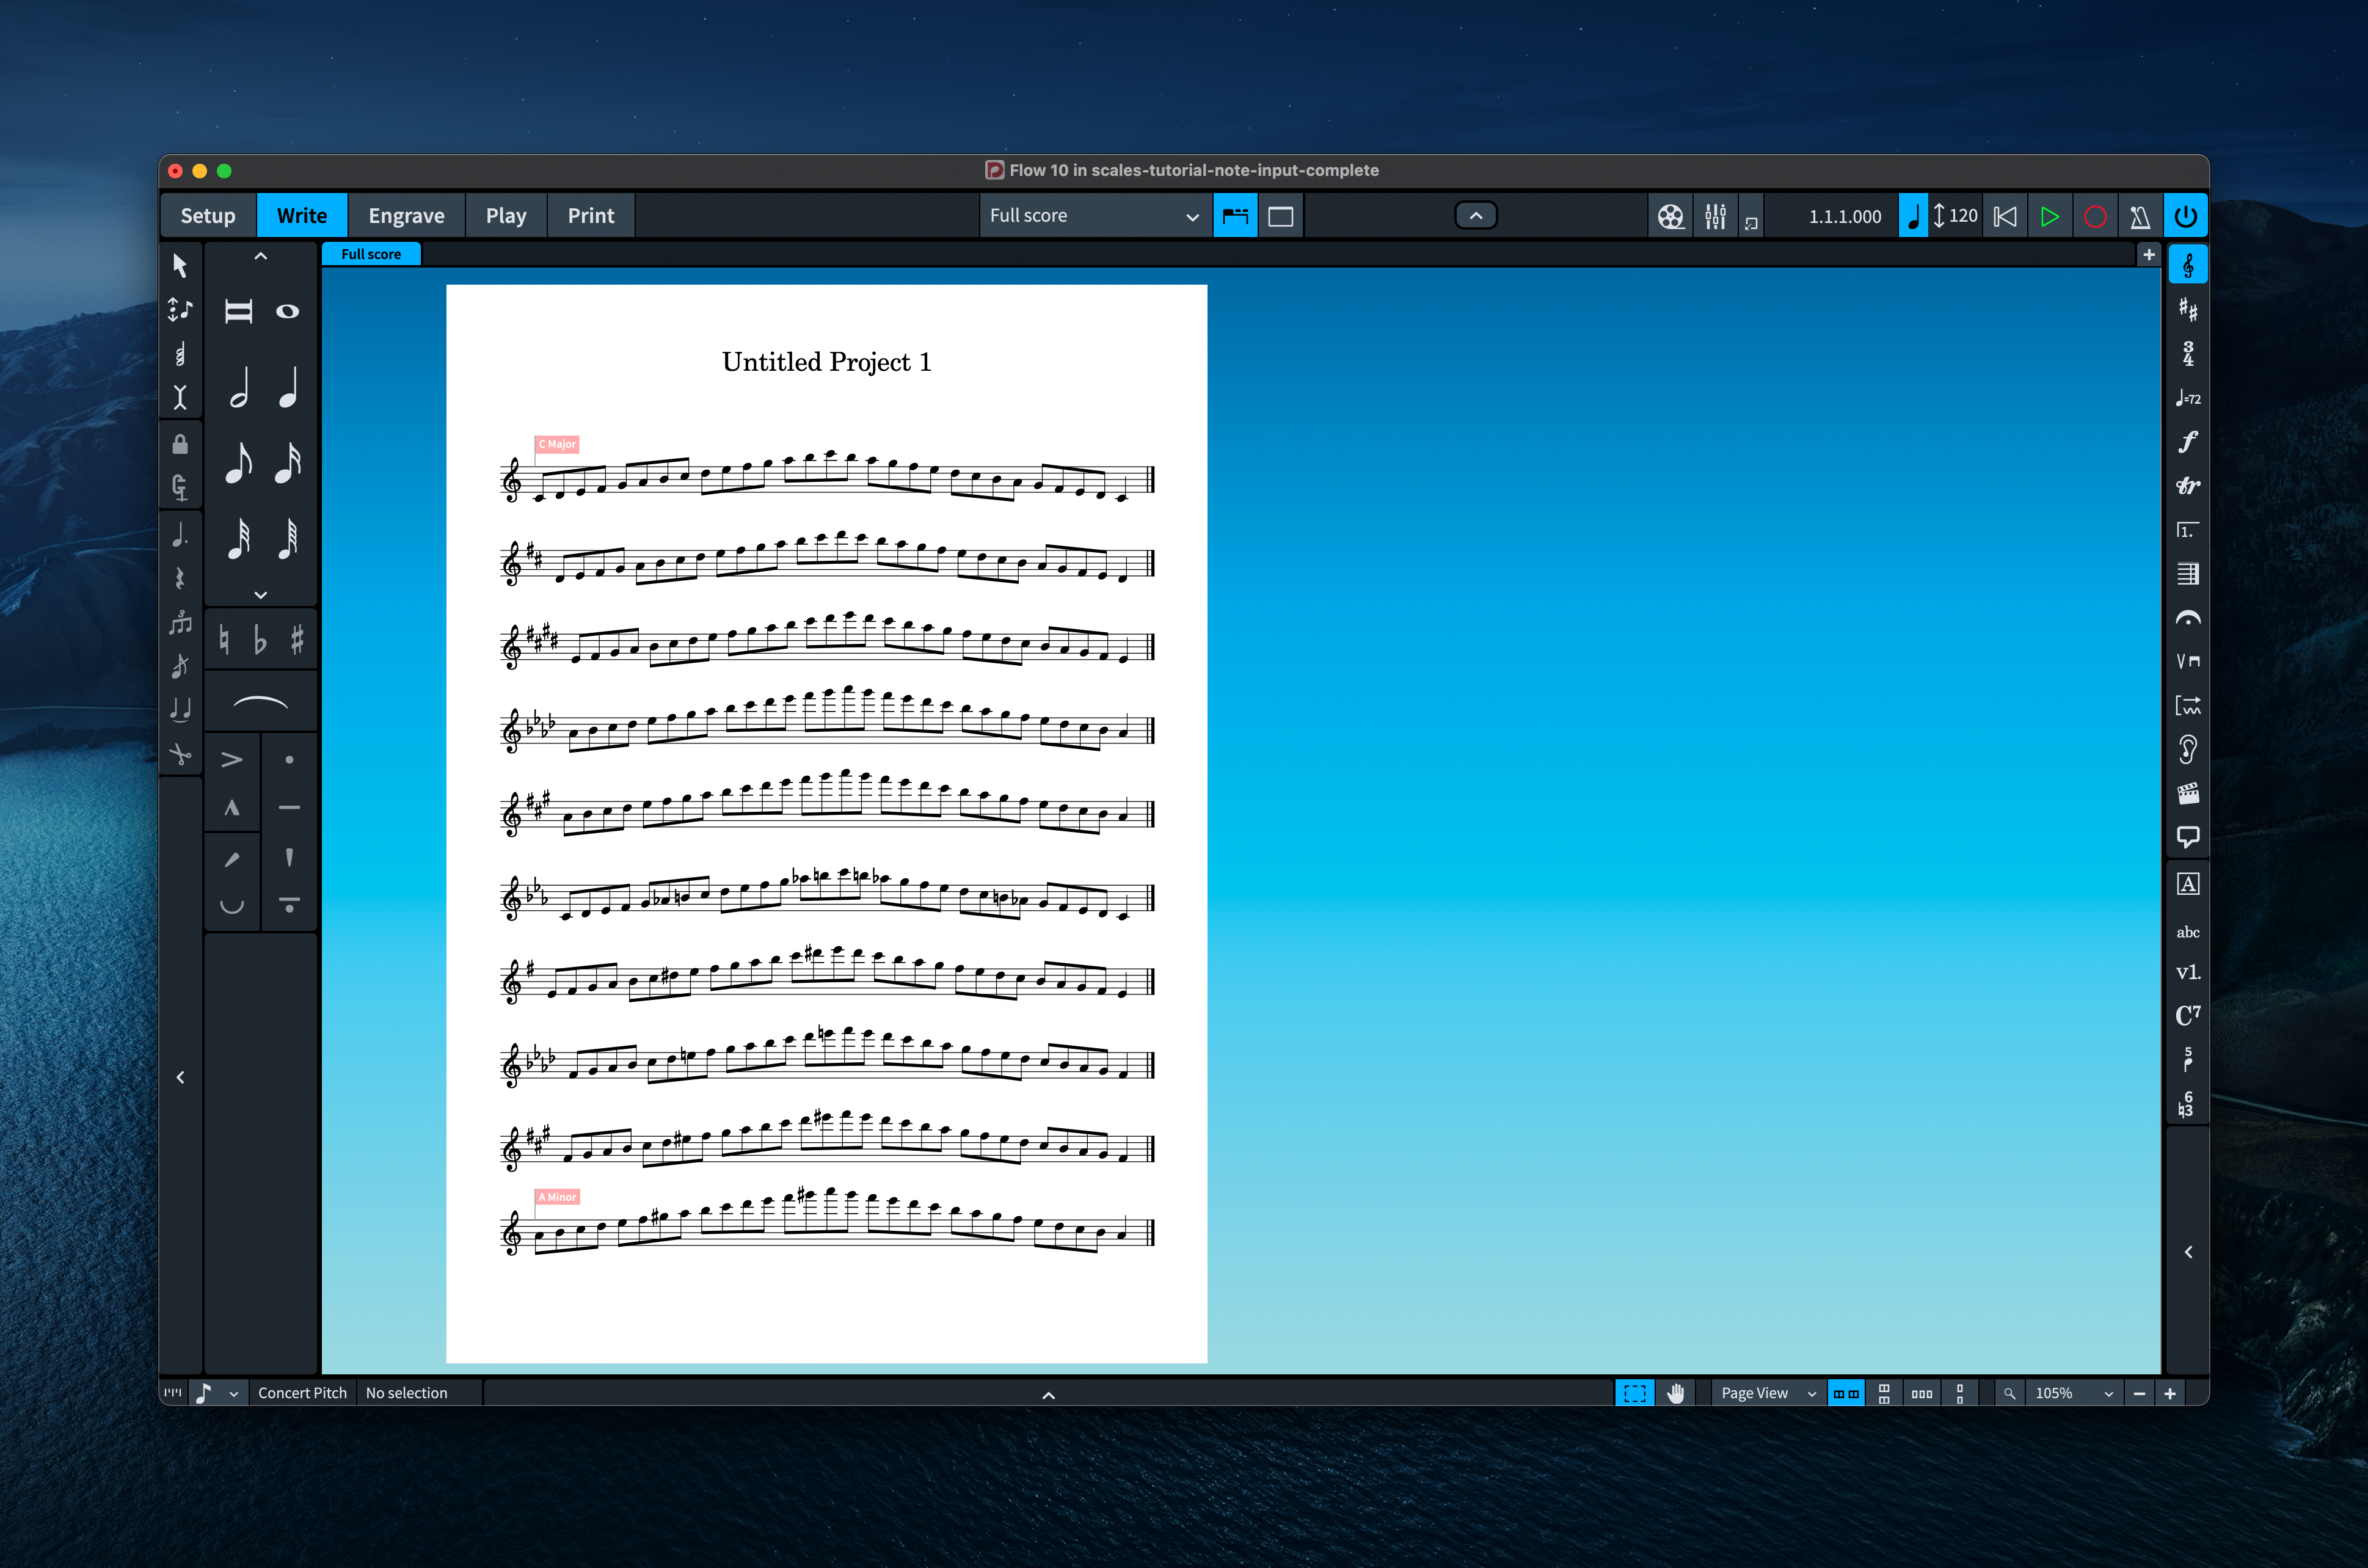
You should now have five pages in your layout, with scales in C major, D major, E major, A flat major, and A major. Let’s add a handful of minor scales, and then we can work on the formatting. Some of the scales will spill over onto a second system: don’t worry about that for now. All will soon become clear.
This is a good point to save your project. Dorico has an auto-save feature (set by default to save your project every five minutes), but you should always save your project regularly so that you minimise the risk of losing any work in the unlikely event of the application or your computer crashing.
Adding the first harmonic minor scale
If Dorico had a feature to transpose music from one scale to another and rewrite the music to fit the new scale tones, we could save ourselves a little time on this next step (watch this space!), but for the time being we’ll input the first one by hand, and then transpose them as before.
- Switch back to Setup mode: you should remember the shortcut by now!
- In the Flows panel, click the + button in the Flows panel to add a new flow, Flow 6.
- Click the new card for Flow 6 in the panel to bring page 6 of the layout into view, where you will see the empty open meter bar containing a single quarter (crotchet) rest.
- Return to Write mode: again, this shortcut should be well under your fingers by now.
- Select the quarter (crotchet) rest in the empty open meter bar and type Shift+N (or type Return) to show the caret.
- Type Shift+K to open the key signatures popover, and enter c (lower case c, i.e. without holding Shift) to enter a C minor key signature.
- Referring back to the method under Inputting the first scale if you need to, input the following scale:
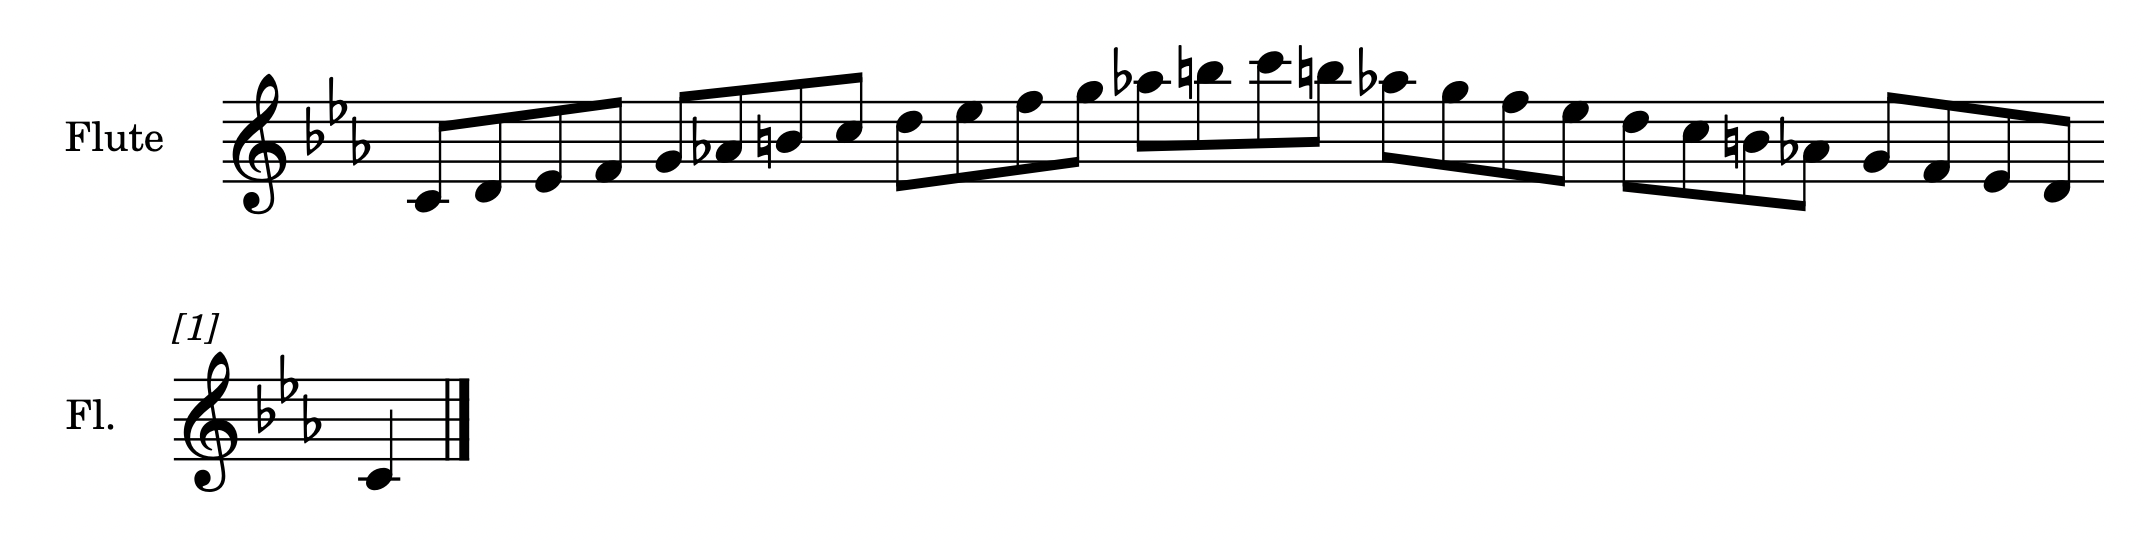
Don’t forget to use Split Beam to split the single long beam group into shorter groups of four. As before, don’t worry about the fact that the scale spills onto a second system: that will all be taken care of very soon. To input the required B naturals for B4 and B5, type 0 (zero) or click the natural button in the left-hand Notes panel before you type B to input the note. You will also notice that the A flat, which is in the C minor key signature, is nevertheless shown in each case, to make the vital character of the harmonic minor scale apparent. Select each A flat using Ctrl+click (Windows) or Command-click (Mac) and type – (hyphen) or click the flat button in the left-hand Notes panel to add the explicit flats. You can do the same for any B naturals that don’t show an accidental, selecting them and typing 0 (zero) to make the accidental appear.
Adding more harmonic minor scales
Referring back to the method under Adding more major scales above, return to Setup mode and use Duplicate Flow to duplicate Flow 6 four times, so that you have a total of 10 flows in the project. Once you have duplicated the flows, switch back to Write mode. Use Select All to select the contents of each flow in turn, then use Write > Transpose to transpose each scale as follows:
- Flow 7: E harmonic minor, beginning on E4 (Interval: Third, Quality: Major, Direction: Up)
- Flow 8: F harmonic minor, beginning on F4 (Interval: Fourth, Quality: Perfect, Direction: Up)
- Flow 9: F sharp harmonic minor, beginning on F#4 (Interval: Fourth, Quality: Augmented, Direction: Up)
- Flow 10: A harmonic minor, beginning on A4 (Interval: Sixth, Quality: Major, Direction: Up)
At the end of this process, you should have a layout containing 10 flows, each on its own page. We now have all of the raw material we need to put together our worksheet, and the fun can begin.
Formatting first steps
If you’ve had any problems following the tutorial this far, you can download a Dorico project with all of the preceding steps completed, here.
In other music notation software, this might be the point at which you start manually moving material around from one page to another, using various page formatting tools and commands. We can get most of the way to our worksheet layout simply by changing some options judiciously.
- Type Ctrl+Shift+L (Windows) or Shift–Command–L (Mac) to open the Layout Options dialog. You can alternatively find this in the Setup menu in Setup mode, but the shortcut is better, because it works from any mode.
- When Layout Options opens, it normally opens with the Page Setup page selected, but if that page is not selected, click it in the left-hand category list.
- Click the Flows subheading below the highlighted Page Setup category. The options shown on the right scroll to bring the Flows section into view.
- Set New flows to Allow on existing page. This tells Dorico that each scale is allowed to continue on the same page as the previous flow, if there’s room.
- Set Show flow headings to Never. This tells Dorico that the heading above each individual flow (which says something like 2. Flow 2 by default) should not appear.
- Click Apply and behind the dialog you should be able to see that the layout now fits onto two pages instead of 10. If you want a closer look, click Close: you can always reopen the Layout Options dialog by typing Ctrl+Shift+L (Windows) or Shift–Command–L (Mac) again.
- Next, click the Staves and Systems category in the left-hand list.
- Set Staff labels on first system to None. This tells Dorico that the Flute label to the left of the first system of each flow should not appear.
- Set Staff labels on subsequent systems to None. This tells Dorico that the Fl. label to the left of the second system of those flows that don’t fit on a single system should not appear.
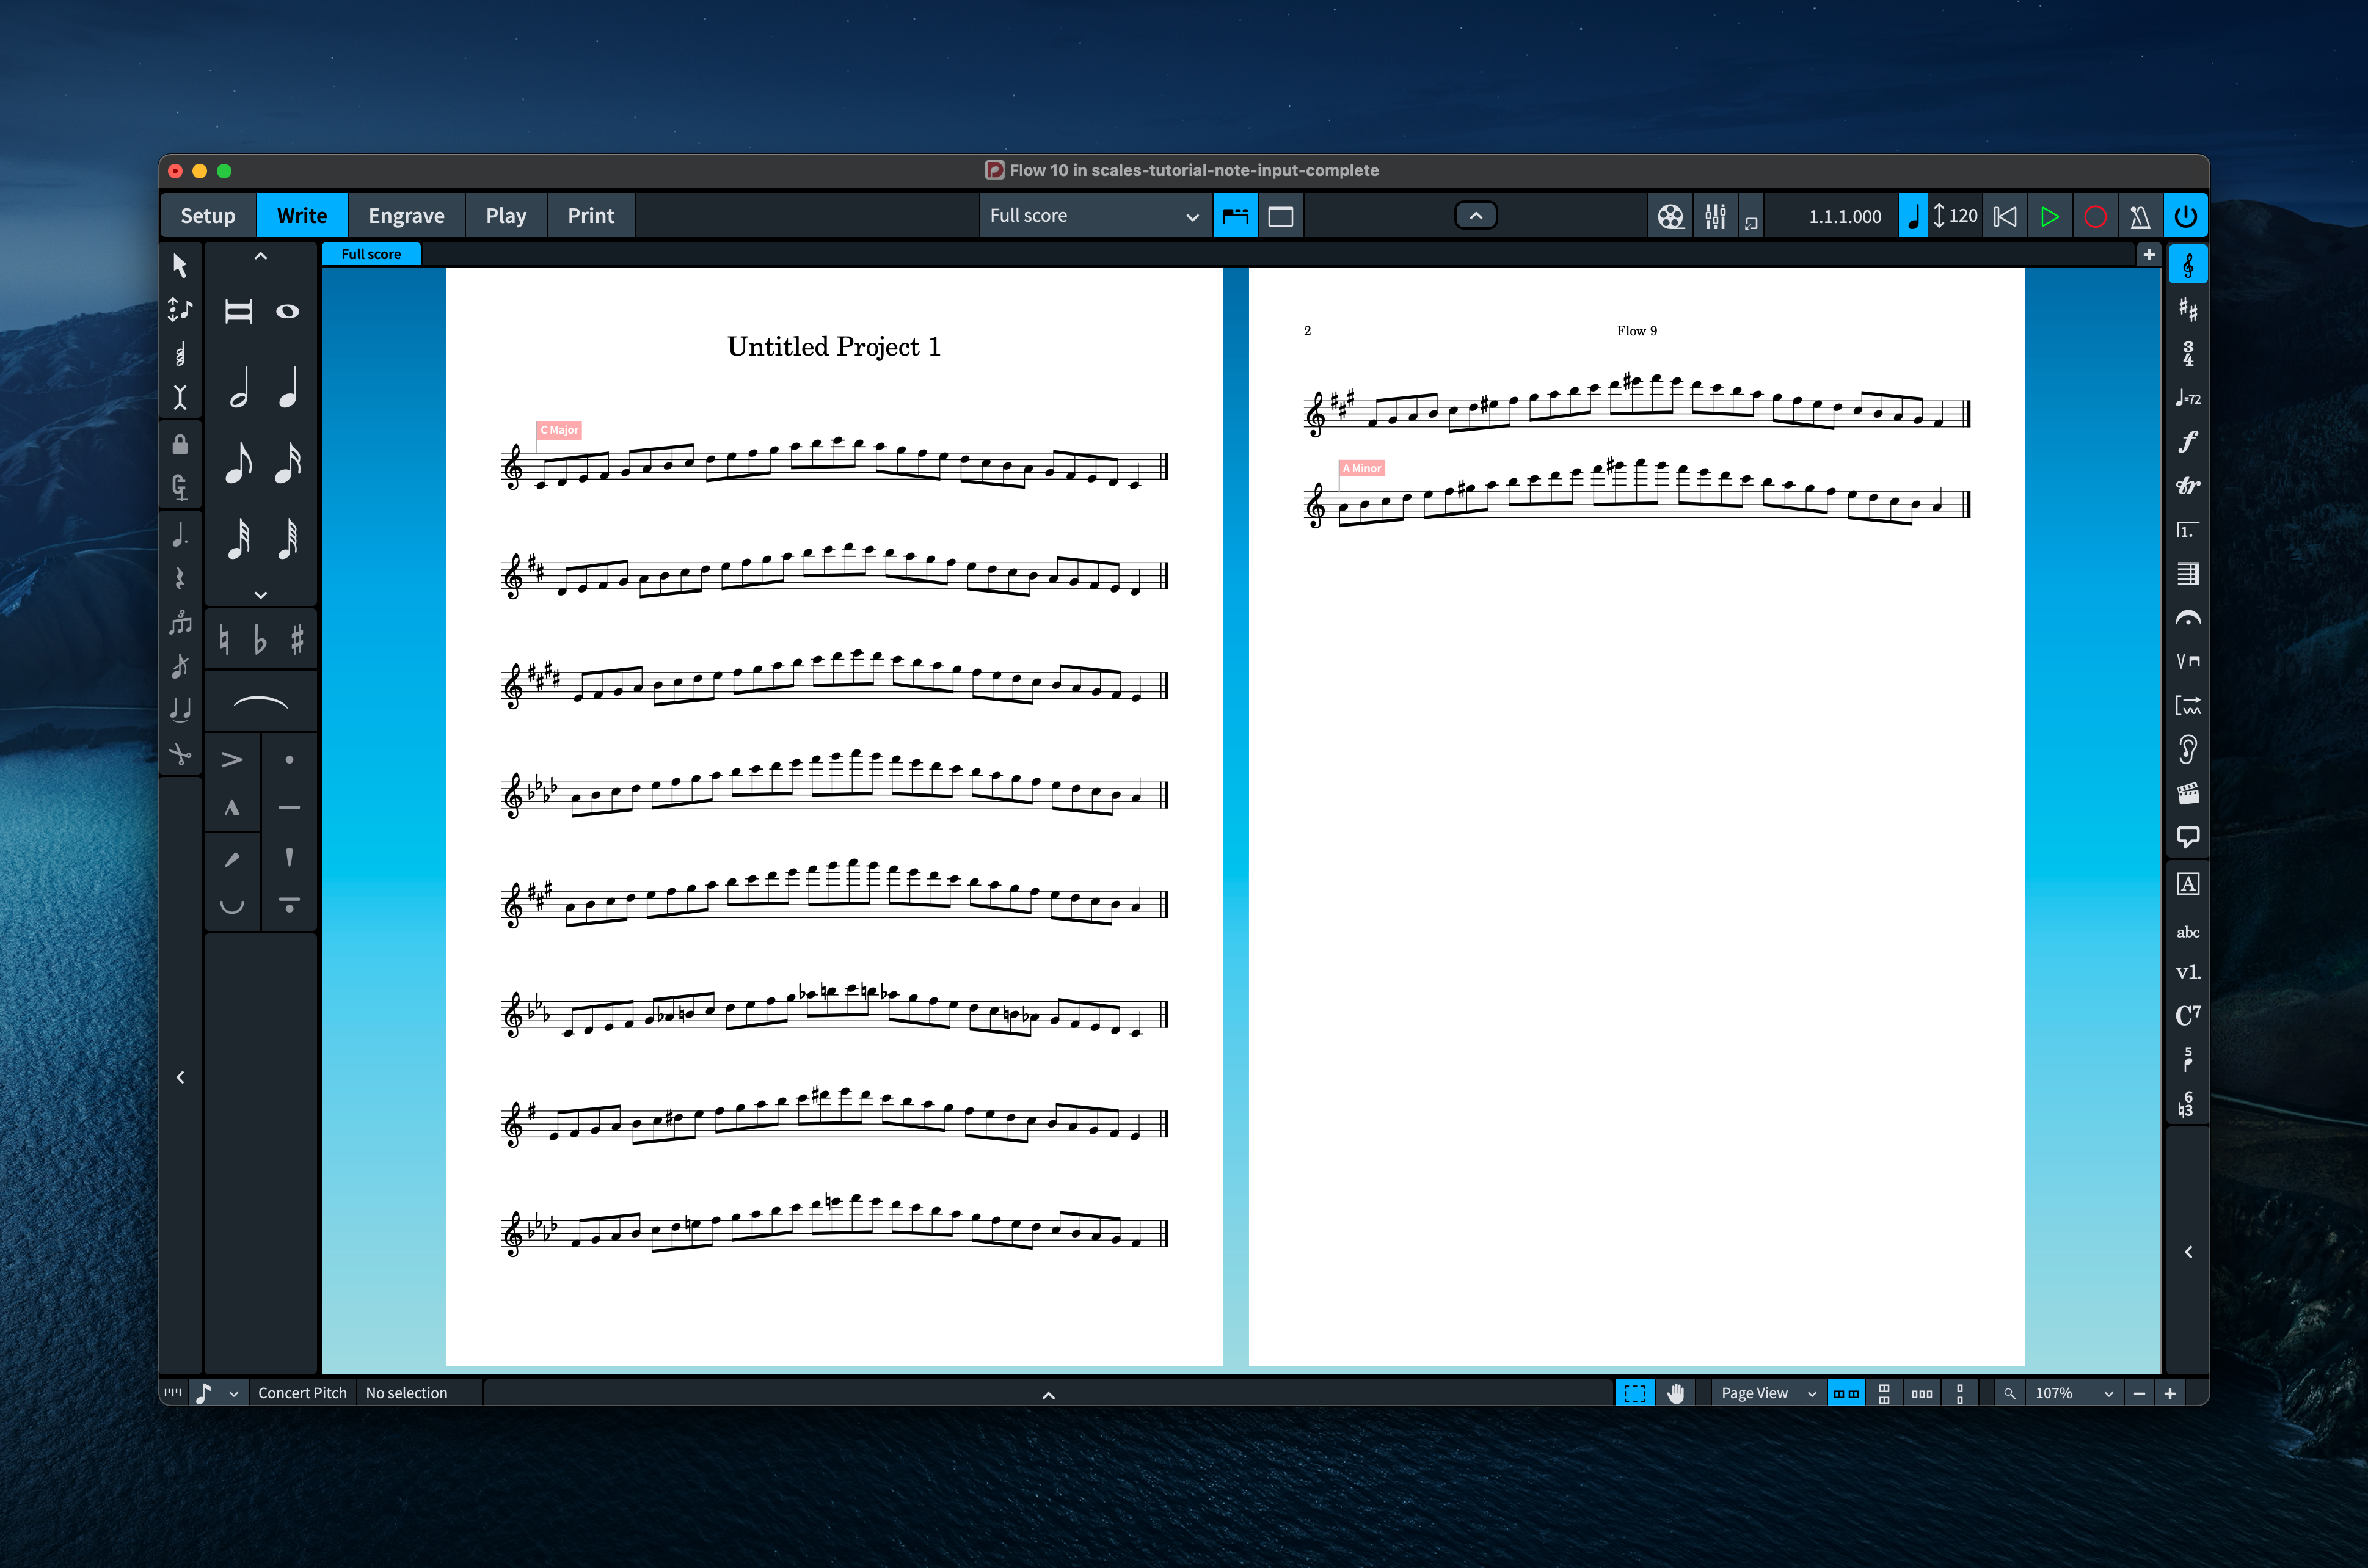
- Click Apply again. Behind the dialog, you should be able to see that each scale now fits on a single system, and there are eight scales on the first page, and two on the second:
Bringing things onto a single page
At this point, our worksheet is taking shape nicely, but we want to eliminate the second page. To do this, we need to bring all 10 scales onto the first page. Again, you might expect that you should do this by dragging the music around, or by selecting all of the music and forcing it all onto a single page, but you don’t need to do that: making a single change in Layout Options will suffice.
- Open Layout Options again by typing Ctrl+Shift+L (Windows) or Shift–Command–L (Mac).
- Click Vertical Spacing in the left-hand category list.
- Set Inter-system gap to 6 spaces.
- Click Apply and Close. Your layout now looks like this:
We’re getting closer and closer! Don’t forget to save your project from time to time.
Labelling each scale
Our page is a little more snug than is probably ideal, and we’ll take care of that in due course. Adding labels to each of the scales will make things a little worse before they get better!
If you’re using Dorico Pro:
- Type Ctrl+Shift+E (Windows) or Shift–Command–E (Mac) to open the Engraving Options dialog. You can also find it in the Engrave menu in Engrave mode, but the shortcut is better, because you can use it from any mode. Engraving Options is not available in Dorico Elements or Dorico SE.
- Click the Text page in the left-hand category list.
- Set Default distance from staff to 2 spaces. This tells Dorico that text items can be positioned a little closer to the staff by default, and will help to make it clear that the text is associated with the staff below rather than the staff above when vertical space is tight.
- Set Position of text relative to other items to Use default position. This tells Dorico that it should not make space for text items added to the layout. This will prevent the music from temporarily springing back onto two pages while we label the scales. In Dorico Elements and Dorico SE, you can’t set this by default, but don’t worry.
- Click Apply and Close.
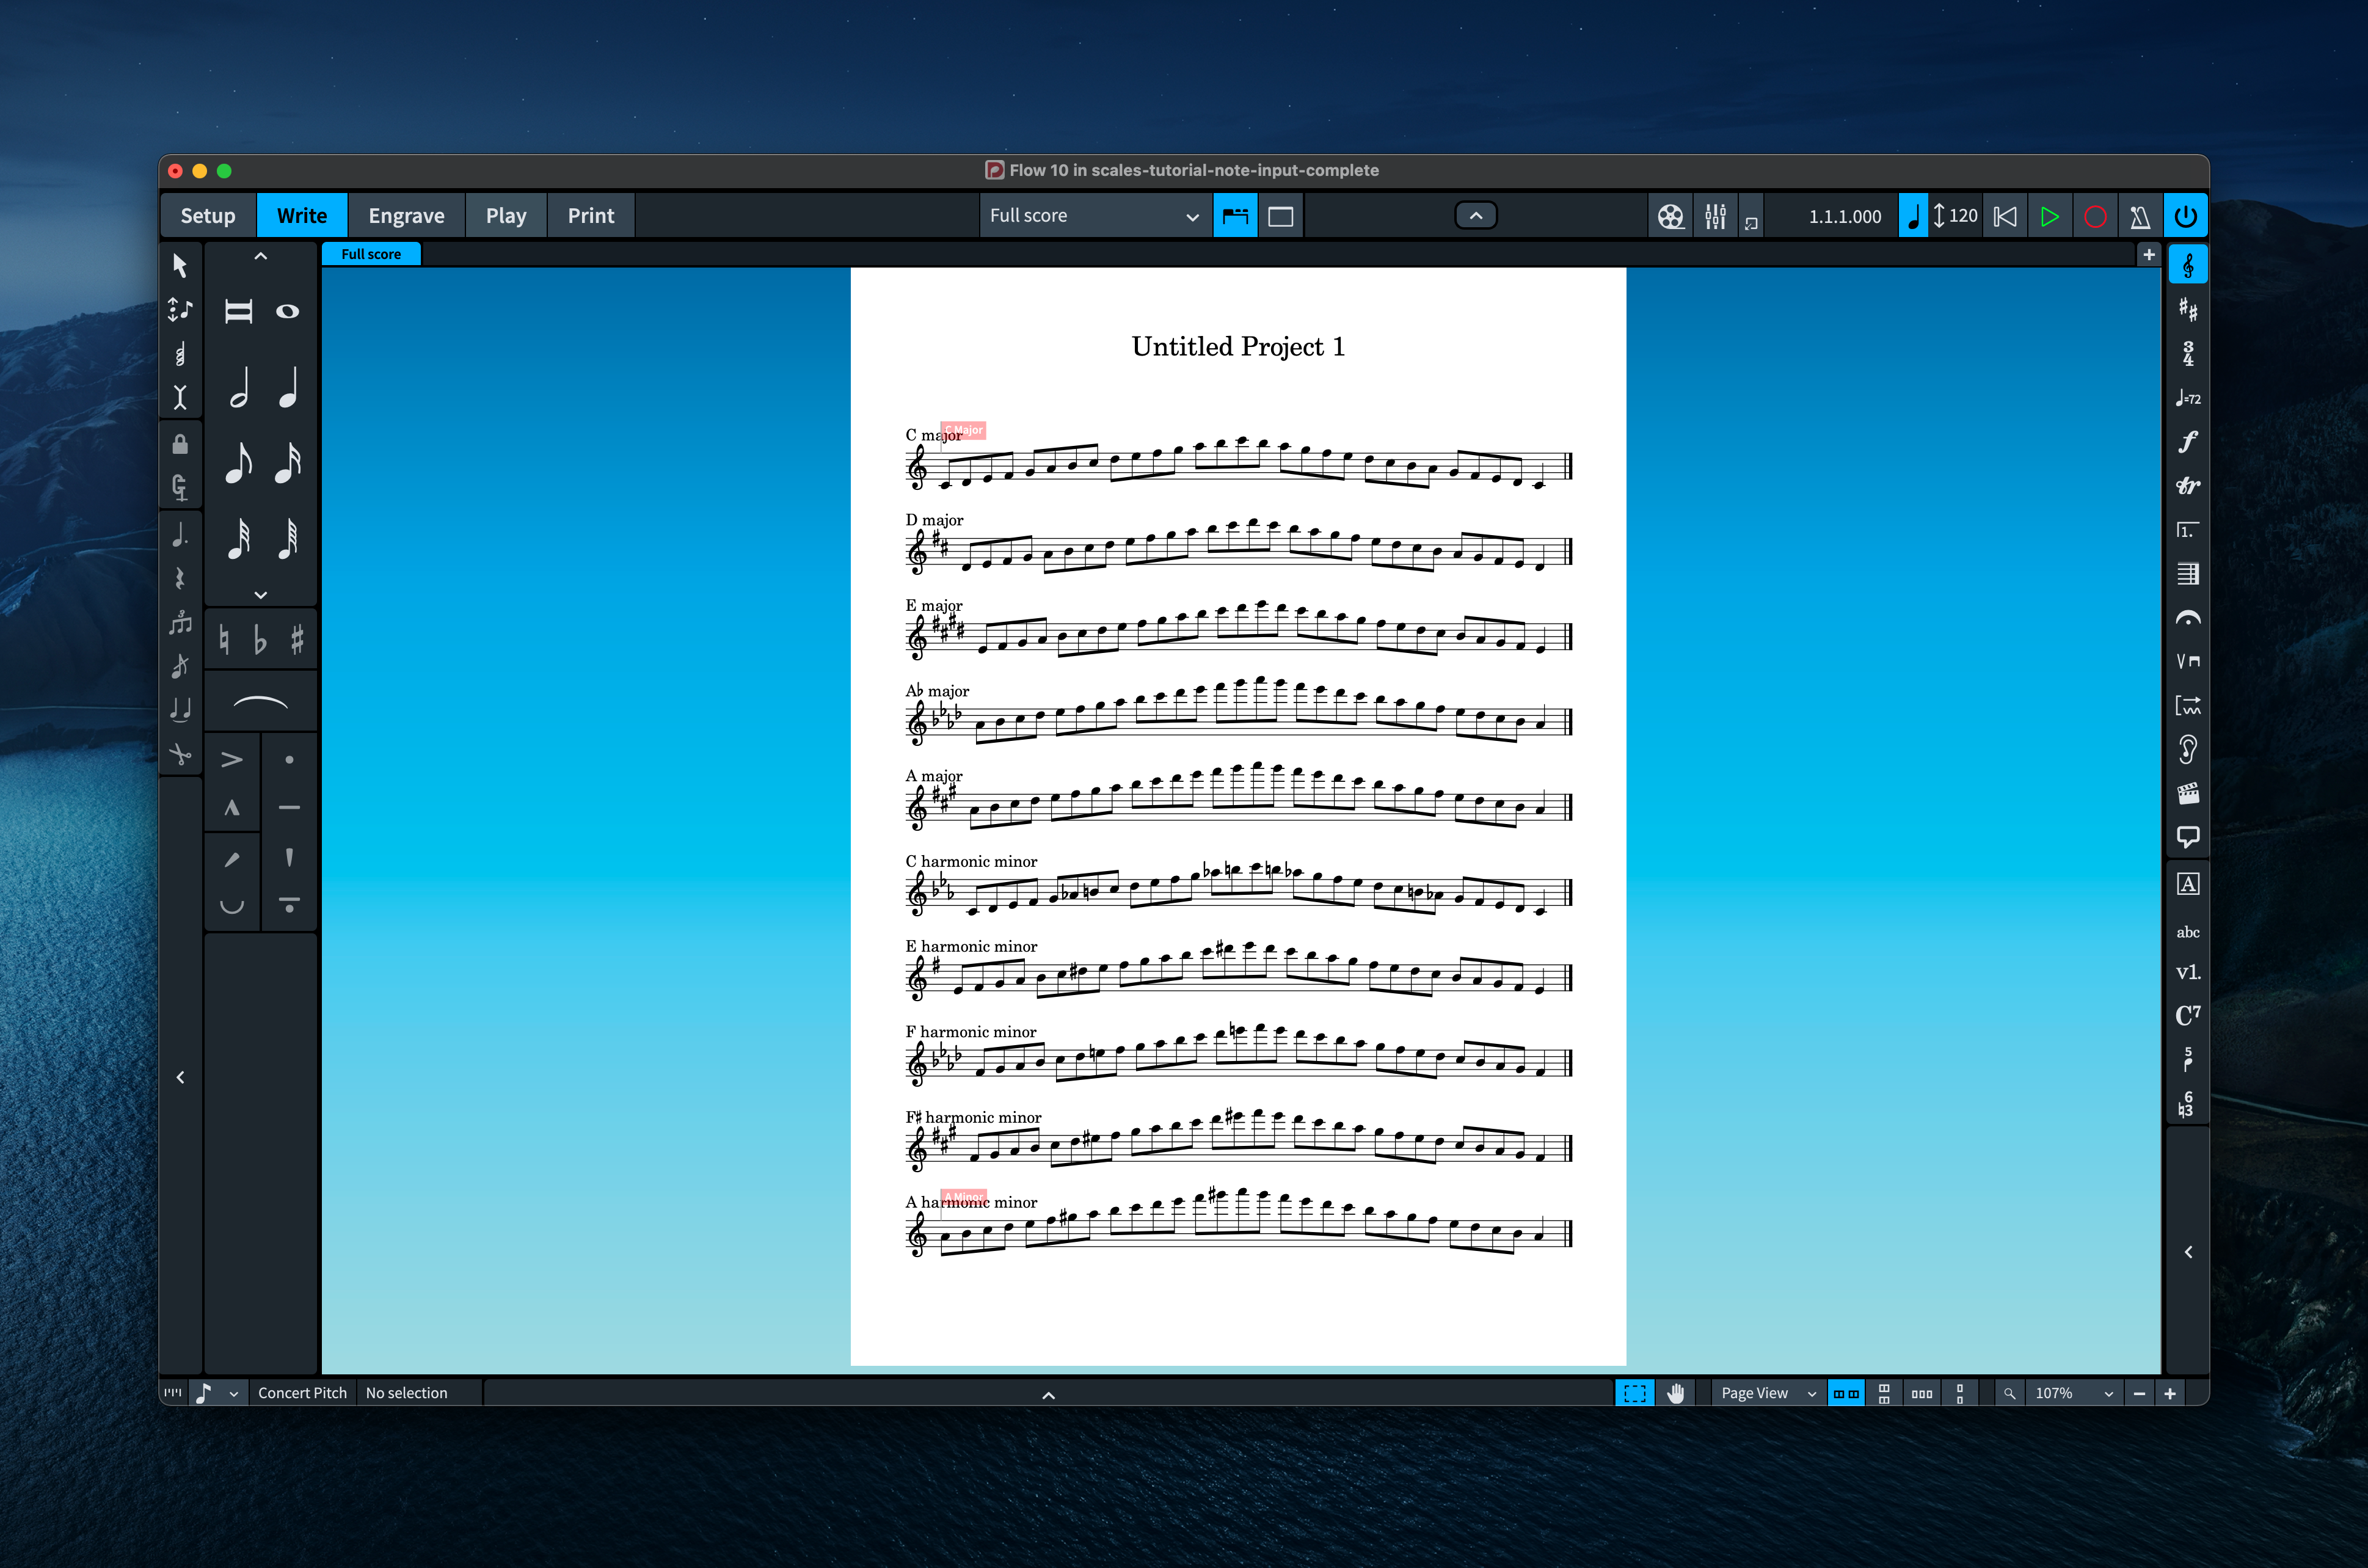
Now regardless of which flavour of Dorico you’re using, let’s label the scales:
- Select the first note in the first scale, type Shift+X to open the text editor, and type C major, then type Esc to finish editing the text.
- To label the next scale, you can either repeat the above step, or you can select the text you added in the previous step so that it is coloured orange, hold down the Alt key, and click the first note in the next scale to copy that text item there. Hit Return to edit the text item to change the note name.
- When you come to an accidental in the scale name – the first one will be the fourth major scale in A flat – copy this flat to your clipboard: ♭
- With the text editor open in Dorico, paste the flat in with Ctrl+V (Windows) or Command–V (Mac). Then select it again by holding Shift and typing the left arrow key once, and finally from the top-left menu where it shows (None) choose Music text:
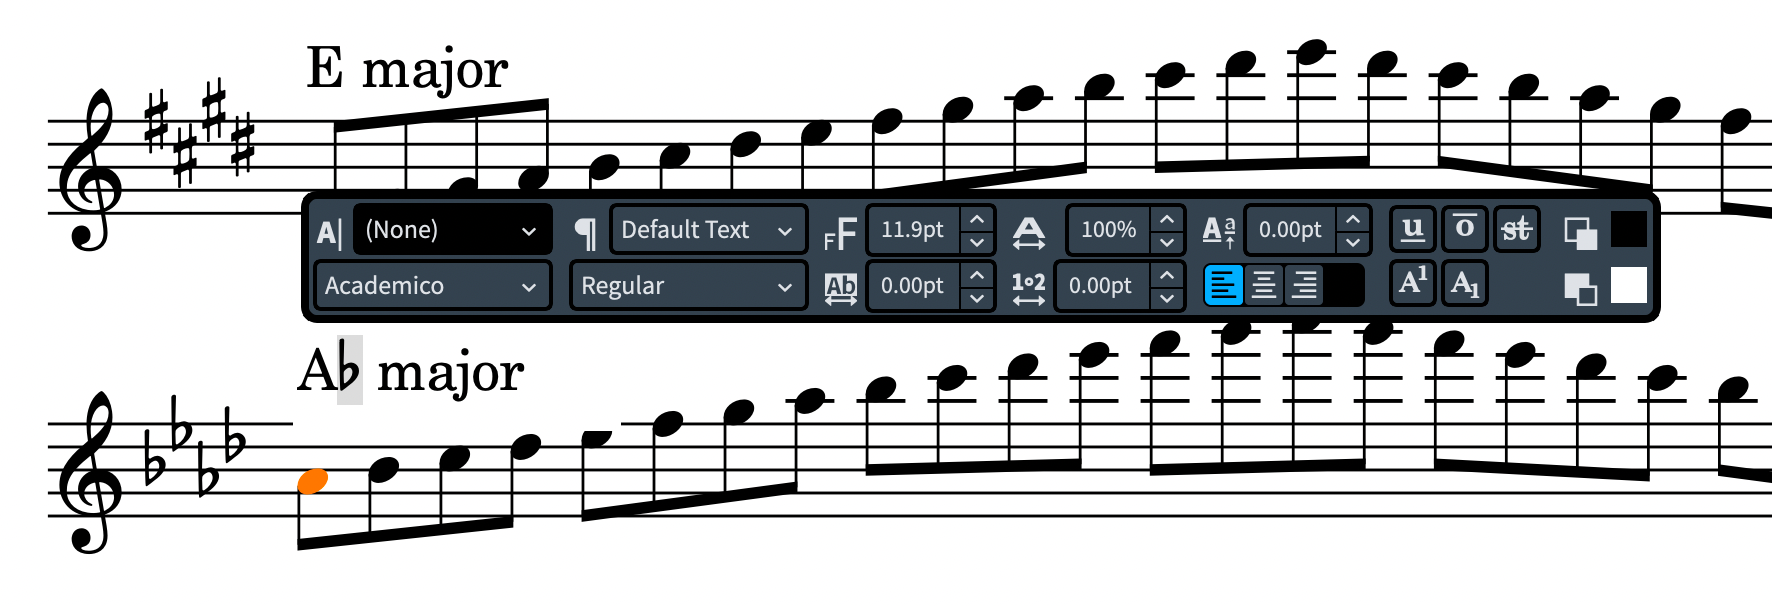
- When you come to F# harmonic minor, copy this sharp to your clipboard: ♯ and repeat the above procedure.
If you’re using Dorico Elements or Dorico SE, at this point you might find that your layout has spilled over onto a second page again. Fear not:
- Open Layout Options again. You know the shortcut by now!
- Click Staves and Systems in the left-hand category list.
- Click the Casting Off subheading in the left-hand category list.
- Activate Fixed number of systems per frame and ensure it is set to 10 systems.
- Click Apply and Close.
If you’re using Dorico Pro 3.5 or later, you can make each scale look a little tidier if you wish by setting the label for each scale to appear aligned with the left-hand margin:
- Switch to Engrave mode by typing Ctrl+3 (Windows) or Command–3 (Mac), or by clicking the Engrave button in the toolbar.
- Choose Engrave > Paragraph Styles. The Paragraph Styles dialog opens.
- Select Default text from the list of styles on the left-hand side of the dialog.
- Activate Align with systemic barline if at start of system.
- Click OK to confirm the change.
- You will find that the scale name is vertically a little tight on the clef and key signature at the start of each system: refer back to the start of this little section to find out how to set the default position of text items relative to the staff to a slightly larger value (hint: it’s on the Text page of Engrave > Engraving Options.)
Your page of scales should now be looking something like this:
Editing the final barlines
At the moment, every scale ends with a final barline. You might like this, but if you prefer your scale to end with a double barline, which is customary, then here’s how to do that.
In Dorico Pro:
- Open Notation Options by typing Ctrl+Shift+N (Windows) or Shift–Command–N (Mac). You can also choose Write > Notation Options if you prefer, but (as always) the shortcut is better because it works from any mode.
- In the right-hand Flows list, click the Select All button at the bottom, so that all 10 flows are shown selected in blue.
- Click Barlines in the left-hand category list.
- Set Automatic final barline at end of flow to Double barline. This tells Dorico that you want each flow to end with a double (thin-thin) barline by default, instead of a final (thin-thick) barline.
- Click Apply and Close.
In Dorico Elements and Dorico SE, you don’t have access to Notation Options, but you can replace each final barline with a double barline manually:
- In Write mode, select the final barline at the end of the first scale.
- Type Shift+B to open the bars and barlines popover.
- Type double (or, if you’re feeling adventurous, type ||, which is two of the vertical pipe character one after the other), and hit Return.
- Repeat the above steps for each scale.
Changing the title
At the moment, our scale worksheet still says something like Untitled Project 1 at the top. Let’s change this to something more appropriate. Again, if you’ve used other music notation software before, your instinct may be to double-click the text at the top of the page and edit it directly, but in Dorico you should normally avoid that. Front matter text and text specific to each flow is shown in the layout by way of text tokens that are present in the default page templates or master pages into which the music is poured. You don’t need to worry about the details for now, so:
- Type Ctrl+I (Windows) or Command–I (Mac) to open the Project Info dialog. You can alternatively choose File > Project Info if you prefer.
- In the Project Info dialog, select Project at the top of the left-hand list, if it isn’t already selected.
- Set Title to something of your choice, for example ABRSM Grade 5 Flute Scales.
- Click Apply and Close.
It’s important that you do learn how the text you specify in Project Info for the project as a whole and for individual flows makes its way into the layouts, but that’s a much bigger topic than we can cover in this tutorial. For further information, I recommend this playlist on the Dorico YouTube channel.
Your worksheet now looks like this:

If you’re using Dorico Elements or Dorico SE, you’ve come to the end of the road, as the remaining steps require features in Engrave mode that are only present in Dorico Pro. But you’ve got a pretty fine-looking page of scales for your troubles. Well done!
Finishing touches
If you’re using Dorico Pro, there are a couple of further improvements you can make in Engrave mode. Firstly, you may have noticed that there is a large margin at the bottom of the page: this is a gap left for a copyright notice on the first page of a layout, and you might similarly find that the gap between the title and the first scale is a little larger than necessary. Secondly, you might want to add an additional heading above each group of scales. Let’s tackle each of these in turn:
- Switch to Engrave mode. You remember the shortcut!
- From the Master Pages section in the right-hand Pages panel, double-click the First page pair.
- This opens the master page template editor. You will notice that a pair of facing pages appears: we need to edit the right-hand page of the pair.
- Select the green text frame at the bottom of the right-hand page containing the cryptic text {@projectCopyright@} and hit Delete.
- Select the two half-width green text frames immediately below the frame containing {@projectTitle@} and Delete each of them in turn.
- Now select the blue music frame, and adjust its size so that it fills the height freed up by removing those green text frames top and bottom.
- For good measure, click the right-hand L<R button in the toolbar at the top of the master page editor to apply your edits to the left-hand page of the pair.
- Click Apply and then Close.
Now your scales are a little more generously spaced, and occupy more of the vertical height of the page.
Finally, to add subheadings above the first of the major and harmonic minor scales on the page, let’s define a new paragraph style and use that.
- Choose Engrave > Paragraph Styles. (Hint: you have to be in Engrave mode to access the Engrave menu.)
- Select Default Text in the left-hand category list.
- Click New From Selection, the second button in the action bar, to create a new paragraph style based on Default Text.
- Set Name to something like Scales heading.
- Activate the slide switch next to Size to override it, and set it to 16pt.
- If you like, you can activate the slide switch next to Font and set that to something else.
- Click OK to confirm your new paragraph style.
Now you can add text items using your new paragraph style:
- Switch to Write mode. You know how by now!
- Select the first note in the C major scale.
- Type Shift+X to open the text editor.
- In the text editor controls, from the second menu in the top row, change Default Text to your new paragraph style, e.g. Scales heading.
- Type Major scales and hit Esc to leave the text editor. If you set Position of text relative to other items to Use default position on the Text page of Engraving Options earlier on, your new heading will be superimposed on top of the C major label. Don’t worry about that for now.
- Repeat the above steps to add the heading Minor scales at the start of the C harmonic minor scale.
- Switch to Engrave mode.
- Click the Graphic Editing button (the top button) in the toolbox on the left-hand side of the window.
- Select the Major scales subheading. If you struggle to select it, hold down the Shift and Alt keys and click again: this will cycle through selecting overlapping items at the same position.
- Click and drag it out of the way of the C major label: after you start dragging, hold down Shift to constrain the text item’s horizontal position while moving it vertically.
- Do the same for the Minor scales subheading.
- We need a tiny amount more room above the Minor scales subheading, so click the Staff Spacing button (the third button down) in the left-hand toolbox. Handles appear at the left-hand side of each system.
- Hold down the Alt key, and click and drag downwards the large square handle for the system with the C harmonic minor scale. This squeezes together each of the staves below the system you’re dragging proportionally, and redistributes the space gained above the system you’re dragging.
That’s it! You’ve done it. Your scale worksheet now looks like this: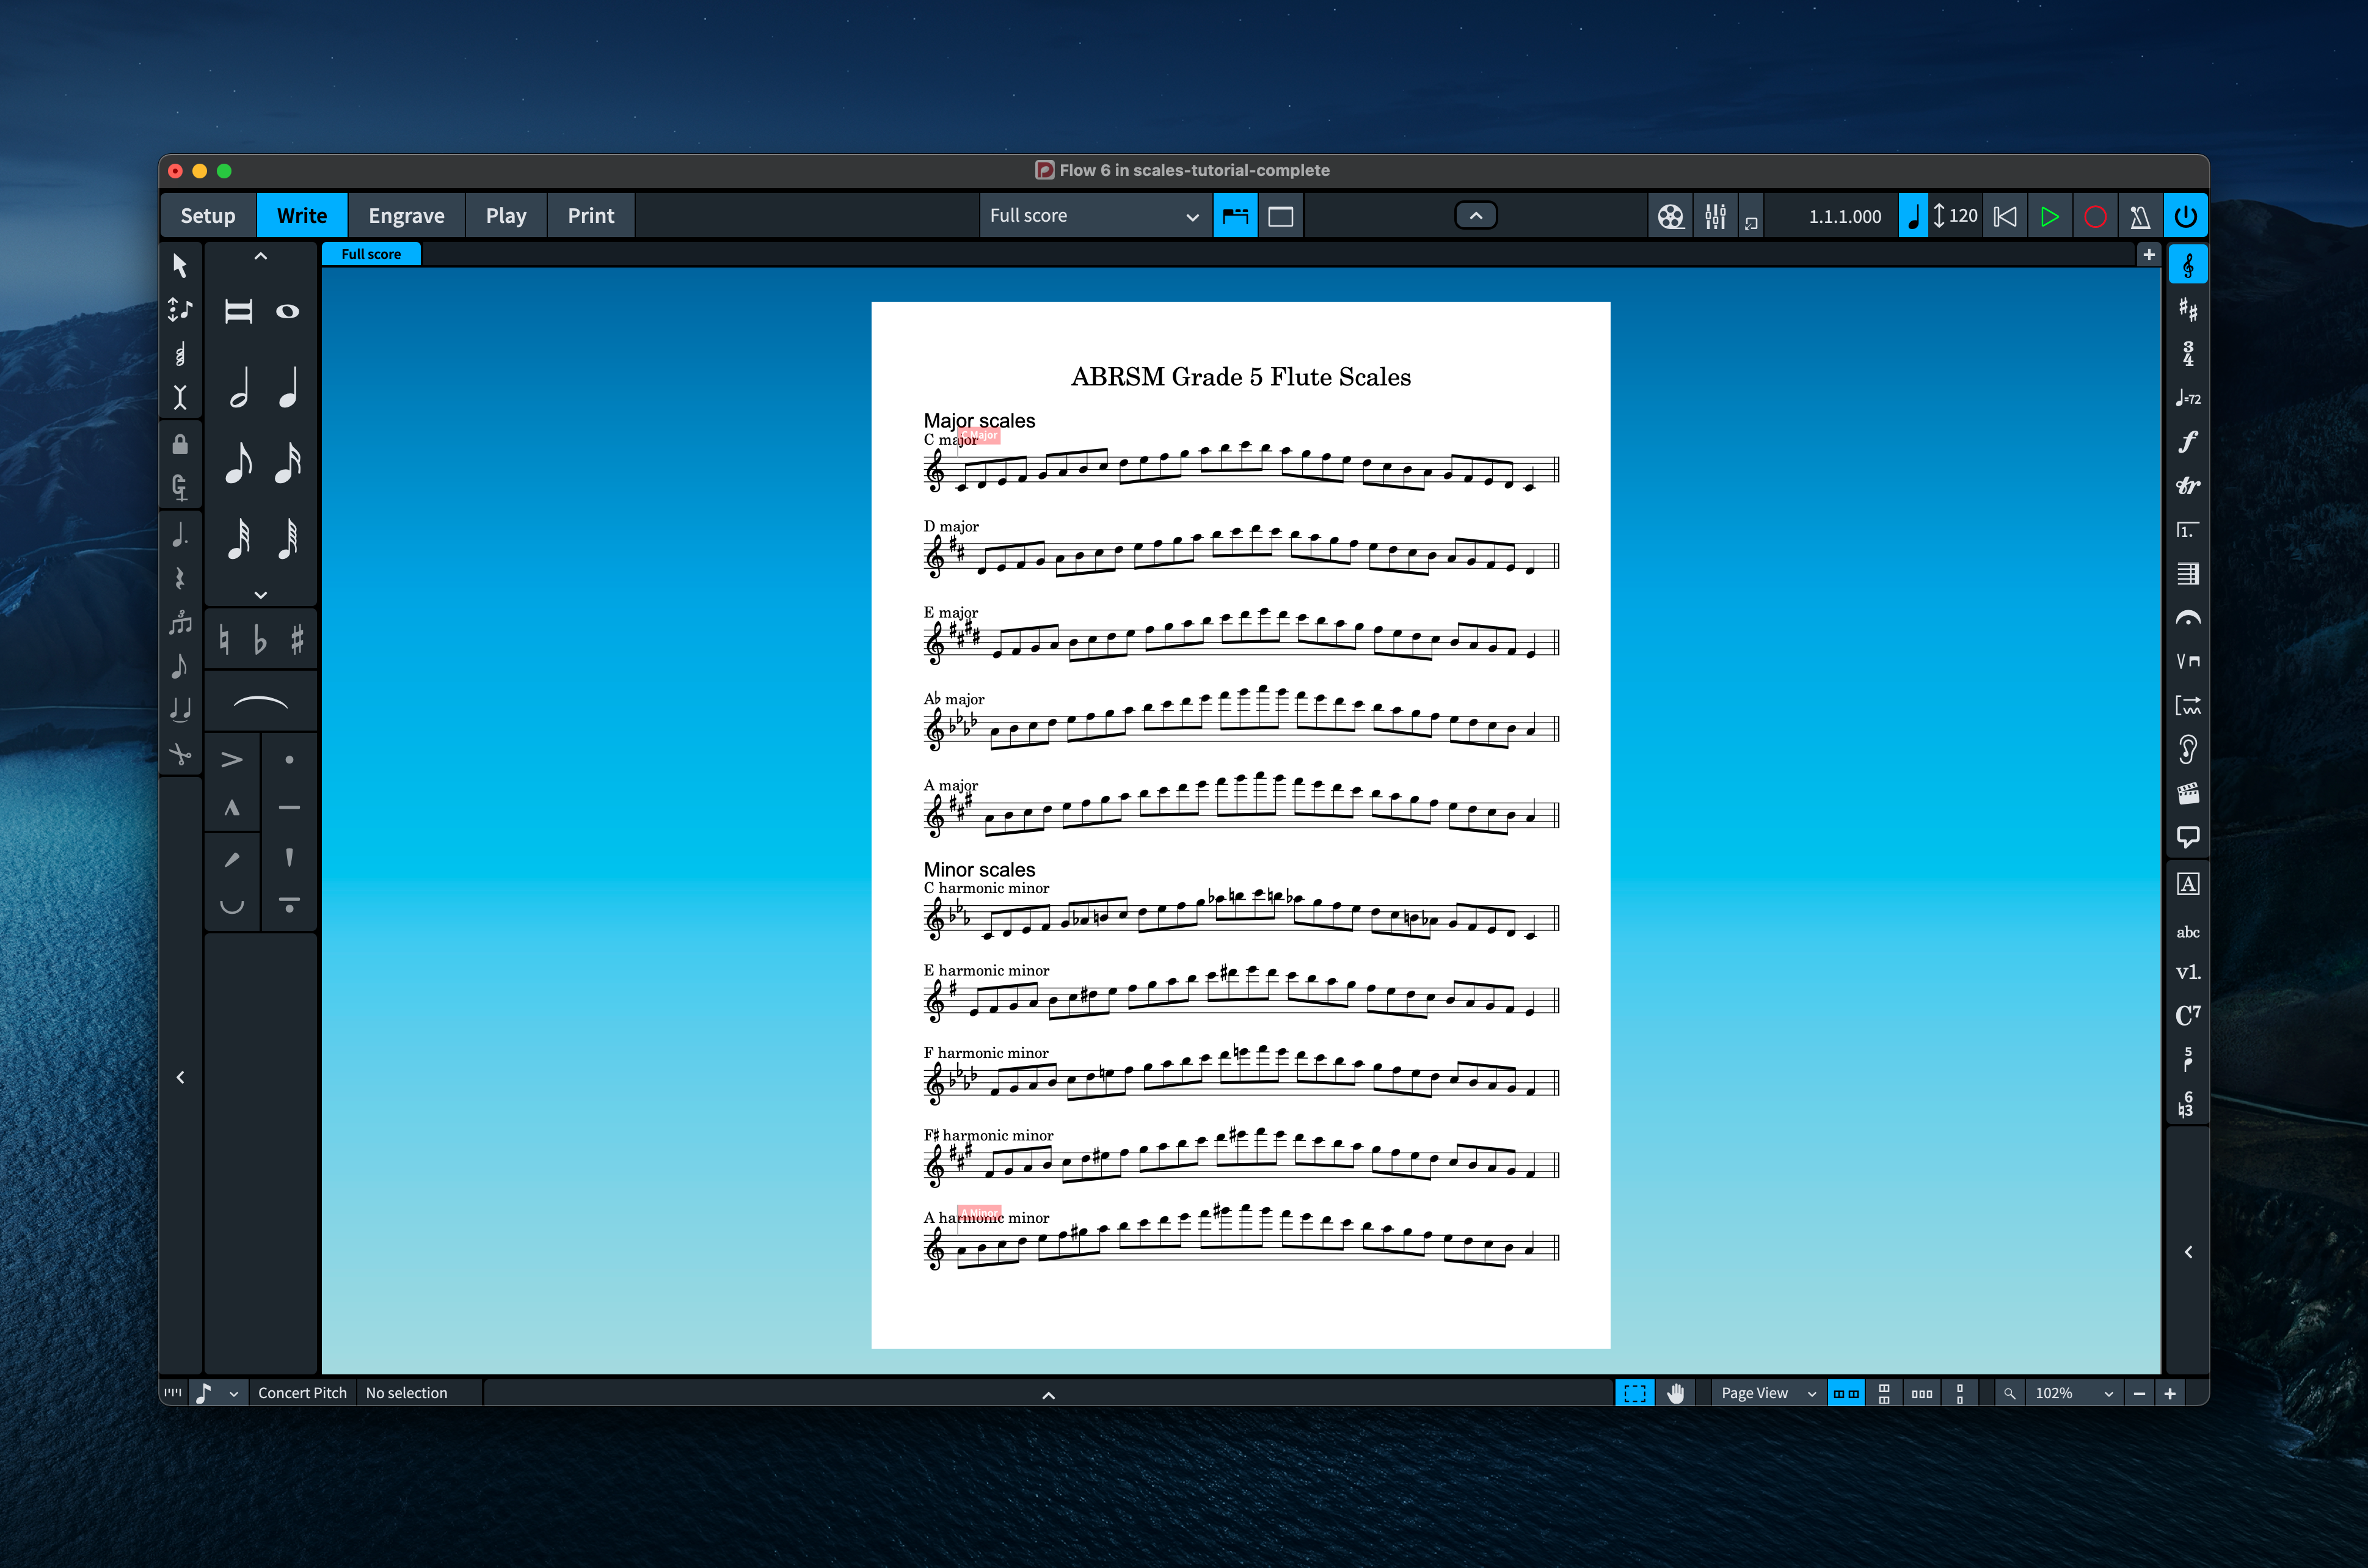
You can download a Dorico project with all of the preceding steps completed here.
Conclusion
In this tutorial, you’ve: created a flow; taken advantage of Dorico’s flexible open meter to input a scale; edited beaming; learned how to duplicate and transpose a flow; discovered how to hide and show staff labels; begun to explore vertical spacing; created and used your own paragraph style; and more besides. You’ve created a scale worksheet that looks great, with next to no manual intervention to horizontal and vertical spacing or system formatting.
Hopefully you feel that you have built some understanding of how to approach this kind of project in Dorico in the future. Let me know what you think in the comments!
Daniel, thanks for this tutorial! I noticed that after adjusting the Master page to remove the copyright, lyricist and composer text frames that all the music “scrunched up”. I needed to go to Layout options and set the Justification to 50% then all was good again. You may want to add this instruction in this tutorial.
Wow. This exactly what I’m trying to do!!! In fact, there’s a big discussion over how to do this in the Dorico forum: https://forums.steinberg.net/t/proper-dorico-technique/737647/40
This is all great and very useful for me. I have a question:
I used my previous already-formatted scale sheet to edit my new sheet but I have one issue.
I am writing scale exercises that aren’t all necessarily the same number of notes each time. After re-typing in my new scale I have to delete the extra notes and then remove the rests. My problem is that Dorico doesn’t resize the note spacing and now I have a lot of extra space at the end of each line. Is there any way to fix this?
I have the problem of sometimes getting an extra rest at the end of the scale. How do I delete it?