We are delighted to announce the immediate availability of Dorico 3, which is undoubtedly the most ambitious release we have yet attempted, and which brings improvements throughout the whole application.
If you’ve already seen and heard enough and you can’t wait any longer, you can go ahead and buy an update to Dorico Pro 3 or Dorico Elements 3 from the Steinberg Online Shop right now. If you need a bit more persuasion to part with your hard-earned money, please allow me to tell you about why Dorico 3 is deserving of your attention.
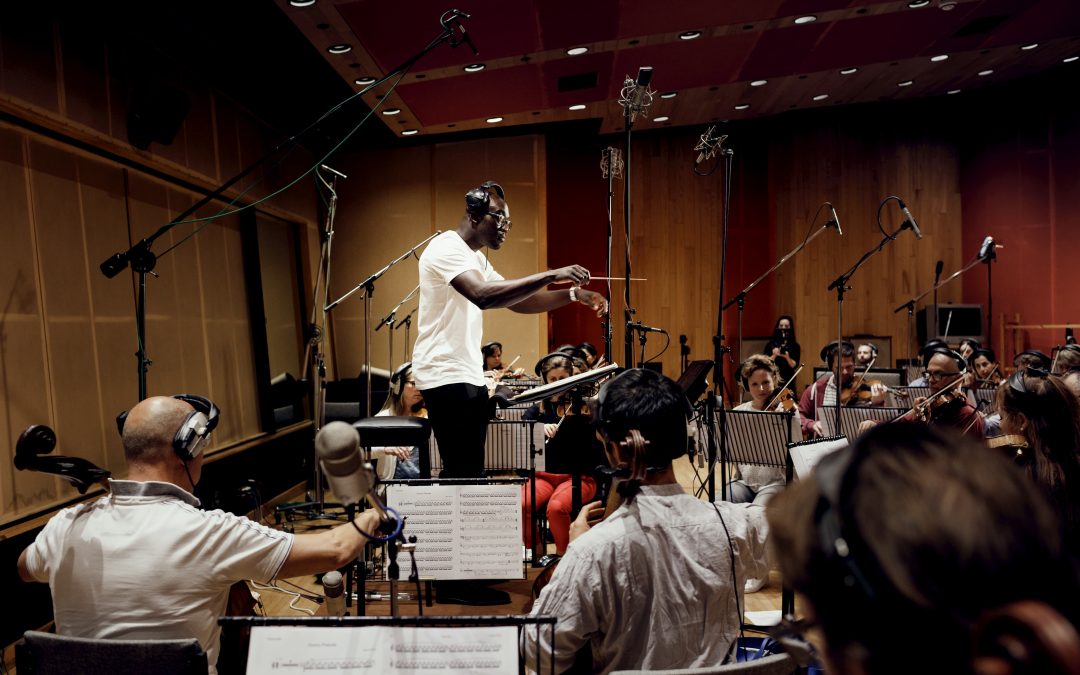
It introduces a truly unique feature, condensing; it brings comprehensive support for notations for guitar and other fretted instruments, including tablature, left- and right-hand fingering, and chord diagrams; it provides smart tools for harp pedaling; it introduces grouped playing techniques; it enriches Play mode with support for custom playback templates, expanded VST Expression Maps, velocity and pitch-bend editing; and so much more.
If there is a unifying theme in the things we have chosen to work on in this version, it is this: we want Dorico to save you time. We want to make using Dorico to produce whatever kind of publication you need faster than doing it with any other software. We want you to be able to spend less time in front of your computer using music notation software, and more time doing the other things you love, ideally without compromising on the beauty and practicality of the final result.
Dorico has always been about automating as much busywork as possible so that you have to spend less time inputting, less time editing, and less time tweaking, and in Dorico 3 we are taking this to a new level. And it starts right at the top, with the headline feature, condensing.
Condensing
Dorico Pro 3 can automatically produce a condensed conductor’s score with a single click, which is such a profound leap forwards in the capabilities of music notation software that it takes its place as the fourth such leap forwards in the Mount Rushmore of music engraving: first, it was possible to extract the parts as separate files from the full score, so you didn’t have to write the music out twice; second, it became possible for the score and parts to be dynamically linked together, so you didn’t have to edit the music twice; third, the software became smart enough to automatically resolve collisions between items; and now, with the release of Dorico Pro 3, the software can automatically produce a condensed conductor’s score while still providing all of the benefits of linked parts and comprehensive, automatic collision avoidance.
These kinds of advances have come along maybe once or twice a decade. (And the team behind Dorico has been responsible for three of those four big advances, not that we’re counting. Okay, you got us, we are counting.)
But let’s take a step back: what is a condensed conductor’s score, and why is it important?
When writing for a large ensemble, such as an orchestra or concert band, one of the challenges is producing a practical conductor’s score that strikes the ideal balance between the physical constraints of the paper size and the presentation of the music. Dorico’s modern orchestra template, for example, includes 38 wind and brass players; add to this harp, percussion, and a full string section, and if you give every solo player and section their own staff, you’re looking at around 50 staves. Assuming you give a moderate top and bottom margin of 12mm, and you will typically try to ensure that each staff is at least one staff height apart, that means that the largest staff size you could manage is 4mm, or just over half the size of the standard 7mm staff size used for most instrumental parts – and that is the best case scenario, assuming nothing needs to be spaced further apart than that default, quite tight spacing.
However, if you can practically halve the number of wind and brass staves from 38 to, say, 20, then the equation changes completely: it is now possible to have a comfortable staff size of 6mm or more and have much less vertical pressure on the layout. Halving the number of staves also greatly reduces the amount of visual information that the conductor has to take in when reading the score: there are fewer, larger staves, and the same amount of information is conveyed in a more efficient, easier to read form.
Condensing is how you halve the number of wind and brass staves: instead of each player having his or her own staff, the music for multiple players – at least two, but sometimes four or more – is written on a single staff.
Historically, producing a condensed conductor’s score has been a very laborious, time-consuming process requiring a great deal of forward-planning. The considerations for how music for multiple players can be written on the same staff are complex: are the players in unison, or are they playing the same rhythm? Does one player’s melody cross over the other’s? Now add a third player into the mix, and a fourth. And what if the texture changes in a bar or two?
So even figuring out a good musical solution to condensing music onto a smaller number of staves is a non-trivial problem that has always required an experienced human editor with a lot of time and dedication. Add to this that computer engraving software has historically provided next to no assistance with this process, particularly if the goal is to be able to create individual parts from the same source material as the conductor’s score, and the result is that in this age where practically all new performance materials are produced using music notation software, there are fewer and fewer condensed conductor’s scores for new works and new editions.
Dorico Pro 3 aims to change all of that. My learned and chocolate-voiced colleague Anthony explains it all in this video:
Condensing is something that we have been planning since long before Dorico 1.0 was released nearly three years ago. Many of the decisions about the architecture of the software were based around making condensing possible. In a real sense, everything we have done since we joined Steinberg in late 2012 has been leading up to the introduction of this feature. It’s a huge milestone for the team, and for the product, and, I think, for the field of music notation software.
That is not to say that condensing in Dorico Pro 3 is perfect: there is still much to do. We will continue to refine the feature and enrich its capabilities, with some improvements coming in a free update that we hope to release before the end of the year, and we expect there to be a great deal more that we can do with condensing long into the future. But I am immensely proud of what the team has accomplished with condensing for this release, and if you are routinely working with large forces, I believe you will quickly find that you cannot live without it.
And, for what it’s worth, I believe the technical requirements of pulling off a feature like this put it practically out of the reach of any existing competing product for the foreseeable future. If you want condensing, then Dorico is the only game in town: don’t expect it to turn up in the next point release for your existing music notation software.
Guitar notation
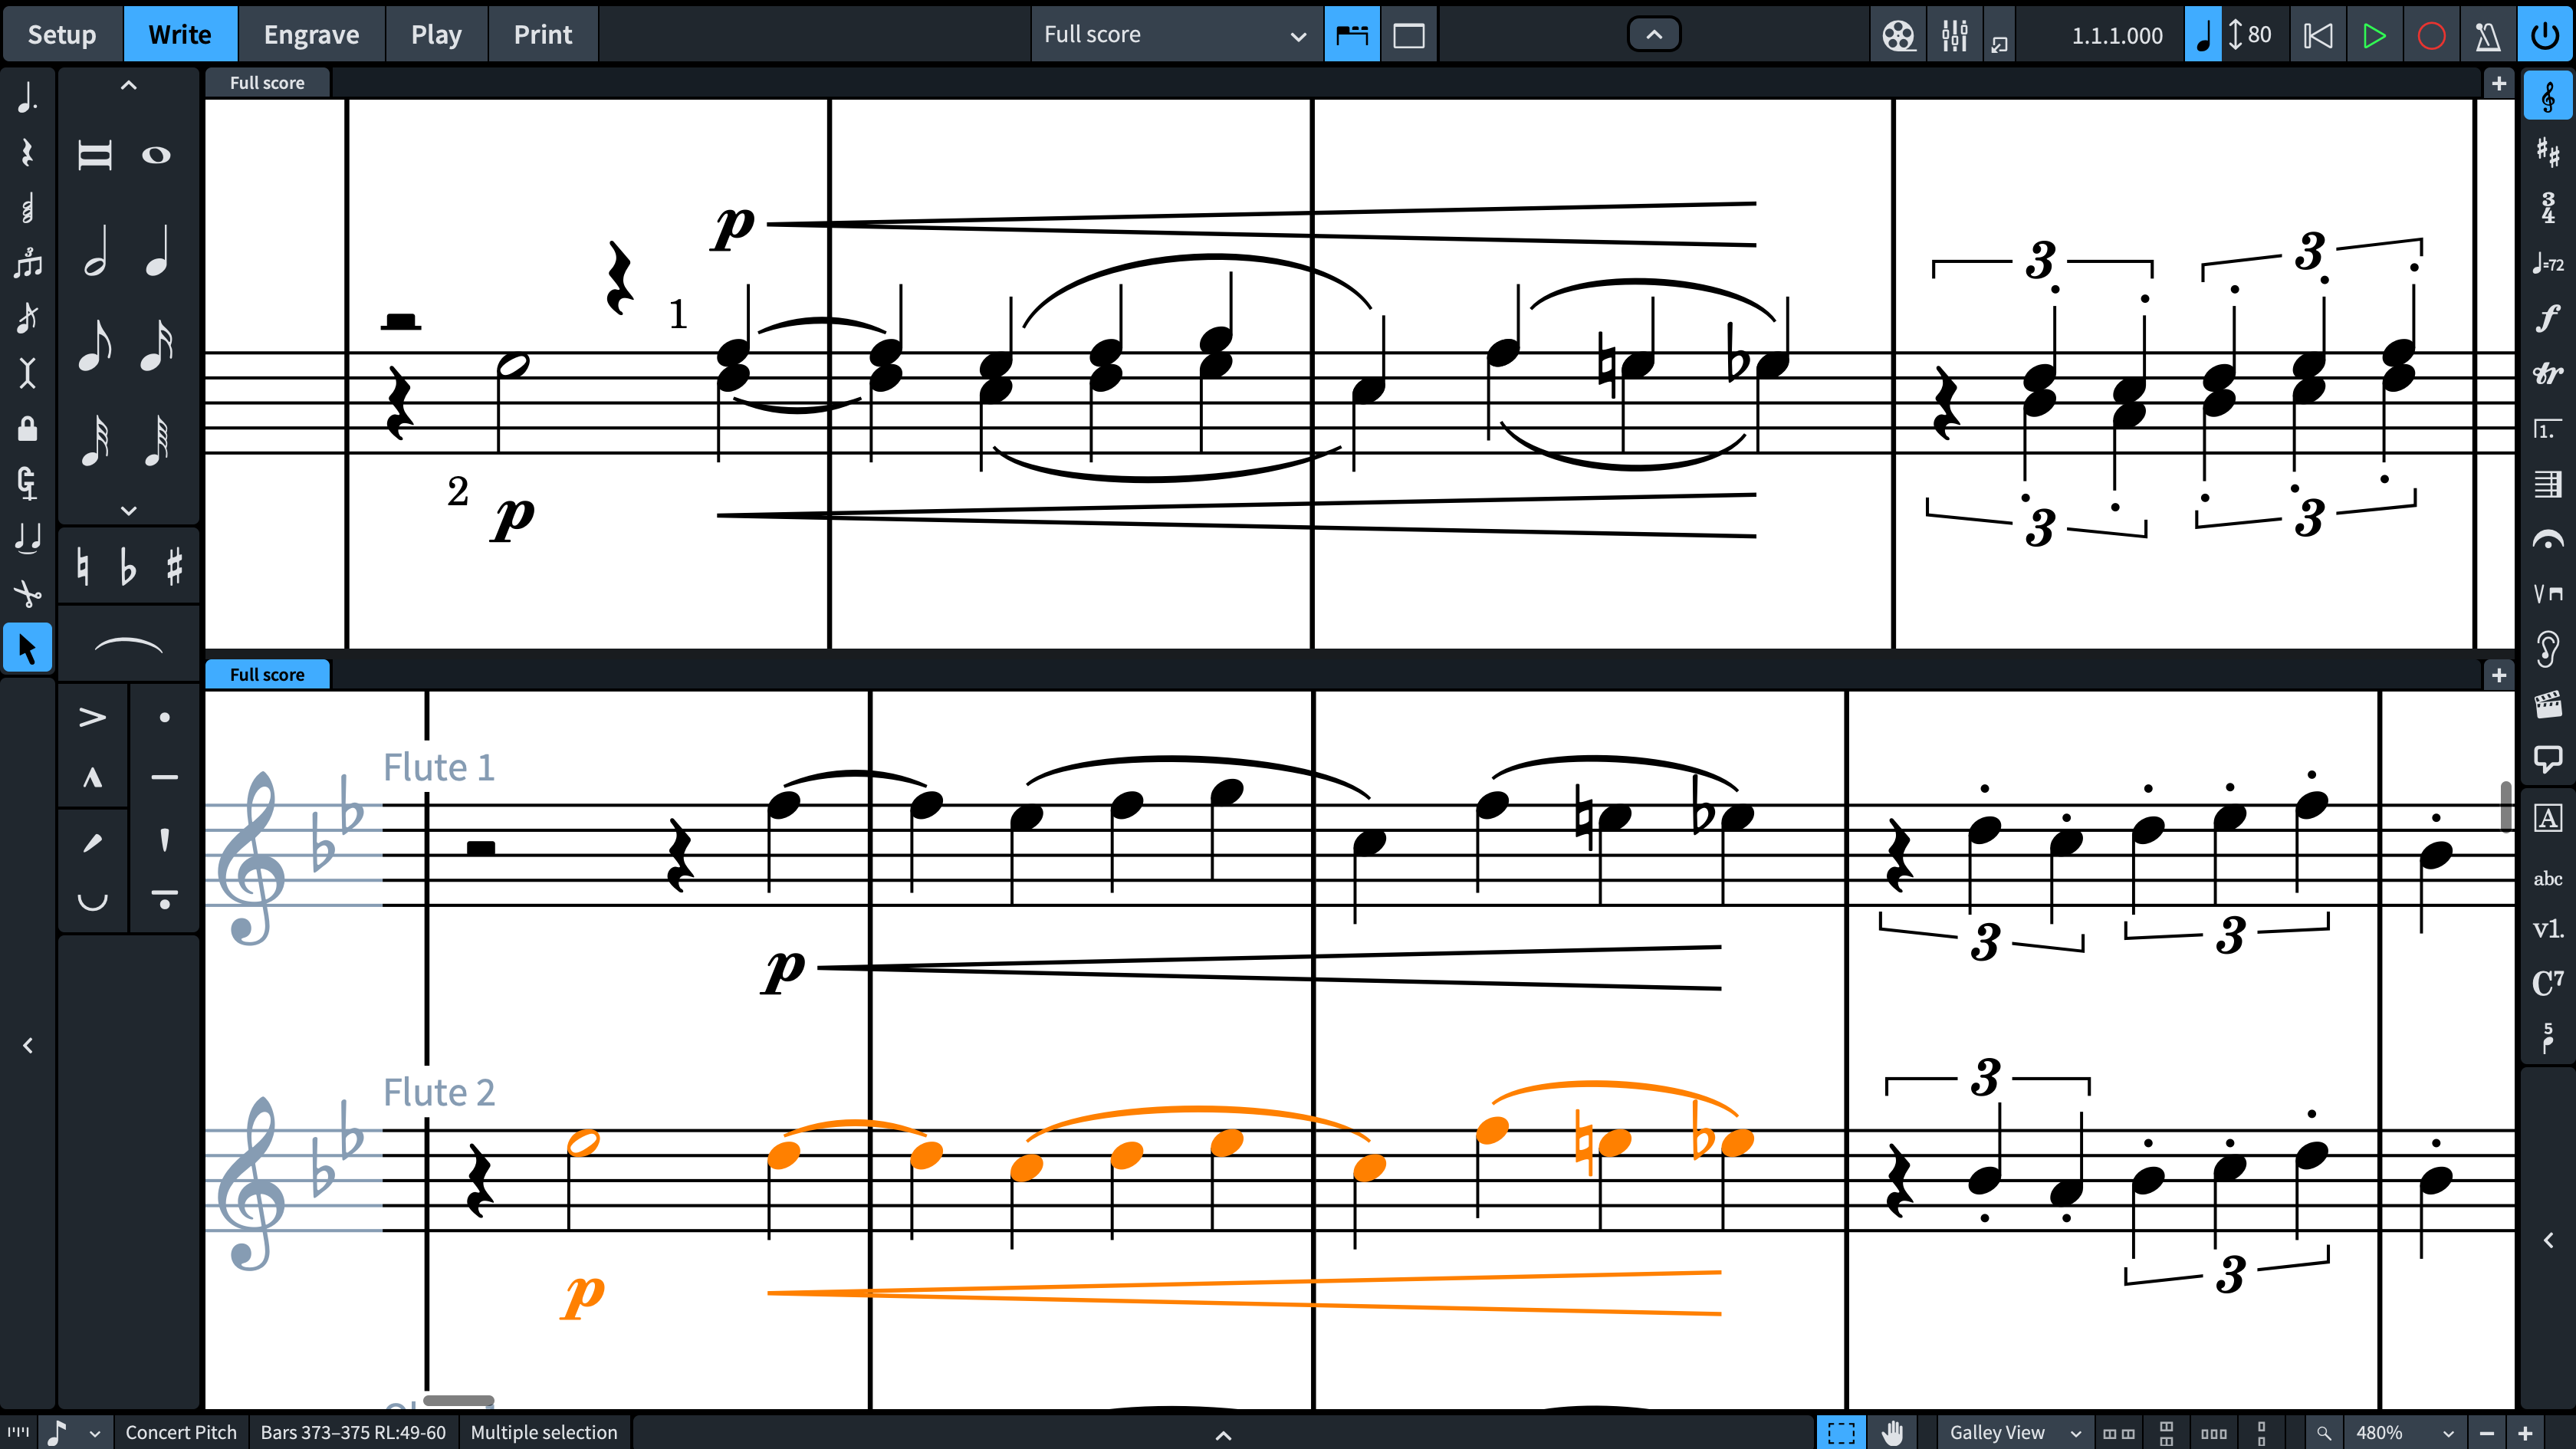
We have worked incredibly hard over the last three years to fill in gaps in Dorico’s feature set compared to competing programs, and with the addition of a comprehensive set of features for guitar notation, including tablature, chord diagrams, idiomatic notations such as bends, plus sophisticated support for classical guitar notations such as left- and right-hand fingerings and string indicators, I believe Dorico 3 handily leapfrogs its more mature competitors in this area in a single bound.
Let’s start with tablature. This starts with Dorico having an enriched understanding of the physical properties of the instruments, including the number of strings, the pattern of frets on the neck of the instrument, and the initial string pitches. Dorico handles unusual instruments like banjo, where the fifth string starts only at the fifth fret, and can similarly handle instruments with non-chromatic fretboards, such as the dulcimer. This knowledge of the instrument’s physical properties powers several features, not only tablature, but also fingering, chord diagrams, and string indicators.
In Dorico, tablature and regular staff notation are simply two different views on the same musical material, meaning that an edit in one presentation is automatically reflected in the other. Of the “big three” – Dorico, Sibelius, and Finale – only Dorico has this feature (though it must be noted that the specialist package Guitar Pro has always worked this way). This is obviously very convenient and means that the days of copying and pasting material between staff notation and tablature can now be consigned to the past.
When you input music in notation, Dorico automatically assigns the string and fret positions on tablature, using an algorithm that prefers to place notes on the lowest string and nearest the nut, but taking into account the context of other notes being played at the same time, to avoid assigning multiple notes to the same string or other unplayable combinations.
When you input music directly in tablature, you explicitly specify the string on which the note should be placed, and you can also move a note to the string above or below by selecting it and typing N or M. The note input method is of course quite different to the method on regular staves: instead of specifying the note durations, the number keys specify the fret numbers, and durations are chosen by typing – (hyphen/minus) to choose a shorter note duration, or typing = to choose a longer one.
As you would expect, you can choose to show tab on its own, or both notation and tab together, or just notation on its own, using the options on the Players page of Layout Options. A variety of options for how rhythms should be shown in tablature can be found on the Tablature page of Engraving Options. Dorico even provides options to enclose notes longer than a quarter note (crotchet) with an elliptical or rounded-rectangle enclosure, as popularised by publications like Guitar World magazine.
Anthony has more details on how to work with tablature in Dorico 3, including an introduction to bends, releases and pre-bends, in this video:
Classical guitar notation is among the most visually dense of all solo instrumental music, packing complex contrapuntal textures and lots of technical information for the player onto a single staff. Dorico is uniquely well-suited to this kind of music, since it already has the finest handling of multi-voice situations of any of the “big three”, but because of the copious annotation typically required for guitar music, presenting the chords and voice-leading clearly is only a fraction of the effort required. In both Finale and Sibelius, positioning left- and right-hand fingering requires a lot of difficult and time-consuming work: using plug-ins, setting up multiple expressions for the same fingering number, plus a good deal of manual positioning besides.
Dorico 3 eliminates all of these steps: all you have to do is simply invoke the Shift+F popover, press the up or down arrow key to switch between left- and right-hand fingering, and type the fingerings you want to appear. When you hit Return to confirm the popover, or type Space to advance the popover to the next rhythmic position, Dorico automatically positions the fingerings for you, right-hand fingerings going outside the staff, and left-hand fingerings nestling in to the left of the appropriate note or chord. Left-hand fingerings automatically cause more space to be allocated, and avoid collisions to their right and left. There is automatic positioning for fingering slides, showing how a finger moves up the neck of the instrument from one note or chord to the next.
The results speak for themselves: this kind of refined placement has normally required a good deal of effort from an experienced human editor performing all of the positioning manually. Now you can simply enter the fingerings, and get on with your day.
Naturally, there are comprehensive options on the Fingering page of Engraving Options, and endless tweaking is possible in Engrave mode, but there’s typically no need to make a lot of adjustments except in very complex situations involving fingering slides.
Take a quick tour of the fingering features with Anthony:
Last but by no means least in the major improvements in guitar notation is chord diagrams, the little grids that show how a particular chord voicing should be fingered on a guitar, banjo, ukulele or other fretted instrument. Dorico 3 takes a novel approach to this, providing a library not of specific chord diagrams tied to particular chord types, but instead of the actual finger patterns that guitarists play on the instrument. Many chord shapes can be played anywhere up and down the neck of the instrument, unless they include open strings that become impractical to barre when the chord is moved down the neck. As such, a shape for, say, D major might also be playable moved up one fret as E flat major, or up another fret to E major.
When deciding what chord diagram to produce, Dorico effectively tries out the shapes in its library that match an instrument with the appropriate number of strings, working out the pitches that will be produced if that shape is played at the nut, at the first fret, at the second fret, and so on. In this way it finds the best matches for each type of chord without having a fixed idea about the ideal shape for, say, E major or F minor.
The neat thing about this is that it means any chord diagram you define in your project can also be applied to different chord definitions, provided you tell Dorico whether or not you consider it moveable up and down the neck of the instrument. It allows Dorico to approach voicing chords the same way a human guitarist does, and it has some of the same tricks up its sleeve as a human guitarist, choosing to omit root notes or higher extensions in order to find the ideal voicing, according to your preferences as defined on the Chord Diagrams page of Note Input Options.
(This video also includes information about some handy improvements for chord symbols in Dorico 3: you can now choose to show chord symbols only during rhythm slash regions, or in a dedicated chord symbol region, which makes it much easier to show chord symbols only where needed, for example during a solo.)
All of these features – bar a few properties that can only be adjusted in Engrave mode – are included in Dorico Elements 3, meaning that all of these professional-level guitar features are available in a package that costs less than $100, making it a viable alternative to packages like Guitar Pro while addressing a broader musical horizon.
Smart harp pedaling
Whenever we first release a new version of Dorico to our beta testing community, I always have a little bet with myself about which feature will generate the most discussion most quickly. In the case of Dorico 3, I was surprised to find that the feature that aroused the most passionate response from our beta testers was the new harp pedaling features. I believe this says something both about the make-up of our beta community, and about the need for this feature.
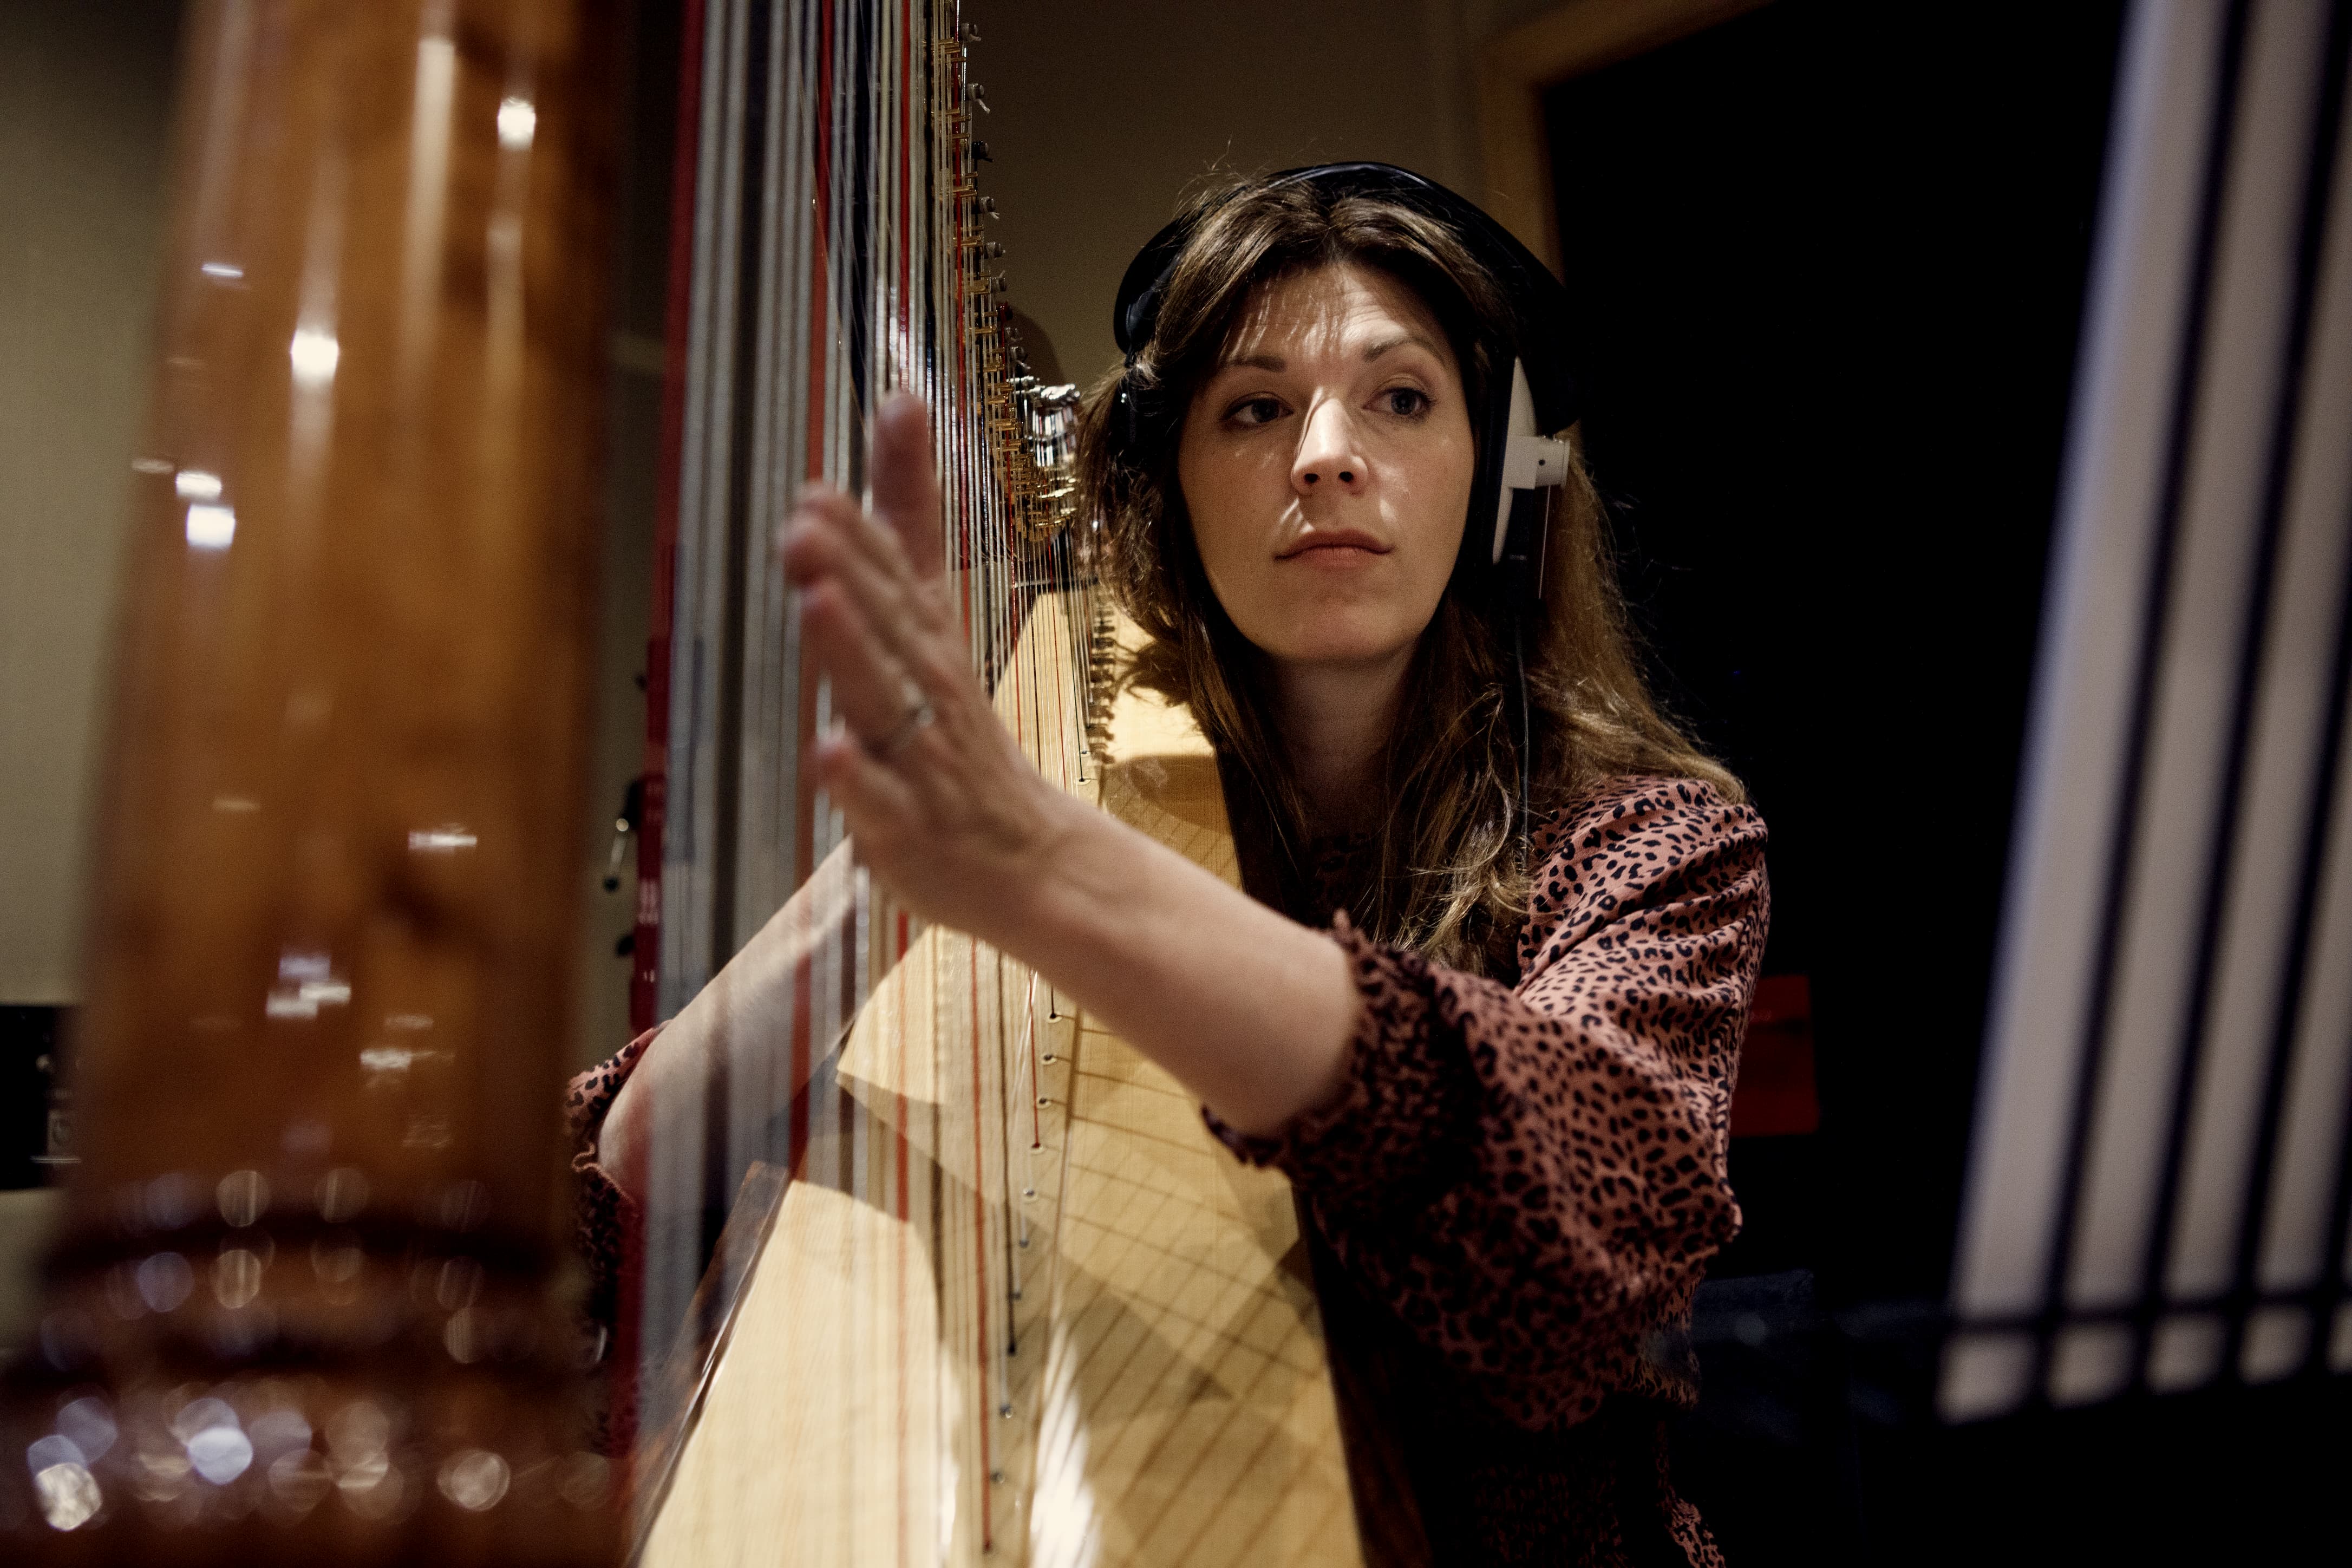
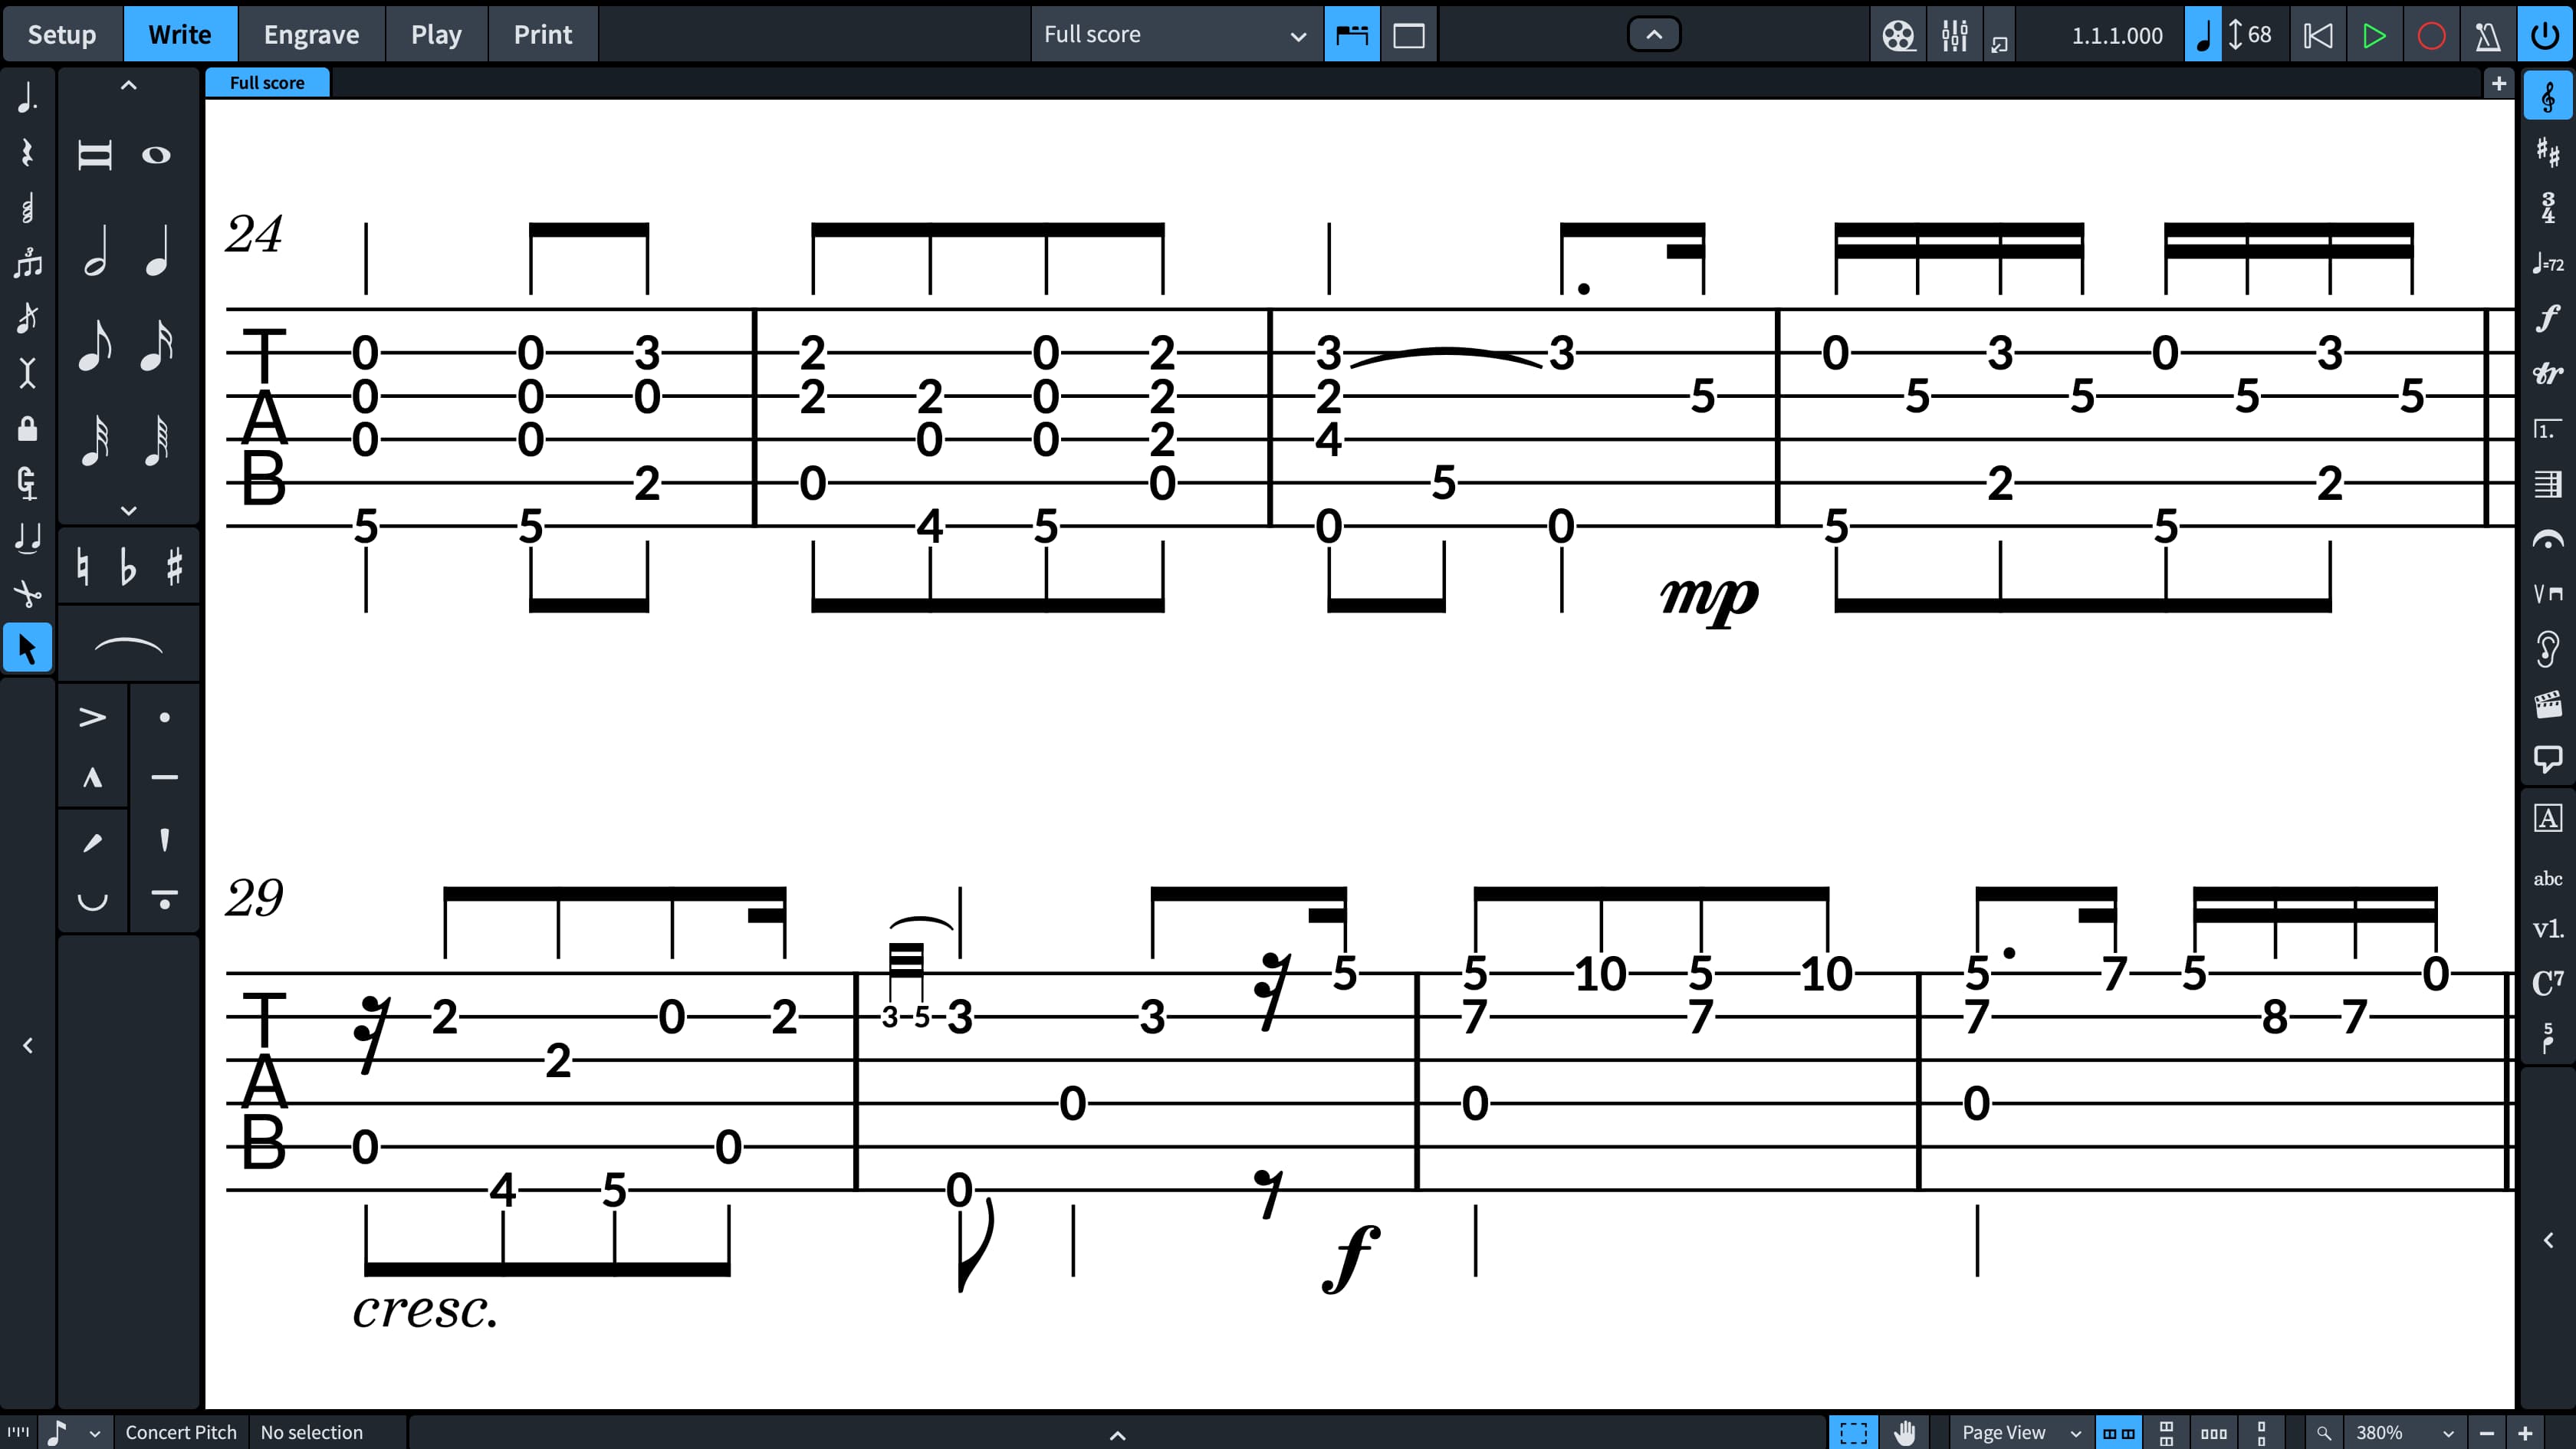
Harpist Camilla Pay, playing at the recording session for “Dorico Prelude” at Angel Studios, London. (Photo: Charlie Clift)
When writing for any instrument it’s important to have an understanding and take into consideration its physical constraints and capabilities, but this is writ especially large with the harp, because the notes that it can play at any given moment are dictated by the pedals arranged around the base of the instrument, with three pedals on the left (for notes D, C, and B), and four on the right (for E, F, G, and A). When, say, the F pedal is in its central position, all of the F strings in every octave of the instrument will play an F natural: when the pedal is in its upper position, every F will be flattened, to F flat; when the pedal is in its lower position, every F will be sharpened, to F sharp.
It’s crucial that the music you write for the harp takes the pedals into account. Although you may ultimately choose not to include any harp pedal indications in your harp part – though on the whole they are appreciated by harpists, even if they may choose to do things a little differently than your pedal indications dictate – you should always be thinking about the practicalities of how the harpist must manage the pedals: even the most virtuosic harpist will balk at having to change multiple pedals in quick succession over a lengthy passage.
Dorico 3 introduces a new tool to help you navigate this minefield. Even if you are experienced in writing for the harp, you should find that these features save you time, and help you to avoid errors.
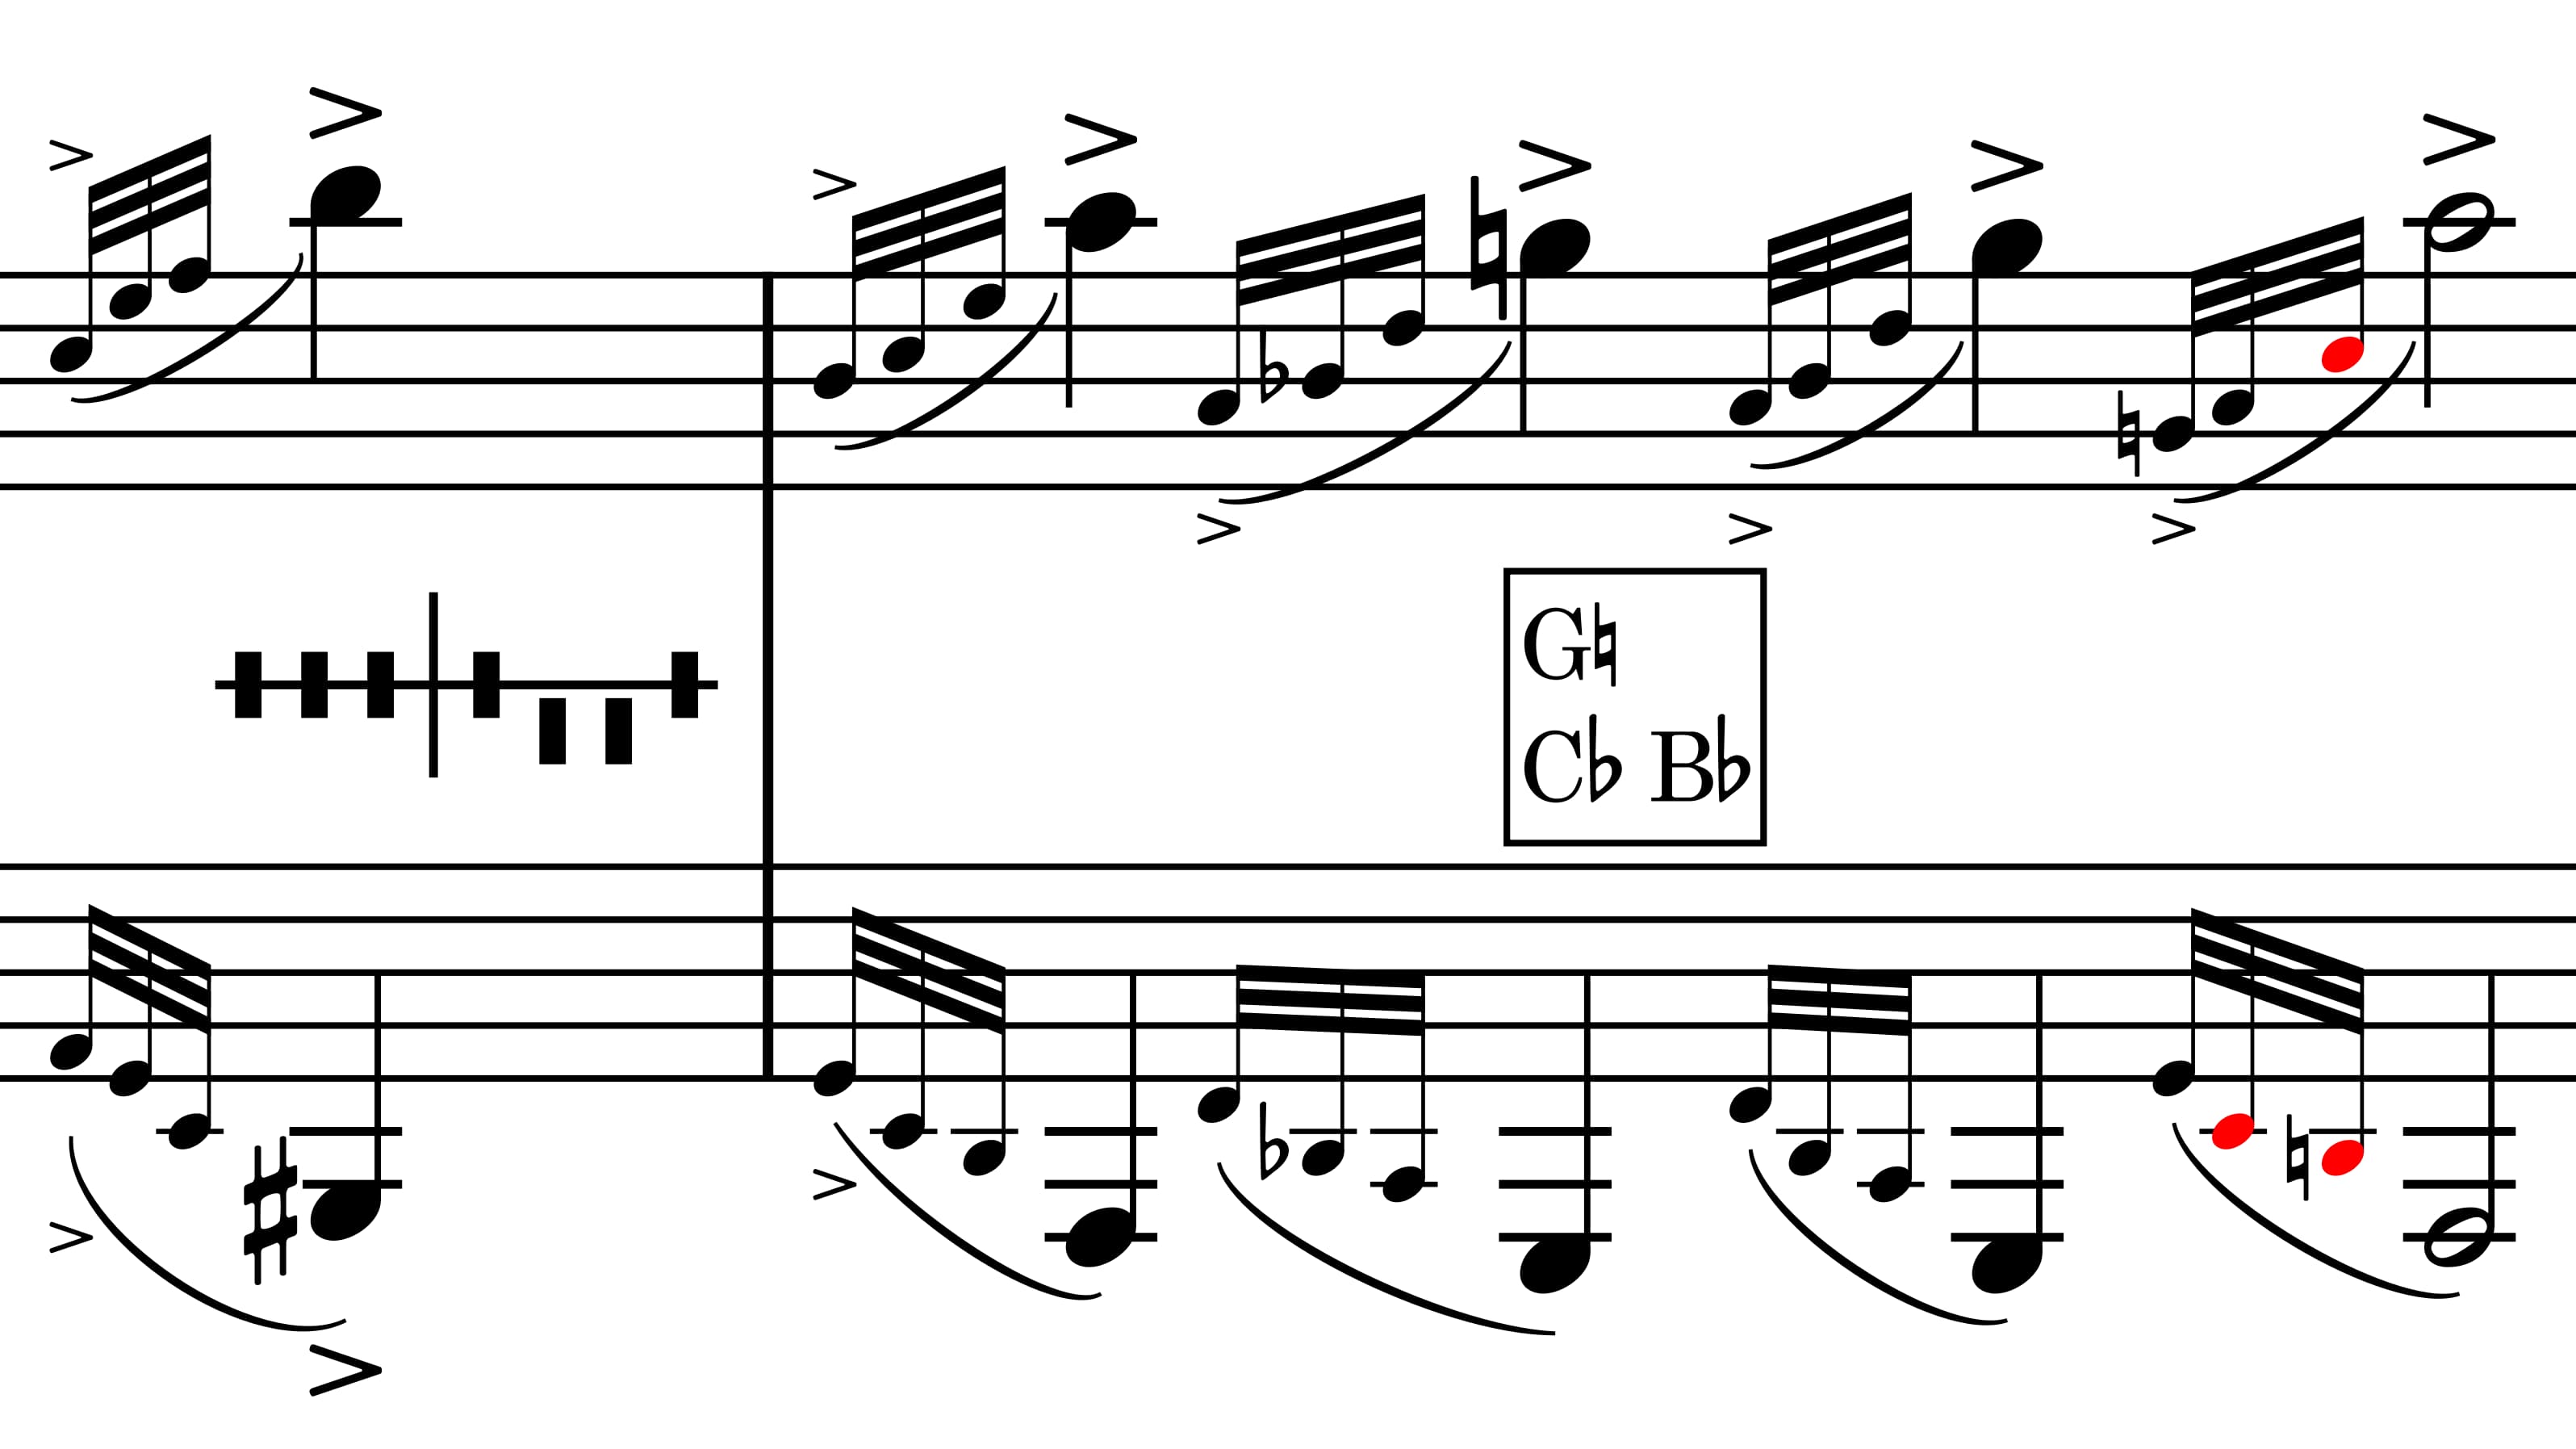
When you add a harp to your project and start writing music for the harp, you’ll notice that any note with an accidental shows up in red: this is because by default Dorico assumes that the pedals are in their central position, which means that any note that is not in the C major scale (or an enharmonic equivalent of a note in the C major scale) cannot be played. The quickest way to begin is to select a note at the start of the harp part and choose Write > Calculate Harp Pedal, which examines the pitches and calculates the correct harp pedal settings for the written notes. As soon as Dorico encounters a note that contradicts a pedal it has already set, it stops, and those conflicting notes will remain red. You can thus work your way from left to right, creating pedal changes at or just before the point at which red notes begin to appear, to get a feeling for the frequency and difficulty of the pedal changes required.
If one pedal is changing every bar or two, that’s no problem for the harpist, but if the harmonies of the music are changing so rapidly that multiple pedal changes are required in quick succession, you should reconsider your approach to your harp part – or risk the wrath or, more likely, the withering disappointment of your harpist.
You can also quickly create harp pedal changes via the Shift+P popover, either by typing a complete set of pedals in an ASCII-art style, e.g. -v-|-v– defines pedals suitable for a D major or B minor scale, with sharpened C and F, or you can specify a subset of pedals by typing their note names, e.g. C#F#.
One of the aspects of the feature that ignited the most discussion amongst our beta testers concerned the handling of partial pedal changes. There is some debate over the conventional placement of full versus partial pedal changes; some prefer full changes to be positioned between the two staves of the harp with partial changes below the lower staff, while others prefer all changes between the two staves. You can determine via options on the new Harp Pedaling page of Engraving Options how many pedals should change in order for the change to be written out in full, and you can also override this on a per-change basis via the Properties panel. To move a harp pedal change from one staff to another, of course, you can simply select it and type Alt+M to move it to the staff below, or Alt+N to move it to the staff above.
One nice side-effect of this instrument-specific knowledge is that harp glissandos now play back taking into account the current harp pedal settings, and if you have a nice harp sound (such as the harp in Steinberg’s Iconica sound library, or Soundiron Elysium Harp), they sound fantastic.
As ever, Anthony has the low-down on Dorico 3’s smart harp pedal changes:
One final note on this feature: when you first open an existing project created in an earlier version of Dorico into Dorico 3, you will find that harp pedal changes do not appear as expected. This is because Dorico has to set up some extra information in the harp instrument in the project upon loading, but that information cannot then be used until the project is subsequently reloaded. So to avoid frustration, when you open your existing project in which you want to add harp pedal indications in Dorico 3 for the first time, save, close and reopen it before you start adding pedal changes, and all will be well.
Custom playback templates
Playback templates bind together information about the instrument sounds, articulations and playing techniques provided by a virtual instrument or other playback device, how to obtain those sounds (defined in a VST Expression Map), and which of those sounds to choose for each instrument in your project. In previous versions of Dorico, you were limited to one or two playback templates supplied with the program to use the supplied HALion Sonic SE and HALion Symphonic Orchestra sounds, or to use NotePerformer, and any use of other sound libraries or virtual instruments required manual setup that had to be repeated in every project.
With the improvements in Dorico 3, it is now possible for you to set up your own playback templates, including custom combinations from different playback devices, and make everything reusable so it needs to be set up only once and can even be exported for use by other Dorico users.
The basic workflow is to configure your VST instrument in Play mode by loading the sounds you want to use, assign the necessary VST Expression Maps in the Endpoint Setup dialog, then save that as an endpoint configuration, which can then be combined with other endpoint configurations or with Dorico’s automatic playback templates for HALion Sonic SE or NotePerformer into a custom playback template. Anthony provides a walkthrough of this process:
It’s also worth dwelling for a moment on an addition to the supplied sample content: Dorico 3 now includes Olympus Choir Micro from Soundiron, a high-quality choral sample library based on the very popular Olympus Choir library. We heard the feedback about the existing choral sounds in the HALion Sonic SE factory content from Dorico users loud and clear, so we set out to find the best possible sounds to improve the situation. We were delighted to find that Soundiron were willing to take their existing Kontakt-based library and re-engineer it for the HALion platform, and the result is beautiful. Once again, Anthony gives you the low-down on the capabilities of this new library:
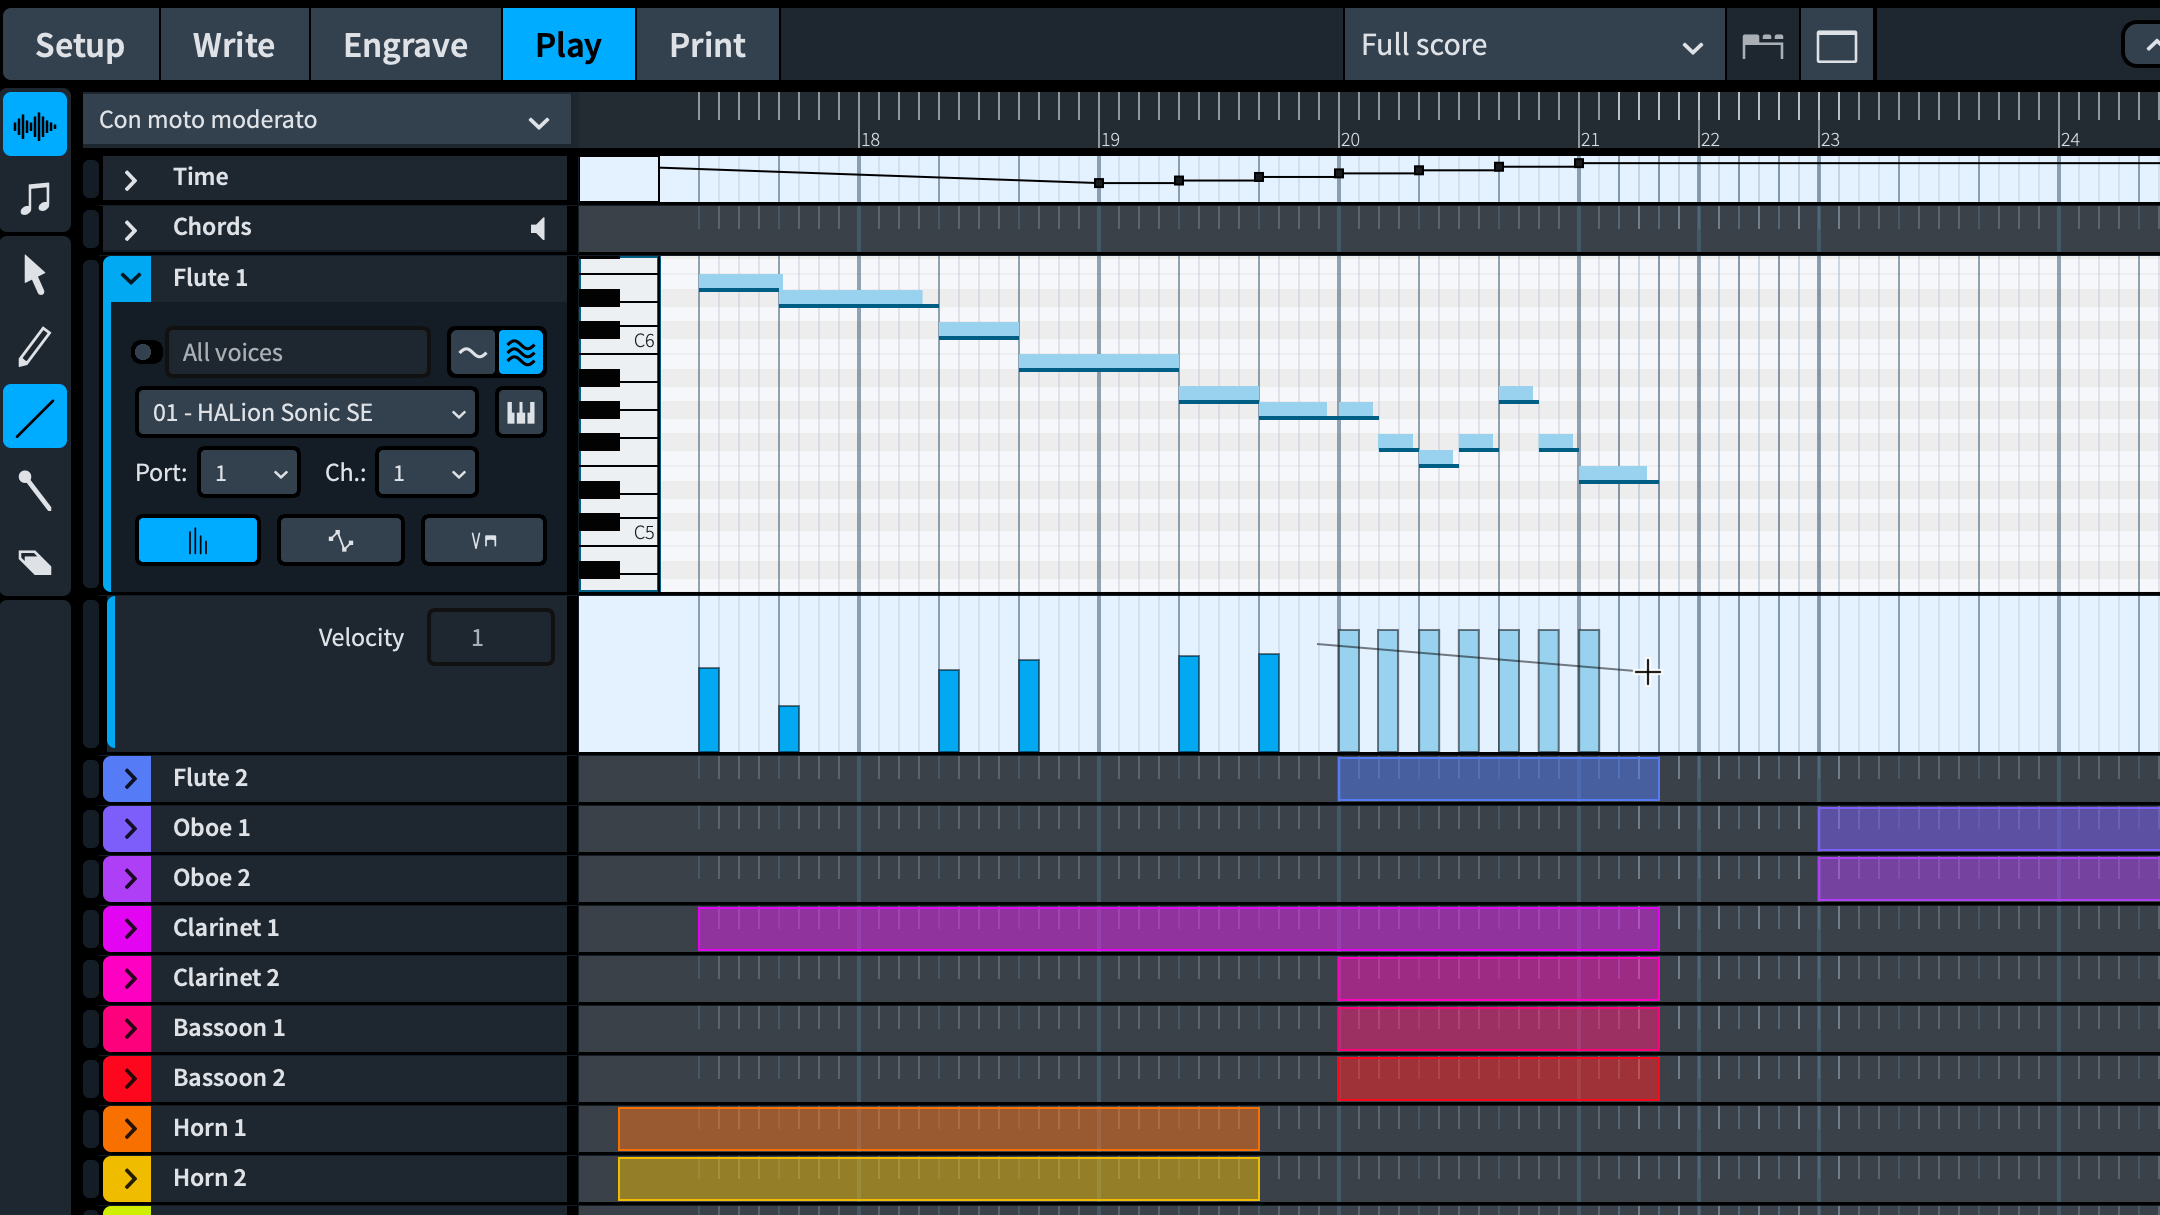
There are many other improvements to Play mode and to playback generally in Dorico 3: more than I can cover in a single post. One thing that many users have been waiting (im)patiently for is the ability to edit the velocity of individual notes in Play mode: the wait is over, as Play mode now includes a dedicated velocity editor.
You can also now edit pitch bend by choosing pitch bend from the menu in the existing controller lane. There are improvements to VST Expression Maps, with better control over volume and the implementation of mutual exclusion groups for playing techniques. And in a major new addition, you can now assign each voice belonging to an instrument to a separate endpoint, meaning that it’s possible to handle things like arco and pizz. simultaneously for the same violin, or to assign different string sounds to each section in a divisi passage, or trigger different organ registrations. Anthony rounds up many of these improvements here:
Comments
Dorico 3 also introduces a simple but eminently functional feature for adding comments to your project, helpful both for leaving reminders to yourself about things you need to check or change, and for working in collaboration with others. We hope that teachers and students in particular will find this feature useful, as it’s included in both Dorico Pro 3 and Dorico Elements 3, so students using Dorico Elements at home can see and reply to comments left for them by their teachers looking at their work in Dorico Pro at school.
Using the comments feature is very simple: select the point in the music where you want the comment to appear, and type Alt+C. A little pop-up window appears into which you can type your comment: hit Return to confirm the comment and add it to the music. A comment appears in the music as a little purple speech bubble, with your initials inside it (when you first create a comment, if Dorico isn’t sure of your name, it will ask you to provide your name and initials). It also appears in the Comments panel on the right-hand side in Write mode, where its full text appears, along with the comment’s author, the date the comment was added, and where in the music the comment is found.
To go to a particular comment, simply select it in the panel. To edit it, select it and hit Return, or double-click it. You can reply to a selected comment by typing Alt+R, which will create a comment at the same position marked as a reply to the original comment, and shown in line below the original comment in the Comments panel.
When it comes to proof-reading your project, you can export a formatted list of all of the comments in the project, which opens up in your web browser and is very easy and convenient to print out.
For a complete walkthrough of the comments feature in Dorico 3, watch Anthony’s video:
Lyrics
Lyrics are near and dear to my heart, since most of my own work with Dorico is in writing and arranging for choir. Dorico 3 provides a handful of really useful improvements for lyrics that I think will be welcomed by anybody who writes for voices. The first is that you can now adjust the vertical position of a line of lyrics in Engrave mode. Dorico has always handled the vertical positioning of lyrics automatically, avoiding collisions with notes that stray outside the staff, and between the lines of lyrics, and between the staves; but until now it has not been possible to nudge lyrics vertically in Engrave mode.
The second is that the way copy and paste interacts with lyrics has been improved: you can now paste lyrics word by word, syllable by syllable, from the clipboard into the music, which allows handy workflows like copying lyrics from one vocal part, then pasting them one by one into the right positions for a second vocalist. You can also copy lyrics to the clipboard and then paste them into another application, like a word processor or text editor, should you need to do so.
The third improvement is that a new Edit > Lyrics > Edit Line of Lyrics dialog has been added, which allows you to see all of the lyrics belonging to a particular line within a flow in a simple dialog, which makes it much easier to see all lyrics at a glance than trying to read them spaced out in the music: naturally it’s easier to spot typos and mistakes in hyphenation when you can see the words in something close to their usual proximity.
You can watch a walkthrough of all three of these improvements in another of Anthony’s videos:
Write mode navigation
One of the few consistent complaints we have received about working with Dorico since its introduction in late 2016 has concerned moving around the music in Write mode. Dorico has always used a graphical approach to navigation in both Write and Engrave mode, which works very nicely in Engrave mode, but less so in Write mode. One way to visualise this is to imagine that the current selected item is like a headlamp in a totally dark room: when you hit, say, the right arrow key, it shines the beam from the headlamp to the right, and it then moves to the item that’s nearest in the cone of light cast by the headlamp. In Engrave mode, this works well, because there are many small items to select – for example, a note is made up of several fragments, such as the notehead, accidental, rhythm dot, flag, beam, and so on – and so the nearest item in a given direction is usually roughly where you would hope or expect it to be. In Write mode, however, there is a smaller number of larger items to select – for example, a note is just a single item in Write mode, combining its notehead, stem, accidental, rhythm dot, and so on – and in a peculiar way this ends up making the result feel more unpredictable, because if the imaginary cone of light catches on the corner of an item that happens to be closer but is in fact not in such a direct line from the original selection, it will nevertheless get selected, and this feels wrong. Even more problematic is moving from one system to another: when you hit the right arrow key to navigate off the end of the system and on to the start of the next, because the navigation is purely graphical, the resulting selection on the new system feels more or less random.
Fortunately such struggles are now a thing of the past: in Dorico 3, Write mode navigation has been completely overhauled, while retaining the useful graphical-based navigation in Engrave mode. Now when you hit the right or left arrow key with a note selected, you will navigate to the next or previous note in that voice, and you will never find that the selection drifts off the staff onto another kind of item: it will stick steadfastly to the voice you started in. You can hit up or down arrow to move through notes in the current voice, and then into other voices on the same staff, and then onto the staff above or below. If you want to select another kind of item, you can hit Tab to cycle through the other items at the same rhythmic position. Once you have, say, a dynamic selected, you can hit right arrow to move to the next dynamic on that staff (though there is a known problem with moving to the next dynamic in the same group, e.g. from a piano marking to a crescendo hairpin starting at the same rhythmic position, which will be fixed in a future update).
Although you cannot navigate by means of the arrow keys or the Tab key onto a system-attached item, if you select e.g. a rehearsal mark with the mouse, hitting the right or left arrow key will navigate to the next or previous rehearsal mark in the flow, which can be a useful way of quickly navigating to other sections of the piece.
I hope that overall these changes to navigation in Write mode will making working with Dorico 3 a more pleasurable and predictable experience.
Project Info
We were surprised to find that Dorico’s early adoptors had so enthusiastically embraced the concept of flows, and were setting up Dorico projects with dozens or, in some cases, hundreds of flows. The Flows panel in Setup mode is really not designed for projects with dozens or hundreds of flows, and we have been thinking for a while about how we can come up with a more ergonomic and useable interface for performing project management tasks on flows when you have more than a handful of them. In Dorico 3 we’ve given the File > Project Info dialog a complete overhaul, and a new key command (Ctrl+I on Windows, Commmand–I on Mac).
The dialog is now modeless, which means you can leave it open while you work, and only apply the changes when you’re done. You can select multiple flows in the new flows list on the left-hand side of the dialog, and change the flow information for multiple flows at once. You can re-order flows in the list, and only take the hit of Dorico performing all of the necessary layout operations when you’re ready, by clicking Apply at that point. We hope that for those of you who are making heavy use of multi-flow projects, the changes and improvements to the Project Info dialog will prove useful.
Text tokens
One more related usability improvement that I’d like to highlight concerns tokens. Tokens are incredibly useful, allowing you to replace information dynamically in your master pages and other places where text frames are used, and they are one of the key ingredients in making Dorico’s page layout features as powerful as they are. However, tokens are hard to work with: they use a funny syntax, requiring you to type {@flowTitle@} and siimlar incantations, and there’s nowhere directly in the application where you can fnid out what tokens are available.
Now, in Dorico 3, when you right-click while editing text in a text frame, a special context menu appears in which all of the tokens are listed, organised into categories, which makes it much easier to insert the specific token you’re looking for.
Lightning round
The Version History for Dorico 3 weighs in at a hefty 70-plus pages, and I cannot possibly hope to cover even half of the things that are new in this version in a single post here. So here is a quick list of some of the other things you can look forward to discovering in Dorico 3:
- Bar numbers can now appear at multiple positions in the system, e.g. both above the top staff of the system and below the bottom staff of the system, as well as, say, above the violins, which is useful for media music scores.
- You can now “hot-plug” MIDI input devices, so if you forget to connect your keyboard to your computer before you start Dorico, you don’t have to restart in order to be able to input notes.
- You can now choose between swinging eighths or swinging 16ths.
- It’s now easy to have a clef change that appears only when the score is shown in concert or transposed pitch, which is very helpful for wind and brass parts
- When showing poco or molto modifiers on dynamics, they can now appear superimposed on top of the hairpin rather than above or below
- The Beat stress options on the Dynamics page of Playback Options are now fully operable for time signatures with any beat grouping
- You can now rename VST instruments in the Endpoint Setup dialog, making them easier to identify both in the VST Instruments panel and in the Mixer
- Dorico warns you when you open a project that uses text or music fonts that are not installed on your computer, and allows you to set replacements
- When Dorico deletes a file – such as an auto-save or backup project, or any user-defined options – it now moves it to the Trash or Recycle Bin instead of deleting it outright, so you can reover it if you need to.
- There’s a useful MIDI input indicator in the bottom right-hand corner of the project window, which lights up green when MIDI data is being received. If you see that this is lighting up all the time, it indicates that you have a device flooding the program with MIDI data, and disconnecting or resetting it may improve performance.
- There are new commands in the Key Commands page of Preferences for increasing or decreasing the intensity level of a dynamic, so you can select, say, an mp dynamic and increase its intensity to mf with a single key command.
There are dozens of other improvements described in the Improvements section of the Version History PDF, and I recommend you take some time to digest everything in there. Almost no corner of the application has been untouched.
You can also enjoy two more round-up videos from Anthony, one concentrating on notation improvements in Dorico 3, and the other whizzing through many workflow improvements found throughout the new version.
Trial version coming soon
The 30-day trial versions of Dorico Pro 3 and Dorico Elements 3 will be available in two or three weeks: we will publish another update to let you know when they are available for download.
Buy or update today
Hopefully after reading all of this and taking in all of the videos, you are ready to take the plunge.
If you already have Dorico Pro 2 or Dorico 1.x, you can buy an update to Dorico Pro 3: an update from Dorico Pro 2 costs €99.99 including German VAT at 19%, $99.99 US, or equivalent in your local currency; updating from Dorico 1.x costs €149 including German VAT at 19%, $149.99 US, or equivalent in your local currency. You can buy your update here.
If you have Dorico Elements 2, an update to Dorico Elements 3 costs just €29.99 inc. German VAT at 19%, $29.99 US, or equivalent in your local currency. You can buy your update here. You can also find upgrades from Dorico Elements 2 to Dorico Pro 3 in the Steinberg online shop.
If you haven’t yet bought Dorico but have a license for Finale or Sibelius, you can buy Dorico Pro 3 at the special crossgrade price, which is €279 inc. German VAT at 19%, $279.99 US, or equivalent in your local currency. To qualify for the crossgrade, you must have a license for the full version of Finale (but not cut-down versions like Notepad, Guitar, PrintMusic, Allegro), any version from 1.0 up to the current 26.1, or a license for the full version of Sibelius: qualifying versions include Sibelius version 1.0 up through version 2018.1, Sibelius Ultimate 2018.4 or later (but not Sibelius 2018.4 or later); no versions of Sibelius First, Sibelius Student, G7 are eligible. (If you find this naming scheme confusing, you and everybody else.)
If you are in full-time education or work as a teacher for an educational institution, you can buy Dorico Pro 3 at the education price, which is €339 inc. German VAT at 19%, $339.99 US, or equivalent in your local currency. For students and teachers, Dorico Elements 3 is just €66.99 inc. German VAT at 19%, $66.99 US, or equivalent in your local currency.
If you both qualify for the crossgrade and for our educational pricing, you can buy Dorico Pro 3 at the special educational crossgrade price, which is €159 inc. German VAT at 19%, $159.99 US, or equivalent in your local currency.
If you represent an educational institution and are interested in multi-user pricing, please contact your local educational reseller or Steinberg for a quote. It is really very inexpensive to buy a site license for your classroom.
In closing
In closing, I would like to express my gratitude and admiration for all of my colleagues in London and Hamburg who have together worked wonders to bring Dorico 3 to life. The core development crew here in London has done amazing, innovative and ground-breaking work, ably supported by the dedicated and tireless audio engine team. Anthony of course deserves special thanks for his incredible work on the tutorial videos that have been dotted throughout this post, and there are several more on our YouTube channel for you to enjoy: putting these together is a Herculean task that he undertakes on his own. And there are people all over Steinberg who have played an invaluable role in ensuring that Dorico 3 launches smoothly today. To everybody: thank you.
In many ways, of course, the journey begins anew today. Thousands of you will soon be using Dorico 3, and we will be hearing from you about the things you like, and the things you would like us to improve. We will continue to listen and to shape our plans around your feedback. We remain dedicated to building the best possible tool for producing music notation with your computer, and there is a good deal more to come.
On behalf of everybody at Steinberg: we hope you enjoy Dorico 3, and thank you for reading.
Congratulations, Dorico Team, great update and new features: the condensing/input on multiple staves at the same time, Tab/chord symbols editing and diagrams (yeah!!), the glissando playback, smart pedalling, the velocity lane in Play Mode and custom playback templates (I can´t wait to check how works the new Iconica Template, very nice)
What a travel since 2016, uh? All the things you’ve done in 3 years…Thank you very much, best
Great, many thanks. Is there an upgrade from Dorico 2 to 3 price for teachers? From Dorico 1 to 2 there was no difference, but I notice that the complete package for teachers is cheaper than the upgrade. Thanks again for all you hard work, much appreciated.
@Jim: There is no educational price for single-user updates: the price is the same whether you originally bought an educational or retail version. (It’s different if you are updating a site license of five or more copies, in which case contact us.)
Hallo
I am really a fan of dorico, but some things I want tell you/suggest:
-First, new Dorico 3 seams unstable. There ist often the coloured ball on my mac…
-I really don^t like one thing with quarters: when I enter at the beginning of the bar a eight pause then following a quarter note Dorico breaks the quarter in two eights, when followed by an eight pause.This is horrible. Can I change this?
I can send you a screenshot if necessary.
-And then a future Idea:
I write much scores for my musicians and I really really would like a feature to arrange a score in 1, 2 or 3 pages with one click. Often the sores has for example 2 pages and 1 staff. I have to fite it in 2 pages manually and this takes much time… Musicians don`t like a rest of one staff at following page. They like full pages and as few as possible. One click – that would be really great.
Thank you
Robert Schmidt
Congrats to Daniel and the team on this upgrade! Though it will doubtless benefit from future refinement, as of version 3, at this point Dorico has everything I need or want, a huge accomplishment, including the level of rethinking and improving on how things have been done in other notation software in the past.
Except perhaps this one thing is still missing: Documentation for scripting.
Are there any available lists of primitives and whatever subset of Lua syntax is implemented? And what interface variables or routines have been implemented in Lua for scripting Dorico that we can use? Is there any kind of basic documentation? Or is the expectation that we can figure it all out by recording and analysing macros? What is the way in?
As you might suspect if you know my music, I am particularly interested in being able to write algorithmic music plugins, generative and that can create accompaniments, variations or whatever. I used Sibelius’s Haskell-based plugin scripting as an idea or initial material generator, a spur to my imagination, and suspect that such possibilities could be taken a lot further in Dorico. But I am not finding enough information about the Lua implementation or scripting system to find out or start using it.
I wouldn’t ask but both web and forum searches have failed to turn up any kind of documentation.
Sincere thanks again for all the work you’ve done on Dorico, and whatever you are woking on now.
@Laurie: I’m afraid at the moment there’s no documentation for scripting because the only things that are really usefully possible are to automate the commands you can run in the program yourself. If you try recording a simple script using the macro recorder in the Script menu you’ll see roughly how the syntax works. You can get a further look at that command syntax by e.g. looking at the application.log file that is created in your user application data folder, which logs out the commands you invoke in each session. A couple of users have managed to do pretty sophisticated things using these techniques, but it’s not for the faint of heart!