In this post I’m going to share the procedure to put together a performing edition of a set of Preces and Responses, based on the text of the Book of Common Prayer. The Preces and Responses are part of the choral evensong service in the Church of England and in Episcopal and Anglican churches around the world. They make an interesting case study for Dorico because they consist of a series of short versicles sung by a cantor, each one followed by a response sung by the choir, and this is an ideal fit both for Dorico’s multi-flow and page layout features.
The particular set of Responses I am going to produce is by William Smith, an English composer from the first half of the 17th century. The Smith Responses are often sung with a setting of the Lord’s Prayer written by Robert Stone, since Smith’s setting includes only a simple chanted version. I will be including Stone’s setting of the Lord’s Prayer in my performing edition. If you want to follow along exactly, you could use Sjouke Bruining’s edition on CPDL as a source: this edition uses the original note values, but I am going to halve the note values in my performing edition, as this reflects modern practice more closely.
Setting up the players
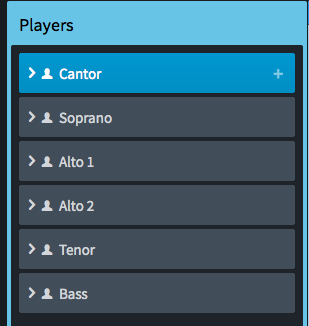 Start a new empty project, and add six players: Baritone, Soprano, Alto, Alto, Tenor, and Bass. You can rename the Baritone player to Cantor if you like, though this isn’t necessary, but it might help keep things straight as you work. Dorico will automatically number the altos as Alto 1 and Alto 2, though it doesn’t really matter as we will only show the names once, at the beginning of the project, and we won’t use Dorico’s automatic staff labeling at all: so open Layout Options, go to Staves and Systems, and set Staff labels on first system and Staff labels on subsequent systems to None.
Each versicle (the cantor’s music) and each response (the choir’s music) will be in separate flows. Only the Cantor player will be assigned to each versicle flow, while the Soprano, Alto, Tenor, and Bass players will be assigned to each response flow (but not the Cantor).
Setting up the flows
You can create all the flows at the start, or you can create them as you go. I prefer to create them all at the outset, as then you can select every other flow to exclude the cantor, and then select the other flows to exclude the other singers. Here are the flows you need to create, along with what I chose to call them. I prefix each flow name with V. for versicle, and R. for response. In the particular set I’m producing, the choir sings everything from the response “O Lord make haste to help us” to the end of “Praise ye the Lord.”, which is normally the final versicle of the Preces and followed by the final response, “The Lord’s name be praised.”, which is omitted in this setting. Often there is a versicle for the first line of the Gloria, and the response picks it up after “…and to the Holy Ghost.” This is why there are two R. flows one after the other in the list at that point.
- V. O Lord open thou our lips
- R. And our mouth shall show forth thy praise
- V. O God make speed to save us
- R. O Lord make haste to help us…
- V. The Lord be with you
- R. And with thy spirit
- V. Let us pray
- R. Lord, have mercy…
- R. Our Father…
- V. O Lord, show thy mercy upon us
- R. And grant us thy salvation
- V. O Lord, save the Queen
- R. And mercifully hear us when we call upon thee
- V. Endue thy ministers with righteousness
- R. And make thy chosen people joyful
- V. O Lord, save thy people
- R. And bless thine inheritance
- V. Give peace in our time, O Lord
- R. Because there is none other…
- V. O God, make clean our hearts within us
- R. And take not thy Holy Spirit from us.
- V. Collects
- R. Amens
At the end of the Responses, the cantor sings three (or sometimes four) collects, which are “collected prayers”. The first collect is chosen for the specific day (and the second, if there are four collects), while the second and third collect are always the same. Each collect is followed by a choral Amen: the first and second collects are normally followed by a single cadence (normally imperfect for the first, and perfect for the second), while the third Amen is normally longer and more ornate. The collects are normally notated as a single reciting tone with no words, and the Amens are written out in full.
Having created and named all the flows, use Ctrl+click (Windows) or Command-click (Mac) to select all of the versicles flows, and then uncheck the checkboxes in the Players panel for Soprano, Alto, Tenor, and Bass. Do the same to select all of the responses flows, and uncheck the checkbox in the Players panel for the Cantor.
Now’s a good time to save your project, so do that to make sure you don’t lose any work.
As you scroll through the ‘Full Score’ layout, you’ll see that each new flow starts on a new page. This will ultimately be no good, but it’s quite convenient for the time being, as the automatic title at the top of each page reminds us what music is supposed to go on each page.
Hiding bar numbers
It is something of a matter of taste whether or not bar numbers should appear in editions of choral responses: since each response is typically very short (only a handful of bars) it is normally sufficient for rehearsal purposes to go from the beginning of each response, so bar numbers are of limited use. I personally prefer not to see bar numbers in my performing editions, so I hide them.
To hide bar numbers, go to the Bar Numbers page of Layout Options and set Show bar numbers to None, then click Apply and Close.
Setting default end barlines
Each versicle and response normally ends with a double barline rather than a final barline (the exceptions being “Praise ye the Lord.” at the end of the Preces, and the final Amen at the end of the Responses), to change this default go to the Notation Options dialog, and click the Select All button at the bottom left-hand corner of the dialog to select all the flows. On the Barlines page, choose Double barline and click Apply. Now select the flows called R. O Lord make haste to help us… and R. Amens from the list on the left by clicking and then Ctrl+clicking (Windows) or Command-clicking (Mac), and choose Final barline, then click Apply and Close.
Inputting a versicle on a single reciting tone
To start inputting the music, select the rest in the cantor’s staff in the first versicle (you can do this without the mouse by pressing any arrow key, which will set the selection to the musical item nearest the top left-hand corner of the window), and hit Return to show the caret. The Smith responses are in A flat major, so use Shift+K to open the key signature popover, then type Ab and hit Return to add the required key signature.
When the versicle is recited on a single tone, normally a single note of long duration is used, with all of the lyrics written underneath. Add a double whole note (breve) for the first versicle, “O Lord, open thou our lips.” To add the text, type Shift+L for lyrics, and type the words in. To put multiple words under the same note, instead of hitting Space to advance to the next note, type Shift+Alt+Space, which inserts a space into the current lyric. (You can also copy and paste text with spaces in it into a single lyric if you find that easier.)
Dorico doesn’t know that this lyric contains multiple words, so the next thing to do is to open the Properties panel (the panel at the bottom of the window, which you can open and close by typing Ctrl+8 (Windows) or Command–8 (Mac), and switch on the Lyric text alignment property, which defaults to Left, which is what we want in this case.
The lyric is now correctly left-aligned, but too long for the music. Don’t worry about this for now: we will return to this when this versicle is in its final position in the page layout.
Inputting the first choral response
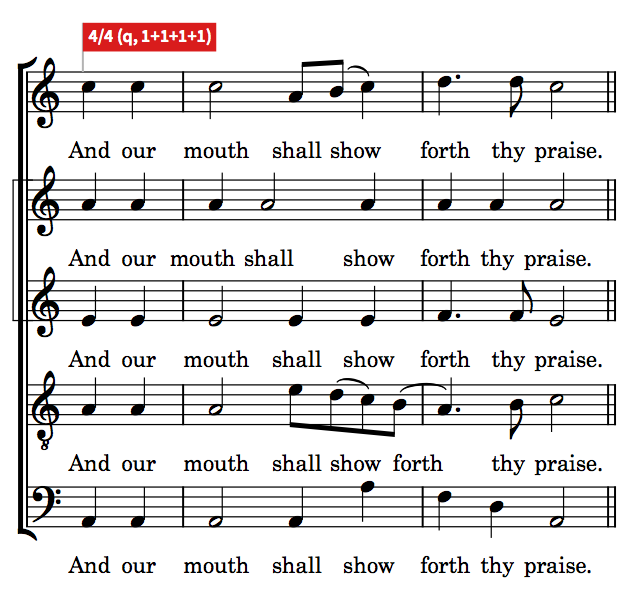
Responses normally show no time signatures, even though they are very often clearly in a particular time signature. The first response in Smith’s set, “And our mouth shall show forth thy praise.” is in 4/4 with a pick-up (upbeat) of two quarters (crotchets).
Scroll to the second page, which shows the title “R. And our mouth shall show forth thy praise”, and double-click the quarter (crotchet) rest to start note input there. Type Shift+M for the meter (time signature) popover, and into the popover type 4/4,2, then hit Return. This tells Dorico that you want a 4/4 time signature with a pick-up of two beats. The time signature is created, and a signpost appears to denote that the first bar is an irregular pick-up bar. To hide the time signature, select it, then switch on the Hide time signature property in the Properties panel.
Otherwise you can input the music in the normal way, either using your computer keyboard or using your MIDI keyboard, and then add the lyrics.
Responses of this era are typically written without dynamics and tempo markings, so the only additional markings to add are the slurs to indicate elisions in the word-setting.
Inputting a versicle with multiple reciting tones
The second versicle, “O God, make speed to save us.”, is recited on a series of tones, rather than a single tone.
Scroll to page 3, which has the title, “V. O God make speed to save us”, and input the versicle as a series of quarter notes (crotchets). Don’t forget to add the A flat major key signature before you start. Dorico does not yet have proper support for stemless notes, which is what would normally be used to show music sung in a speech rhythm, like plainchant, but you can make these notes stemless by selecting them (click in a blank bit of the single bar of the flow to select them all), then in Engrave mode activate the Stem length adjustment property and set the value to -3.5 spaces.
 Because each note in this versicle has a different word, there’s no need to muck about with the spacing: simply type the lyrics as normal, and the space will be correct.
Inputting the remainder of the Preces
In the Smith responses, the choir sings the Gloria immediately following the response, “O Lord, make haste to help us.”, and indeed then follows the Gloria with the final versicle, “Praise ye the Lord.” All of these can be entered into a single flow, as they are sung by the choir as a single span. As before, don’t forget to add the required A flat major key signature before you start.
After the Creed
In a service of choral evensong, the Preces is sung at the beginning of the service, following the opening sentence, confession, absolution, and recitation of the Lord’s Prayer. The Responses are sung later in the service, after the Psalm, lessons, and canticles (the Magnificat and the Nunc dimittis).
In the Smith Responses, the first two versicles and responses follow the pattern we have already seen: versicles on a single reciting tone, for which the text needs to be entered using Shift+Alt+Space between words, then adjusting the alignment of the lyrics via Properties and adding a note spacing change in Engrave mode to ensure there is enough space; and simple choral responses.
If you are using Sjouke Bruining’s edition from CPDL, then Stone’s setting of the Lord’s Prayer is in the right place, but if you are using another source, you can find several settings of the Stone also on CPDL. Several of those editions are in G major, so should be transposed up a semitone into A flat major in order to fit with Smith.
Inputting a versicle with a long reciting tone and other tones
After the Lord’s Prayer comes the versicle, “O Lord, show thy mercy upon us.”, for which all but the last two notes are sung on a single reciting tone. All of the remaining versicles in the Smith set follow this pattern.
Write the long reciting tone using a double whole note (breve), and the two terminating notes using quarter notes (crotchets). As before, select the quarter notes and hide their stems by setting the Stem length adjustment property in Engrave mode to -3.5 spaces.
Type all of the text as far as “O Lord, show thy mercy up” on the double whole note, using Shift+Alt+Space to insert spaces without advancing, then after “up” hit the hyphen key as normal to advance, and finish off with “on us.” Select the first lyric, open the Properties panel, and set Lyric text alignment to Left. Now the versicle will be the correct length.
You can input all of the remaining versicles using this technique.
Interchangeable time signatures
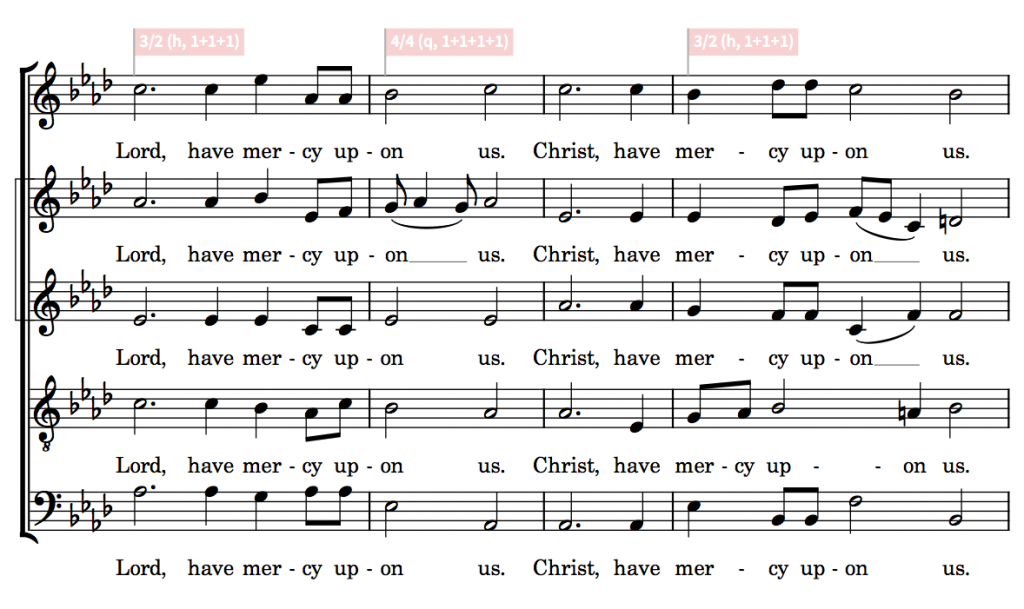
The response “Lord, have mercy upon us…” interchangeably switches between bars that are six quarter notes (crotchets) long, and four quarters long. You can achieve this in Dorico by way of an interchangeable time signature: at the start of the flow, type Shift+M for the meter popover, then type 3/2 (4/4) into the popover and hit Return to confirm. As before, you should hide the time signature using the Hide time signature property.
The first bar of the response is indeed in 3/2 (for the sake of argument), and the next two bars are in 4/4: at the start of the second bar, again type Shift+M for the meter popover, and type 4/4 followed by Return. Notice that the time signature is automatically hidden: this is how interchangeable time signatures work. To switch from one time signature to another, you create them as normal, but if they have been set up as part of the interchangeable set, they are automatically hidden. The final three bars of the response alternate between 3/2, 4/4, and finally 3/2 again. Create these time signatures in the same way, and they will all automatically be hidden.
 Irregular meter in the Lord’s Prayer
If you choose to include Robert Stone’s setting of the Lord’s Prayer in your edition, you will find that the bar lengths in most editions are very irregular, designed as they are to help modern choirs find their way through the syllabic stresses and patterns of the text.
The way I chose to input this setting in my own edition was simply to insert barlines where needed, by typing Shift+B to show the bars popover before inputting the note that I wanted to fall at the start of a new bar, and entering | (the vertical pipe character) into the popover to specify a single barline.
You will notice that every bar shows a signpost for an open time signature, like this:
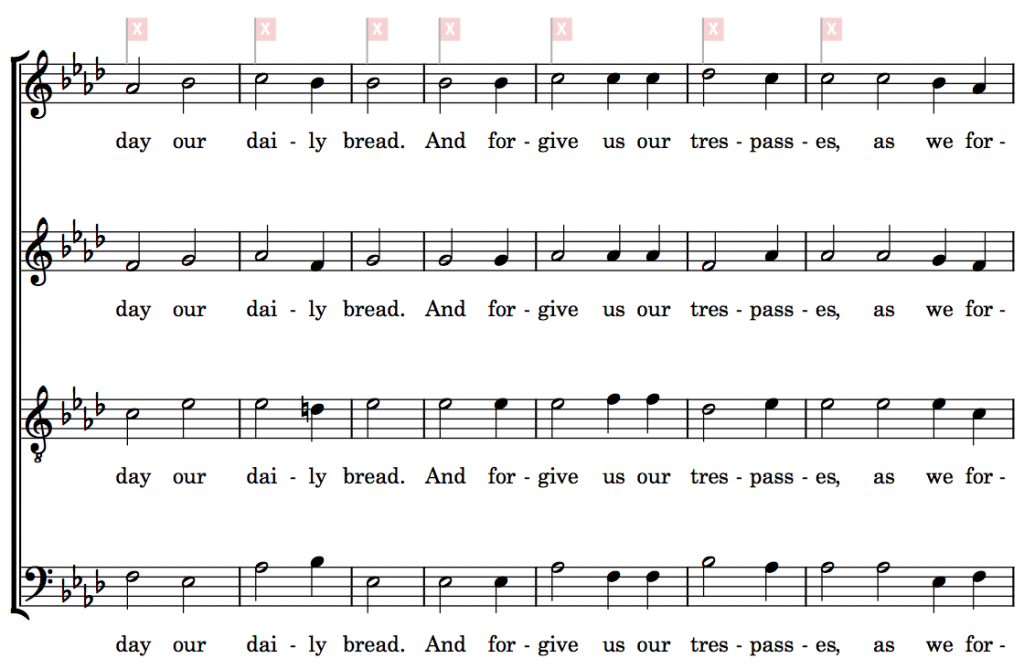 The Stone setting of the Lord’s Prayer is for SATB, rather than SAATB as the Smith Responses are: so if you choose to include the Stone, you should exclude Alto 2 from this flow in Setup mode.
Inputting the Amens
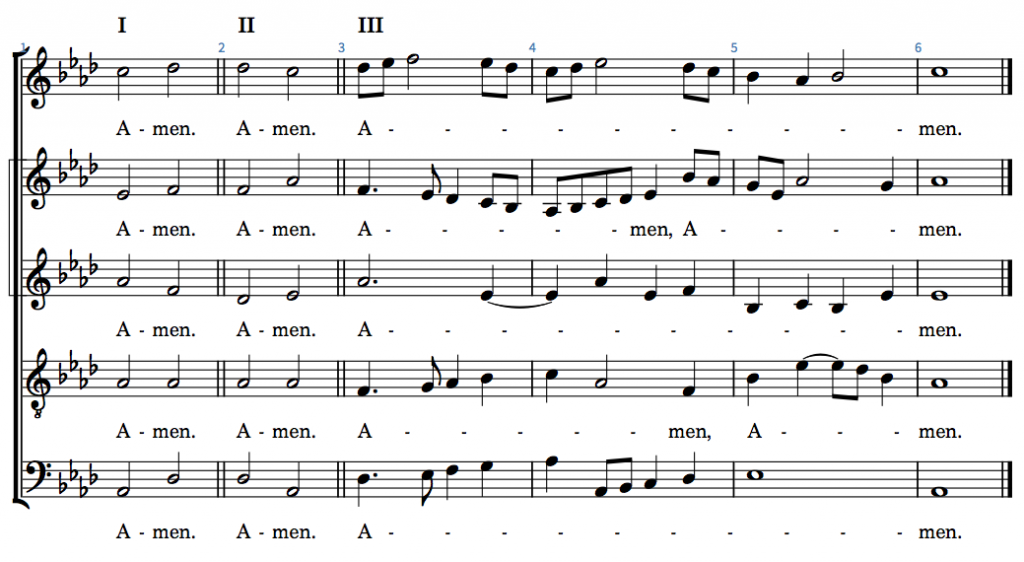
Input the three choral Amens in the same flow: create a 4/4 time signature at the beginning, and hide it in the usual way, then add a double barline at the end of the first and second bars, before adding the four bars of the third and final Amen. Add Roman numerals I, II and III at the start of each Amen using Shift+X text.
 That’s it for note input. Now our attention must turn to producing a pleasing and practical page layout.
Planning the page layout
Go to Engrave mode, and expand the Master Page Sets panel at the bottom of the right-hand panel. Select Default Full Score, then click the + button in the action bar to create a new set of master pages based on this one. Rename the new set to something distinct, e.g. Responses. You can collapse the Master Page Sets panel again now.
Next, in the Master Pages panel above, choose your new Responses master page set from the Current set drop-down menu. Select the First master page pair, and delete it. You will now see that each flow follows on from the last one, but none of them now show any titles. At this point, the layout is 13 pages long.
For my performing edition, I’d like to fit the music onto eight A4 pages, which will allow the music to be printed large enough for my singers to read it comfortably. Reducing the staff size a little, from rastral size 3 (7mm or 0.28″ staff size) to rastral size 4 (6.5mm or 0.26″ staff size) reduces the number of pages from 13 to 11. You could reduce the page count by reducing the number of staves (some editions use only three staves for the choral responses, with Soprano and Alto 1 sharing a staff, and Tenor and Bass sharing a staff) but it is certainly clearer if each part has its own staff. So in the end I settled on rastral size 5 (6.0mm or 0.24″ staff size), but we’re still going to need to get our hands dirty to produce a more compact layout that makes clear what’s going on.
So let’s do just that: double-click the Default master page pair in the Master Pages panel on the right-hand side, and in the master page editor, delete the blue music frames and the wide green text frames from both the left- and the right-hand pages (but not the narrow green text frames in the outside corners of the pages, as these contain the page numbers, which we want to retain).
When you close the master page editor, you will be alarmed to see that all of the pages of music have disappeared. But don’t worry!
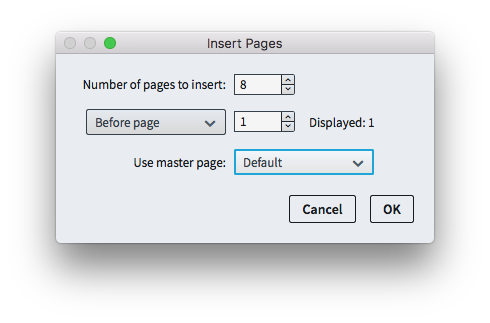
In the Pages panel on the right-hand side, click the Insert Pages button in the action bar, and in the dialog that appears, choose to add 8 pages based on the Default master page pair.
You will now have eight pages in your layout, all completely empty of music, ready for you to start work.
Adding layout-specific music frames
 The basic procedure for laying out the music is as follows: create an empty music frame, change the flow filter so that only the flow you are interested in appears, rinse and repeat.
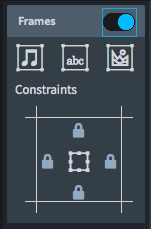
To add a music frame, switch on the switch at the top of the Frames panel on the left-hand side in Engrave mode. Click the music frame button (the one with the pair of eighth notes (quavers) on it), then click and drag on the page to create a frame of the desired size.
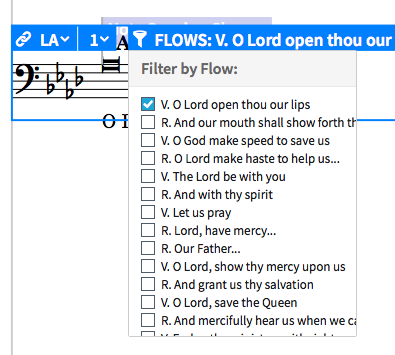
Dorico automatically assigns the final flow in the project to the frame. To change which flow is going to appear, click the little downward arrow to the right of the name of the flow shown in the controls glued to the inside of the top edge of the music frame.
In the menu that appears you can see the flows that are included in this music frame chain. Scroll to the bottom of the list to uncheck R. Amens, which will be included for each new frame that you create, and then scroll back to the top of the list to check the appropriate flow.
For each versicle, I recommend making the music frame the whole width of the page, so that the versicle is written out unjustified. You can also then position the bottom of the music frame for the versicle and the frame for the corresponding response in the same place, which makes it easier to align the Cantor’s staff with the Bass staff. (Normally, when the versicle is written on the same system as the response, the versicle is positioned at the same vertical position as the Bass staff.)
Adjusting the width of the staff for reciting tones
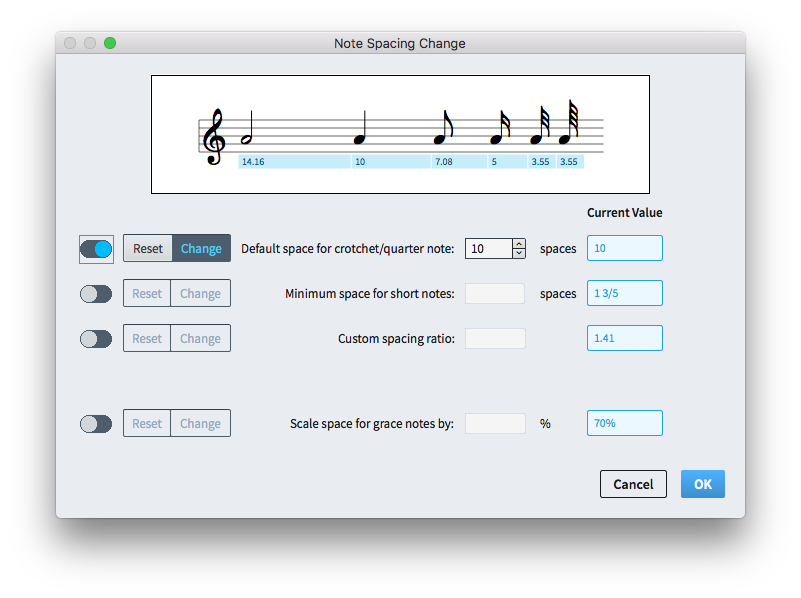
As you add the versicles on single reciting tones, you will see once again that the staff stops before the end of the text. My preferred way of fixing this is to use a note spacing change. In Engrave mode, select the double whole note, then choose Engrave > Note Spacing Change. In the dialog that appears, switch on the toggle switch next to the text Default space for crotchet/quarter note, then click Change to enable the numeric control to the right. Change this value from 4 to e.g. 10 and click OK.
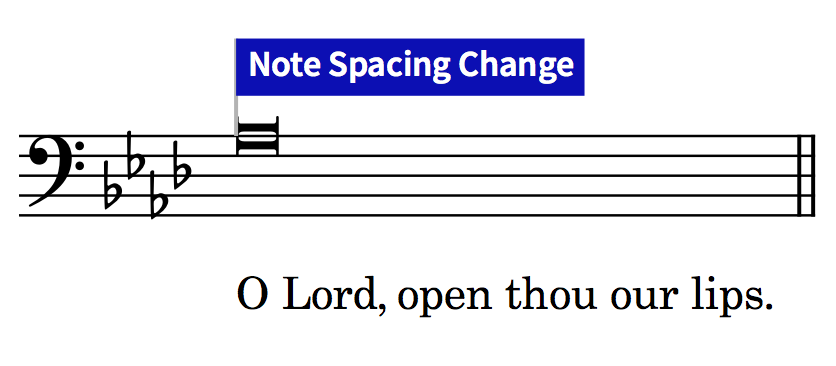
Now the staff will be long enough for the text, and a Note Spacing Change signpost appears: if you need to adjust the spacing later on, you can double-click that signpost to reopen the dialog.
Adding several music frames to the same frame chain
When you come to the response “O Lord, make haste to help us”, you will need to create several frames in the same chain. This flow will have one frame on the first page, a frame on the second page that occupies the whole height of the page, and then a frame at the top of the third page for its final system. Each frame you drag out is the start of a new chain of frames, but we need to join these frames together. Look at the frame chain indicator – the two letter combination glued to the top left-hand corner of the frame – at the end of page 1 that contains the start of “O Lord, make haste to help us.” In my project, this indicator is LD.
To make the frame on the next page part of the same frame chain, so that the music flows from the frame on page 1 into the frame on page 2, click the frame chain indicator in the top left corner of the frame on page 2, and choose the same frame chain identifier as the frame at the bottom of page 1: in my case, this is LD, but it may differ in yours.
Repeat this process at the top of page 3, and the music should flow all the way from the bottom of page 1 to the top of page 3, through three separate music frames.
You will need to follow the same procedure for “Lord, have mercy upon us”, which needs to run to two systems at the top of page 4, and for the Stone Lord’s Prayer, which starts at the bottom of page 4 and then continues on page 5, where a second music frame in that chain should occupy the whole height of the page.
Page 6 is the most crowded page of the whole layout, as it needs to include three versicles and responses. I ended up splitting the lyrics for the versicle, “Endue thy ministers with righteousness” onto two lines, putting “Endue thy” in the first line of lyrics, and then putting the remaining words into the second line of lyrics. The same trick of left-aligning the multi-word lyrics works when there are two lines of lyrics, as well. I also manually adjusted the alignment of “O Lord, save the Queen.”, nudging “O Lord, save” to the left in order to make this versicle take up less space and to allow “And mercifully hear us…” to fit on the same system.
Be careful with the heights of the music frames: except on page 6, which is very tight, you can afford to make the frames tall enough that the choral staves are justified and occupy the whole height of the frame, giving the music a bit of breathing room.
This part of the project will take some time to get good results. I have done this a couple of times before, and it still took me around an hour to get the music looking good. Be patient, and save your work often. The new features to nudge and resize frames with the keyboard added in Dorico 1.1 are a huge help with this process, as is the feature to copy a frame from one page to another, if you discover that you need to move a frame forwards or backwards by a page during the layout process.
You may well save yourself a fair bit of frustration if you study the layout I settled upon, as it shows one possible solution for laying out this set onto 8 pages relatively comfortably.
Finishing touches
The staves at the start of the Preces should be labeled, so there is no doubt as to who is going to be singing which part. Use Shift+X text to add the word CANTOR above the initial versicle, and SOPRANO, ALTO 1, ALTO 2, TENOR and BASS above their respective staves in the initial response. I use all bold, upper case letters, since it is conventional in lots of vocal and choral music publishing in Europe to use upper case labels for vocal staves, but you should feel free to use whatever looks right to you. Depending on where else you are using Shift+X text in your project, you might want either to change the default position of text relative to the staff on the Text page of Engraving Options, or simply nudge the six labels a little closer to the staff in Engrave mode.
You might also like to move the lyrics a little closer to the staff: the default distance is 2 1/2 spaces, but I find that I can normally get away with 1 1/2 spaces, and this makes the lyrics a little more clearly associated to the staff above. This setting is changed on the Lyrics page of Engraving Options.
Add text frames with right-aligned text at the top of the first page for the composer’s name, and likewise just before the setting of the Lord’s Prayer on page 4, to make clear that this is by Stone and not Smith. Add text frames with centred text above the first versicle and response, labelling “The Preces”, and then on page 3 above “The Lord be with you.”, which you might choose to label as “The Responses” or, as I have, “After the Creed”.
You should also add a title at the top of the first page: add a text frame, and use the Title paragraph style to add the title, “Preces and Responses”.
This is a good point at which to save your work again, and then print the pages out onto paper so that you can have a close look at them. In doing this I noticed a few places where I needed to make a few spacing adjustments (for example, ensuring there was enough space for the hyphen in the word “Glo-ry” at the end of the first page, and enough space between “thy” and “Name” in the first system of the Lord’s Prayer on the fourth page). With a bit more work and time spent, you can achieve publication-quality results.
I hope this tutorial has been helpful and that you have learned something about how Dorico’s page layout features work.
You can download the completed Dorico project here, or you can also download a PDF of the completed project here.





Thank you, Daniel, for your wonderfully detailed outline. You and the rest of the Dorico team continue to amaze me with your hard work and dedication and the wonderful results of your efforts!
This is marvelously specific and helpful (and educational, for someone like me unfamiliar with CoE practice). Thank you so much! I plan to follow it through in detail. One minor question: when I download and open your completed Dorico project, all the 4/4 time signatures are visible (though in the PDF, they’re hidden as you describe). Is this just an oddity of my setup?
@rinaldo302: It’s not an oddity of your setup, but rather indicative of a change in how certain properties are handled between Dorico 1.0.30 and Dorico 1.1. The project I uploaded will look identical to the PDF in Dorico 1.1, which will be available very soon now (before the end of the month).
Dear Daniel, Great tutorial. But have you noticed that in the pdf the key signature is missing at the first entry of the choral parts. That would sound pretty odd 🙂
@David: Yes, I did fix that between making the PDF and uploading the Dorico project. I’ll replace the PDF.
In my Dorico, the last line of page 6 is truncated at: And makes thy chosen / (the full Response is in the PDF).
@Neil: That’s because the project was made in a pre-release build of Dorico 1.1. Look again in a few days when you can try it out in the new update.
I have purchased Dorico 5 (moving over from Sibelius) and checked out the Smith responses file. The ‘And make thy chosen people joyful’ response is truncated and after several hours of watching tutorials and experiment with note spacing in Engrave mode, I cannot get the second bar to appear (although it is all there in Gallery View. I have 3 sets of versicles and responses to set and don’t want to dive in until I understand this.
@Nigel: To make “And make thy chosen people joyful” show completely, select the first rest at the start of that response in Engrave mode, then choose Engrave > Note Spacing Change. Create a note spacing change that sets the ‘Default space for crotchet/quarter note’ to e.g. 3 spaces, and click OK.
That is a fantastic explanation of the process, Daniel. It shows just how versatile Dorico is. Thank you for sharing that with us — the procedures which you outline so well are applicable to a wide variety of compositions, not just this project. Thank you!
Step by step, detail after detail–how helpful is this! It’s only a little after 6 am, and I want to skip my walk, my breakfast, and even my second cup of coffee to run into the studio and duplicate this. Thanks so much, Daniel.
What is the benefit of having all the segments in separate flows?
@Anders: It makes the page layout considerably more simple, because each versicle and response is self-contained. You can never end up with e.g. the start of the next versicle or response incorrectly showing up at the end of the previous one. You also have complete freedom over the horizontal and vertical position of every chunk of music in a very direct fashion, because you can move the frames anywhere you like.
Frame breaks and frame order should allow the same flexibility, right?
I don’t mean to argue. It’s a wonderful tutorial! And when you’re engraving pre-existing music, this is probably the simplest way. Just wanted to point out to other readers that it is possible to achieve the same without breaking into flows. Might be useful in other scenarios. Also makes bar numbering easier.
@Anders: To a degree you are right, yes, but for this kind of music where the instrumentation varies from one frame to the next, you can’t use a single frame chain or a single flow because you cannot change the player filters from one frame in a chain to the next.
” you cannot change the player filters from one frame in a chain to the next.” That would be a powerful feature!
Correct me if I’m wrong, but I believe ‘Hide empty staves’ does the trick in this setting.
@Anders: Yes, you could use hide empty staves, though I personally do not think that is in any way as convenient, either from the point of view of inputting the music, or from the point of laying it out.
Fortunately Dorico is a powerful program that provides a variety of tools that can be used to support different workflows. If you’d like to write up your own detailed tutorial for how to produce this kind of score using your own preferred approach, then go for it! I’ll happily link to it, or even publish it for you.
Any word on when Chord Symbols might be available? Perhaps, in the interim, you could do a tutorial on how we might enter chord symbols using plain text. Thanks!
@Ernie: Dorico 1.1 is imminent, and it will include chord symbols. More information here.
Thanks for this very helpful tutorial! One point: the note system of the cantor (page 1) is not aligned with the following bass system. Of course I can drag the system manually, but is there a function to do this automatically? This would be very useful and timesaving.
@Uwe: No, at the moment there’s no way to align frames or indeed to align staves between frames automatically, but maybe one day.
Thank you, I will be ordering it! One question on the Educational pricing. I am a music teacher and I will be crossgrading from the Sibelius educational version. Will I need to re-submit my educational status to use the educational version of Dorico? The Steinberg site is not very clear about this.
@Ernie: Yes, if you want to buy Dorico at the educational crossgrade price, you will need to submit both proof of ownership of Sibelius or Finale and proof of your current educational status. If you buy from one of our resellers, they will help you through this process. If you buy from our online shop, you will be prompted to upload a PDF during the purchase process, which is then reviewed and approved by our staff. Make sure that PDF contains both proofs within a single file (e.g. on separate pages) and you should find that everything goes smoothly.
Hi Daniel – nice 🙂
One problem – the score loads Halion SE but no sounds are loaded ?
@Mads: I had changed the sounds to use woodwind sounds instead of the default voice sounds, which are really not too great. You should be able to choose Play > Apply Default Playback Template to make Dorico reload the default voice sounds again, and then if you feel so moved, you can change the assignments in Play mode.
Are there plans to get decent choir sounds? The current ones seem totally unusable (both solo and group). I’m looking at switching from Sibelius, but this is definitely an issue. Changing to windwoods won’t work because I compose for orchestra+choir so need to be able to distinguish. Thanks.
@Stephen: We won’t be able to add new vocal sounds in the short term, I’m afraid, but it’s definitely something we intend to improve in future. For the time being, you might want to consider adding some vocal sounds from another source – I recently bought the Soundiron Olympus Elements library for Kontakt and find it to be a big improvement on the HSSE sounds.
Hi Daniel, could you maybe make a short video showing a vocal score in Dorico playing back with the Olympus choir? – a simple SATB a Capella or SATB with piano/organ accompaniment piece will do.
I am thinking about purchasing it but I am not sure. The examples on their website sound epic but have you been able to get something similar just by playing back a Dorico score? In your experience, does it produce better choir sound than Noteperformer? Does it follow dynamics or lyrics syllables right away?
@Jan: Olympus Elements can certainly be used to produce big, epic and cinematic wordless chorus, but by default it doesn’t sound like that when played back from Dorico. For me the reason I choose it over the default vocal sounds included in the bundled HALion Sonic SE 3 player is that the tuning is truer, and the rise time is faster, so the attack sounds more together with any other instruments you have in your ensemble. I personally prefer the Olympus sounds to those in NotePerformer, but NotePerformer is also superior to the content included with HSSE3 in terms of attack and tuning. If you would like to send me one of your own projects, I could export it from Dorico using the Olympus sounds so you can get a sense of it with a piece you know well.
Daniel, this entry is really a model of how to lead a novice through all the steps needed to input and format a musical work with some complexity of procedure. Bravo!
Following your instructions, I worked through every step and made it all happen myself, which was most gratifying as well as educational. I think I learned more by doing this than in passively watching the excellent video tutorials, because I had to truly think through every step. A few thoughts came to mind.
1. As time goes by, I hope that you or someone like you will create more such step-by-step tutorials, and that they can be saved or “pinned” in a readily findable sub-site. (One among many blog posts simply can’t advertise itself as it deserves.)
2. If that ever happens, slight expansion at one or two points could be beneficial. As a music professor myself, I think I detected a very occasional (understandable) tiredness as we got further into things — like exactly how to decrease staff size. A Google search showed me where to find that, but it might as well be present here too, as you’re so meticulous about giving ALL the steps most of the time.
3. I wonder if there would be any benefit to providing several interim “.dorico” files with the article, representing different stages of partial completion. I did every step myself, and there’s no doubt that I benefited from it. But there was undeniably a lot of more or less routine note and lyric entry involved along the way, good practice in techniques but not in itself useful for my future music-making. Maybe more would be tempted to try it out if they knew they could skip a certain amount of slog. Or maybe doing it all, as I did, really is the best way. I’m not certain about this.
Let none of this overshadow what a great contribution this article is!
And, recognizing the day on which I make this comment: CONGRATULATIONS on the magnficent Dorico 1.1!
Hi – I’ve just revisited this tutorial, which I enjoyed a second time through. I notice that now I don’t need the stemless note workaround, as there is a dedicated implementation in Dorico 2. I wonder if there is anything else that would be done differently now we have Dorico 2.1?
Thanks,
Geoff D.
@Geoff: I had to remind myself of all of the steps in the tutorial, but I don’t think there’s anything else that would be done differently in version 2.1. When I get a chance I’ll update the post to improve this part, but I’ll also need to revise the files available for download as well.
Thanks Daniel – great tutorial to work through.
@Daniel, in Layout Options (Dorico 2 and later) > Page Setup > Flow,
if I specify New flows: Allow on existing page,
I did not make any master page changes. Much less control than using master pages though.
Great tutorial, Daniel, especially now I am working on music like this for a client.
G’day, Daniel,
Is there anything that would be done differently with Dorico 3? Thank you! From Ming
@Mark: No, nothing to speak of, I think.
Hi Daniel,
I love the article and had read it quite some time ago. I’m trying to follow the steps in the latest Dorico 4.1.x for the Byrd responses and have hit an impasse at the point of setting up the page templates.
When I create a new template set renamed to responses, delete the first page, and edit the Default master page to remove the music frames and non page-number frames, all the music disappears as expected, but I am unable to add any pages since that option under Pages is now grayed out and is unresponsive when clicked. I can provide a screenshot (or project file) as needed.
Any thoughts?
Is this a bug, or do I need to take a different approach in 4?
Thanks,
Tim
I am having these same issues….
I just got done with all the note inputting, and now I am stuck on the whole page layout things. First, my version of Dorico has “Page Layout” instead of “Master Pages,” but I think they’re supposed to be identical things. Second, I created the new set and called it “Resources,” and deleted the one called “First,” but my layout didn’t change. I was still at 28 pages. The instructions said I would go down to 13. Third, I did the step for removing the green and blue frames, which indeed made my music disappear. However, it wouldn’t let me click the add pages button. So, I haven’t been able to follow any of the steps for Page Layout yet. Any help would be appreciated!
@Joshua: I should probably revise this tutorial to take account of the changes made in more recent versions of Dorico, particularly to the names of things. It sounds as if your current roadblock is that having made a new page template set, you’ve not chosen to use your new page template set in Layout options.
Okay, I kinda got it to work. I went to Page Layouts and ensured that all parts were using the Responses page template. Then, I allowed multiple flows on a page, which helped! It didn’t go to 13 pages, but it did retain the flow titles. I lowered the rastral size and it went down to 11 pages. However, when I deleted the music frames from the default template and my music disappeared, it did not let me select the “Insert Pages” button so now I’m left with a black screen.
A revised tutorial would be welcome (or even a Discover Dorico session? I only gave a cursory look, but the last session that I’m seeing that deals with all of the relevant frame chain/page layout type things is also from a while back).
I’ve got a buddy who I’m trying to tempt over from Finale; he’s working on his own Preces and Responses setting and wanted to do some of the standard/traditional things in the document, so I sent him this tutorial. I was trying to help him troubleshoot an issue he was having today, and, best I can tell, where he’s gone wrong seems to be a result of name changes and updates to the program.
Absolutely brilliant – thanks!