
Ben Byram-Wigfield is a musicologist and publisher, who produces vocal and instrumental music from the 16th to the 20th centuries. He has been a Finale user for over 20 years, and is the author of Finale Music App Basics (Flame Tree Publishing, 2015). In this post, he shares his perspective on coming to Dorico as a very experienced Finale user.
We are, by and large, creatures of habit. If you’ve been using Finale for many years, you will be accustomed to do things in a certain way, and to think about music notation according to the concepts that Finale uses. Trying to use another notation app, like Dorico, after years of familiarity with Finale, can be frustrating simply because the concepts (to say nothing of the interface) are different. As a long-time Finale user, here are the differences I’ve found between the two.
With any new app, your first impulse will be to dive straight in. You can familiarize yourself with the interface, have a look at the menu commands and options. However, this will only get you so far, and you’re likely to miss out on a lot and get frustrated. So grab a drink, and watch some of the many videos on YouTube that show you how things work. That will be time better spent than randomly pressing things, getting unsatisfactory results and walking away unimpressed.
After typing in your music, or importing an existing document as MusicXML, a Finale user’s instinctive desire will be to look at the score and start manually adjusting things. This minim needs a cautionary accidental; those tied notes should be one dotted note; those staves want to be further apart. STOP! Rather than tinkering with a succession of individual items, in Dorico, you need to look through the many and various settings and options, where you can set global parameters that the app will then apply to the whole document. You could consider them to be like Finale plug-ins that are constantly being executed. These settings may be a bit bewildering: Layout Options, Engraving Options, Notation Options, XML import options, and more. But there is a logic to their location. Once you’ve got used to where they are what they do, you’ll be able to give your score a consistent look without making many manual adjustments.
Dorico has five modes of operation: Setup, Write, Engrave, Play and Print. These are largely self-explanatory, though perhaps the distinction between Write and Engrave needs to be clarified.
Write mode is where you can add (or delete) notation. It’s tempting to think that Dorico’s note entry is similar to Finale’s Simple Entry: select a duration from the palette, add attributes such as accidentals, dots, (even slurs!) and then play or type a pitch. However, that assumption only goes so far. Firstly, the numbers that select the durations are ‘off by one’. A minim (half note) is 7, not 6, as in Finale. You might be tempted to change the key commands for durations to match Finale (you can change or assign keys to any of Dorico’s commands from the application’s preferences), but once you start doing that, where will it end…? It’s probably better to accustom yourself to the defaults.
Dorico’s entry caret does not move note-by-note, as in Finale, but within a quantization grid, and it will enter notes wherever this cursor lies: this can be within the duration of an existing note, reducing its value. Rests can be inferred simply by skipping forward in the grid beyond the last note, and existing notes can be lengthened or shortened by the quantization duration. There’s also an Insert mode. Finale users often enter notation in several passes: first the notes and articulations, then dynamics, then expressions, then lyrics, then slurs. In Dorico, you can get more done in one pass, without changing tools or modes.
One concept that took me some time to get used to was Dorico’s handling of whether a note is tied or dotted, particularly over the half-bar. While you can force an entered note to be stuck in a particular form (using Force Duration), it is the Notation Options that decide whether such notes will be tied or dotted by default. Dorico thinks about notes of any length as one continuous object. How it is displayed will depend on its context.
Finale’s Layers find their parallel in Dorico’s Voices: new voices must be created with Shift+V; then once created, you can toggle through them by pressing V.
Engrave mode is where Finale users will feel at home. Here is where you can make manual adjustments: adjust slurs, flip things, add or remove cautionary accidentals, hide time signatures, move staves, systems and notes. And although Dorico’s tools for adjustments are very capable, if you find yourself making too many, you should go back and check whether Dorico’s Engraving Options can do all that work for you. System Breaks and Frame Breaks are performed in Engrave mode, which is most akin to Finale’s Fitting and Locking of systems. However, the need to break/lock every system is greatly reduced, and again, you may get better results letting the music flow and adjusting the Layout Options.
Power-users of Finale learn to use its metatools: adding notation quickly with a variety of key presses. Dorico, too, has all of its features easily accessed from a range of keypresses. Different types of notation can be triggered by Shift followed by a mnemonic key: T for Tempo, D for Dynamics, L for Lyrics. These commands usually invoke popovers, which are small text fields where you can enter relevant details, such as p<f for a group of dynamics. Learning Dorico’s key commands for navigation, selection, input and adjustment should be a high priority. Luckily, they are well-thought out to be memorable and consistent.
Finale covers a wide range of musical elements within two concepts: Articulations and Expressions. In Dorico, Dynamics, Tempos, Rehearsal Marks, Ornaments, Holds, Fingering, and Playing Techniques are all separate items with different behaviours. Playing Techniques straddles both Finale’s Articulations and Expressions, and you can add to its comprehensive list of symbols and text. You can assign these items to the page using key commands and popovers, or just click on them from the panels that sit at the edges of the window. If you’re looking for something more Miscellaneous, then you need System Text (Shift+Alt+X), which will appear on the top staff of any layout at that point. You can select other groups of instruments within the system that will also display the text, in Layout Options, a bit like Finale’s Staff Lists.
This is, of course, a very cursory first impression of the ways in which these two apps use different concepts to describe music, that most human of ideas, within a computer. Hopefully, it will help to reduce any frustrations and obstacles when you need, or want, to try a different tool for a different job. Finale’s endless flexibility comes at a cost of having to be endlessly explicit about what you want. Dorico’s approach gets the music on the page faster, using a large set of rules that you define. As a result, fewer manual adjustments are necessary. But the most effective demonstration of the differences I leave as an exercise to the reader: try adding a fermata to one note in Dorico (the organ introduction of the choral work by Charles Wood that you can download here is as good a place as any) and see what happens.
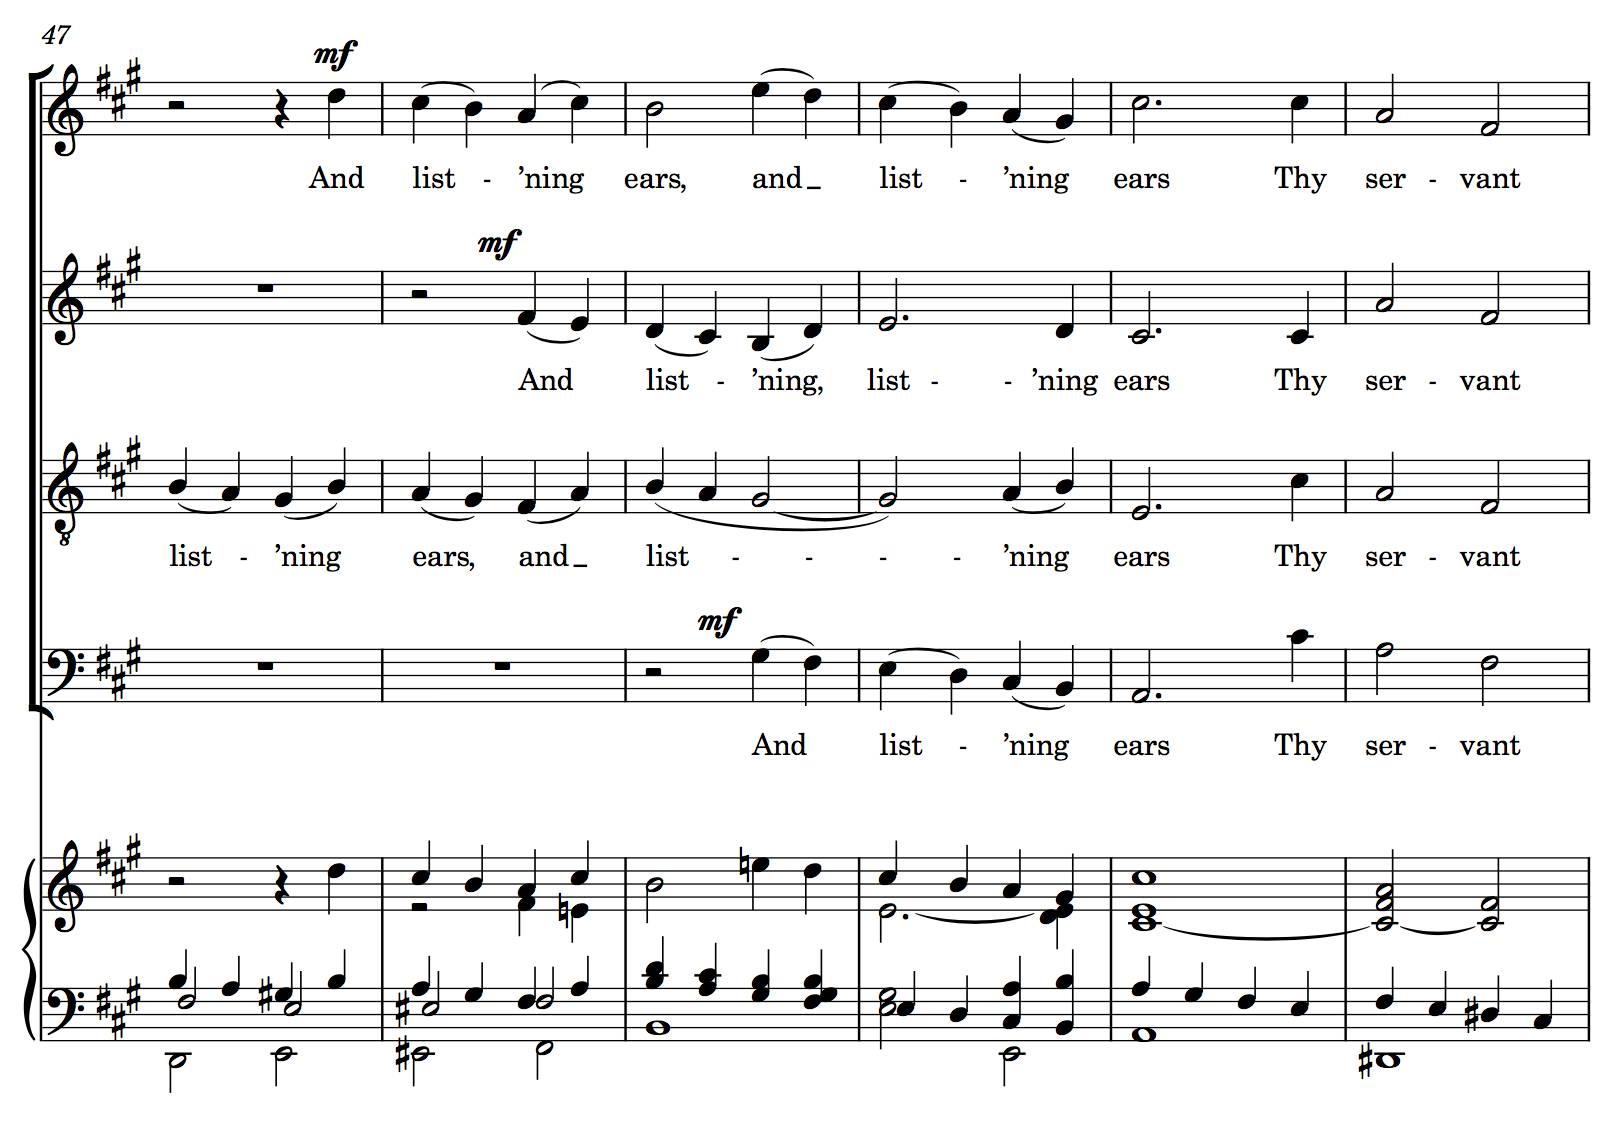
An excerpt from Charles Wood’s “Expectans Expectavi”, as set in Dorico
Download Ben’s edition of Charles Wood’s Expectans Expectavi in Dorico format or PDF format
This edition was produced by importing the bare notation as MusicXML from Finale. The page layout and position of all notation elements were defined by Dorico’s own settings, which I configured to my taste. The only manual adjustments made were slight alterations to 2 slurs, 3 cautionary accidentals and 4 articulations. Some text items had to be re-created.